Why Is My CO2 Laser Not Cutting?
Overview
What you will learn
In this guide, you will learn how to diagnose why your laser will not cut through your material.
When to do this
You would check the following points if you experience your machine not cutting something that it, in theory, should be able to. There are many potential causes for why your laser will not properly cut through the material you are working with. It could be an issue with the material, like glue that does not laser well in an MDF composite, the settings chosen are not appropriate for the material, or a mechanical issue like a failed component to name a few.
Points to Check
The following points are in order from most to least common issues experienced from our customer base as a whole. There is not a set order of operations, unless specifically stated in the section, that the following points should be checked in. Use your best judgment when troubleshooting cutting issues.
Settings

When cutting thick materials (¼” and above), 60-90% power and a speed of 5-20 mm/s is usually in the ballpark. For cutting thinner materials (approx. ⅛” and below), try starting with a more conservative 30-60% power with speeds around 10-30 mm/s.
Speed and power settings are dependent on the wattage of the tube in your machine. For example, a NOVA14 and a MIRA9 are vastly different in total workspace, but if both machines have a 100W laser tube installed they will likely have the same general settings when cutting.
- 40W CO2 tubes tend to cut best at the lower speed range with the power range detailed earlier based on thickness of material. The max thickness cutting potential for a tube of this wattage is about ¼”.
- 60W CO2 tubes tend to cut best at the lower speed range with the power range detailed earlier based on thickness of material. The max thickness cutting potential for a tube of this wattage is about ⅜”.
- 80W-100W CO2 tubes will likely stay towards the low to mid teens for speed settings with the power range detailed earlier based on thickness of material. The max thickness cutting potential for a tube of this wattage is about ½”.
- 130W and above CO2 tubes will be able to go towards the upper end of the speed range with the appropriate power range. The minimum thickness for cutting would be ½”.
NOTE: Different materials will cut differently. ½” acrylic would cut more easily and consistently than something like a ½” hardwood, which would struggle to cut properly even with a high wattage tube.
It is important to mention that adjusting speed or power settings will both change the outcome of the cut, even if only one variable is changed. Generally speed needs to be lowered, or power needs to be increased. When you are troubleshooting settings it is good practice to only change one variable at a time, like lowering speed and keeping power constant. That way you are able to determine the direct cause and solution of the inability to cut.
For example, doing something like only lowering speed will also change how deep the beam goes, even if power stays the same. The laser is hitting the same area for longer, giving more energy to the area over time.
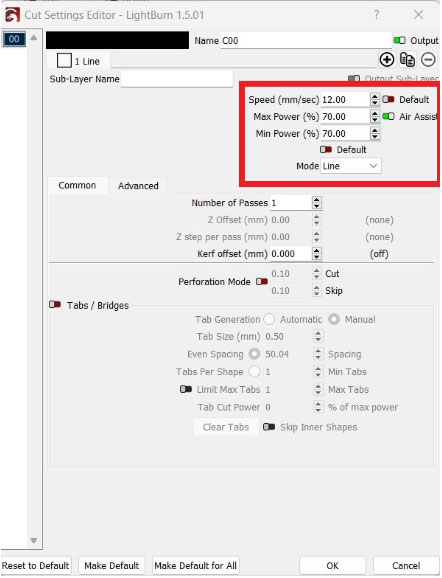
Another place to check is the Min/Max power settings in Lightburn. When traveling short distances, it's likely the laser will never achieve the speeds necessary to trigger the Max Power setting and the entire job will be cut using the Min Power setting instead. Therefore, when cutting, it's recommended your Min Power is set to match your Max Power.
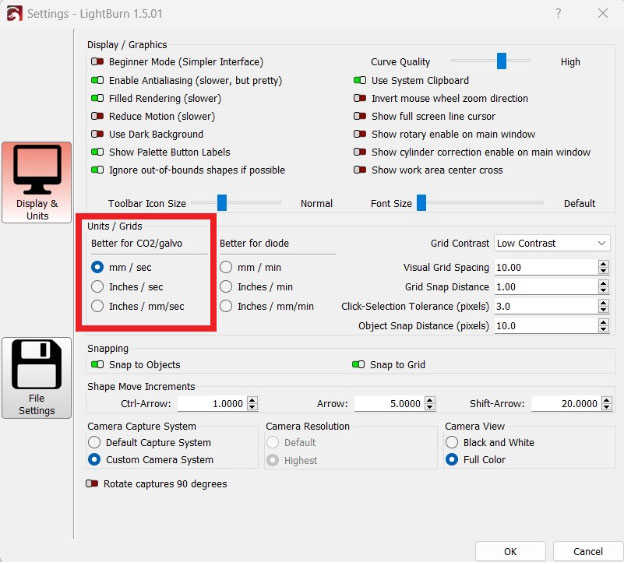
Lastly, ensure your "Unit/Grid Setting" in Lightburn is not set to "inches / sec". We recommend using “mm / sec” or "inches / mm/sec" so that the speed of the laser is still programmed in mm, which is ideal for general use. If you wish to set your grid to inches, we recommend using "inches / mm/sec" which will change dimensions to inches but leave speed in mm. Most settings that you will find from others will be made with mm/s speeds in mind.

Optic Health
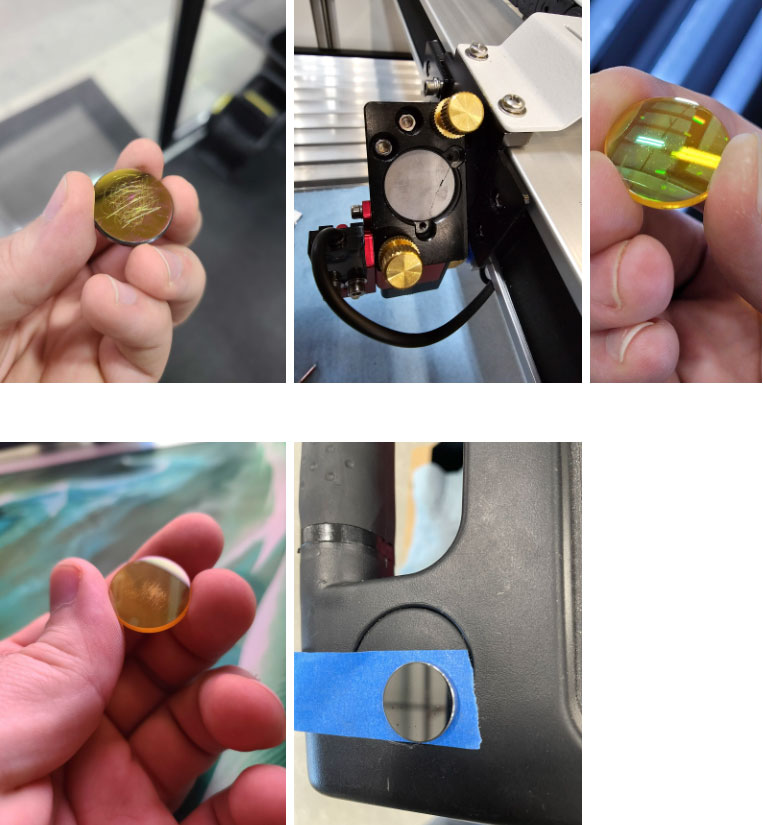
Ensuring your mirrors and focal lens remain clean is essential to a properly functioning laser. The mirror on the laser head is especially susceptible to dirt and debris, as it is not uncommon for smoke to enter the laser head from above. Oftentimes the vapor will get baked onto the mirror over time when the machine is running. Both the mirror on the laser head and the focal lens should be checked regularly, as they are in a high risk area for gathering debris.
Any smudging, soot, scratching, etc. will all lower the power output of the machine, due to the energy getting absorbed into the dirty or damaged optics instead of reflecting as it should. Something as minor as a small scratch at the center of the mirror or lens can result in a 20-40% decrease in power output by the time the beam exits the nozzle (per each damaged optic the beam comes into contact with).

It is recommended that the optics in the laser head are checked after about 40 hours of use in the machine. Blow any large debris off with compressed air, and wipe clean with a lens wipe or comparable optics cleaning solution. It is good practice to check the other optics (mirrors 1 and 2) at this time as well, though the mirrors not in the active workspace tend to get dirty or damaged much less frequently.
Frequent dirt or debris found on the top mirror and/or focal lens is also a potential indication that your fume extraction setup may not be sufficient or that too much air pressure is being used.
Debris found on the underside of the focal lens is an indication that you may be dealing with contaminated or insufficient airflow coming from the internal air pump or from an optional external air compressor.
NOTE: If using an external air compressor, it is recommended to have a water separator installed. It should be drained regularly, along with the air tank itself. Otherwise, the moisture in the compressed air will increase the likelihood of debris burning onto the lens.
For instructions on how to check and clean your optics, see our AEON Laser Knowledge Base article on Routine Cleaning and Maintenance.
Lastly, it's important to ensure your focal lens is installed in the correct location of your lens cartridge and is in the proper orientation (convex, the domed side, facing up). For the MIRA series, the standard 2" and optional 4" lens should be installed on the top of the lens cartridge, whereas the optional 1.5" lens should be installed on the bottom. For the NOVA Series, the 2.5” lens is installed in the sliding housing and the 4” lens is installed in the little red housing near the top of the laser head assembly. See our guides on installing an alternative lens.
NOTE: It is important to check alignment after touching any optics.
Laser Head Squareness
Did you recently experience a collision with your laser head or bend your autofocus pin? If so, see our AEON Laser Knowledge Base articles on Squaring the Laser Head and Replacing the autofocus Pin . If the laser head is out of square, the beam will not exit the nozzle properly and will likely clip on the edge of the opening. This can result in a total loss of output power.
NOTE: It is important to check alignment after adjusting laser head squareness.
Alignment
If your laser isn't aligned properly, it will never perform as it should. Ensuring the laser beam can travel unobstructed across the entire series of mirrors, through the laser head, and out of the nozzle is key. After checking optic health or adjusting squareness, it is important to check the machine's alignment as well.

Below are the videos we have on alignment for both the MIRA and NOVA series of machines.
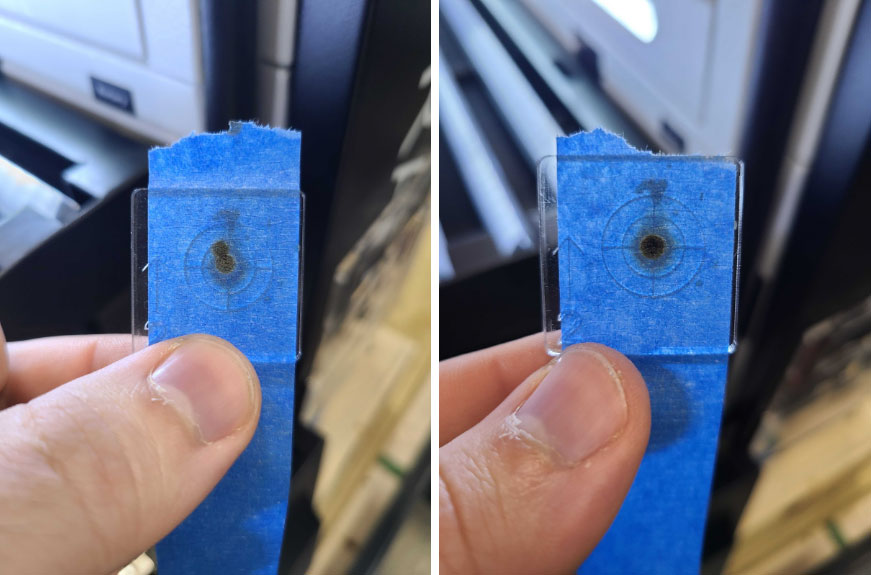
NOTE: We recommend you check the alignment and take a photo of each burn mark individually with a new piece of tape BEFORE making any adjustments. If something is clearly off, go ahead and run through the alignment process.
MIRA Pro Alignment Videos
NOVA Alignment Video
WARNING: If you hear an electrical clicking sound coming from your laser tube or see signs of melting on the red high voltage wires, turn OFF your machine immediately and reach out to us at support@aeonlaser.us. Continuing to use or pulse the laser with a dead or damaged laser tube may result in serious injury or death.
If your laser is perfectly aligned and it's still failing to cut, the next thing to examine is the beam path when exiting the nozzle. What happens inside the laser head is of utmost importance, as this is where it's most common to experience a loss in power with alignment.
An improper beam path will cause the focused laser beam to not fully exit the nozzle, which in turn results in a severe power loss.
Bring the laser into focus on the material in question. Run a 1” square test cut using conservative settings. Assuming the laser fails to cut through in one pass, remove the nozzle from the laser head and repeat the test next to the first one.
If it cuts through with the nozzle removed, it means the laser beam was indeed clipping the inside of the nozzle and that the beam path needs to be adjusted. See our AEON Laser Knowledge Base article on the 5 Point Test for detailed instructions.
WARNING: It is not advised to continue using the laser without the nozzle. Doing so will result in flare-ups, damage to your focal lens, and potentially a fire.
Focus Check
Is your laser in focus? This might seem obvious, but this is a crucial step that is often overlooked. Simply jog the laser head so that the autofocus pin or nozzle (if you have a modern NOVA) is over your material. Then, initiate the autofocus command from the keypad. If you prefer to manually focus, see our AEON Laser Knowledge Base article on How to Manual Focus.
CAUTION: Never autofocus when using the 4" lens kit on a MIRA. Doing so will result in a collision, which will cause damage to your machine.
When using the autofocus command on a MIRA, sometimes the autofocus pin can come loose and result in an improper focal distance. Similarly, a loose nozzle can throw off your focal distance when autofocusing with a NOVA or manually focusing in general.
Ensure both nozzle and autofocus pin are screwed in all the way, then autofocus on the material. Next, confirm the focal distance is correct by using a focus gauge to measure the distance between the nozzle and the surface of the material. It should be within .5 mm of the standard manual focus depth.
While there is a use case for running the machine out of focus, attempting to cut material is not one of them. You should ALWAYS be in focus when trying to cut with the machine.
Air Flow
Adequate air flowing out of the nozzle is an important element of all cutting applications. It prevents smoke from interfering with the path of the laser beam, helps keep optics clean, and it ensures that small flare-ups are quickly extinguished. Running your laser with insufficient airflow can result in cuts not passing all the way through the material, a clogged nozzle, a melted airline, or a fire inside your machine.
NOTE: An external air compressor is recommended for most cutting applications where the standard air pump will likely not suffice. If you use your machine mainly for cutting, it may be a good idea to invest in an external compressor. See our AEON Laser Knowledge Base article on External Air Compressors for additional information. Though it is not necessary to have when cutting, it certainly helps.
With the bed of the machine all the way down, examine the opening of the nozzle and the underside of the laser head bracket for charring. In particular, check to see that the airline is intact and properly connected to the air fitting on the laser head. If you find any signs of damage or feel an air leak in the area, please submit a support ticket .
If everything checks out, power the machine ON and hold a piece of paper underneath the nozzle to ensure that air is indeed exiting the nozzle and that it is free from moisture.
Chiller Water Check
Contaminated water can result in a power loss directly out of the laser tube. This is sometimes noticeable during an alignment, where pulsing the laser beam produces a ring-shaped burn instead of a solid circle. Things like algae or dissolved solids from the internal piping of the chiller and machine contaminate the water over time. This will cause the water to absorb the energy being sent to the tube, instead of allowing that energy to charge and exit the tube as a strong beam like it normally would.
It is recommended for the water in the chiller to be changed on a quarterly basis (every 3 months). If it has been longer than a few months since the last time you did a water change, it might be time for a water change. Try flushing the system with fresh water
CAUTION: Only use distilled or reverse osmosis water for the machine's chiller.
To flush the system, empty the water from your chiller into a bucket. Refill the chiller with distilled water and power ON the machine to allow the system to cycle momentarily. Power the machine OFF, empty the chiller again, and repeat. Fill and empty the chiller with distilled water a total of 3 to 5 times. Once complete, attempt cutting again to see if your results improve.
Having clean water in the system is essential for the machine to function properly. The main issues that come with contaminated water are as follows:
- Heat Dissipation:
CO2 laser tubes generate a significant amount of heat during operation. The chiller system helps dissipate this heat. If the water is dirty or contaminated it will act as an insulator, reducing the ability of the water to conduct heat away from the laser tube. This can lead to overheating, reduced performance, and even damage to the laser tube. - Tube Contamination:
Impurities in the water, like dissolved solids and minerals, can deposit on the inner walls of the laser tube over time. This buildup can hinder the laser's performance, affect beam quality, and decrease overall efficiency. - Corrosion and Erosion:
If the water contains corrosive substances, it can lead to corrosion of the laser tube's internal components. Corrosion can weaken the tube structure and compromise its integrity. Erosion caused by impurities in the water can also damage the internal surfaces of the tube. - Optical Distortion:
Contaminated water may cause optical distortions, affecting the quality and precision of the laser beam.
To ensure the optimal performance and longevity of a CO2 laser tube, it is crucial to use clean and properly treated water in the cooling system. See our AEON Laser Knowledge Base article on Chiller Maintenance for additional information.
Material Check
The material that you are trying to cut could be the issue itself. Not all materials are suitable for laser cutting. Ensure that the material you choose is compatible for cutting with a CO2 laser. Commonly cut materials include acrylic, wood, paper, cardboard, fabric, and leather. CO2 lasers are not designed to be able to cut metal.
Material can come warped or warp over time if it's not being stored properly. Ensure your material is not warped and is lying perfectly flat on your bed. Warped material will not be level/in focus across the bed, and this can result in the material not cutting. Before initiating a cut job, it's recommended that you check the focus at all 4 corners and center of the material to ensure the laser beam remains in focus throughout the entire work area. Some materials may even warp or deform when exposed to heat during a cut.
NOTE: A deviation of 1 mm across the entire sheet of material is usually not a problem. Otherwise, you may need to shim your material or use pins/magnets to hold the material down to ensure the laser beam remains in focus across the entire work area.
Reflective materials, such as metal, can reflect the laser beam and damage the optics or laser tube. CO2 lasers are most effective on non-metallic materials. If cutting metal is desired, consider a fiber laser, which is specifically designed for metal cutting and marking.
The surface finish of the material can affect cutting quality. Smooth and flat surfaces generally result in cleaner cuts. Rough or textured surfaces may require tweaking settings to compensate, such as adjusting focal length or using masking tape to protect the surface.
The color of the material can affect how well the machine will cut as well. Darker materials typically absorb more laser energy than lighter ones. Consider the material's color when setting laser power and speed parameters. CO2 lasers operate at a wavelength of around 10.6 micrometers (µm), which is most effectively absorbed by materials that are darker in color. As a result, lighter-colored materials tend to reflect more of the laser energy rather than absorbing it. While it's not accurate to say that a specific color is "not good" for a CO2 laser, lighter-colored materials may require higher power settings or may be less efficiently cut compared to darker materials.
Fume Extraction Check
Ridding the cabinet of smoke as quickly as possible is instrumental when it comes to cutting applications. A tell tale sign that your fume extraction will need some tweaking is when you can see the red beam entering the laser head for extended periods of time during operation. This symptom becomes most apparent towards the front of the machine.
If you notice the lingering smoke has gotten progressively worse, it's an indication that you may just need to clean your exhaust fan. See our AEON Laser Knowledge Base article on Exhaust System Cleaning and Maintenance.
Inefficient fume extraction can result in the accumulation of smoke and debris around the cutting area. This can obstruct the laser beam, leading to poor cutting quality, incomplete cuts, or variations in the cutting depth. Proper fume extraction ensures a clear cutting path for consistent and high-quality results.
NOTE: If the problem has been present since Day 1, you'll want to reevaluate your entire ducting system.
Tips for a proper fume extraction setup:
- Keep your exhaust run as short as possible.
- Avoid 90 degree turns and try to keep the total number of bends to a minimum.
- If your exhaust run exceeds 15 ft, an additional inline fan towards the end of the exhaust run is recommended.
- Avoid reducing the size of your ducting below the diameter of the supplied exhaust hose (6”).
- Use the smallest amount of the supplied exhaust hose possible to get you from your machine to the nearest wall. A small amount of slack in the line is OK.
- Avoid installing a cap or vent at the end of your exhaust run. A blast gate that can be fully opened and closed is ideal.
- Consult with an HVAC professional for an ideal fume extraction setup whenever possible.
Machine Components Check
WARNING: Ensure the machine is OFF and unplugged before physically touching any internal components unless otherwise directed. Failure to do so may result in electrocution or serious injury.
Last but not least, we should ensure the laser tube and laser power supply are in good condition. As your laser tube gets closer to the end of its lifespan, it will gradually begin to lose power and you may have noticed the pulse marks getting weaker as you progress through the alignment check. Once the laser tube is completely dead, it may start to arc from the high voltage cable anytime it’s pulsed and will be accompanied by a clicking sound.
If the machine was ON and running recently, allow it to sit OFF and unplugged for a few minutes before checking the following areas. With the machine powered OFF and unplugged from the wall, open the laser tube compartment and inspect the glass for cracks, particularly at its core where the water flows through. Ensure that water has not leaked into the outer core of the laser tube and that there are no signs of algae or discoloration in the inner tube or in its water lines. Inspect the two wires connecting to the laser tube for any signs of burns or melting.
Remove the left access panel (in reference to the front face of the machine) and inspect the red high voltage wire and the area surrounding the laser power supply for signs of burning as well.
WARNING: If you hear an electrical clicking sound coming from your laser tube or see signs of melting at any of the red high voltage wires, turn OFF your machine immediately and reach out to us at support@aeonlaser.us . Continuing to use or pulse the laser with a dead or damaged laser tube, may result in serious injury or death.
If all checks out and there are no reasons for concern, close your laser tube compartment and plug the machine back into the wall. Power the machine back ON, but leave the left access panel open. You’ll first want to ensure that the red LED readout is lit up while the machine is ON and sitting idle. Next, run a job on the laser as you normally would, and bring your attention to the red LED readout on the laser power supply. The readout should now display a series of numbers and letters while in operation. Make note of what is displayed and reach out to support@aeonlaser.us if needed.
WARNING: DO NOT stand too close or reach into the machine from the left side access panel while it's in operation. The laser power supply outputs very high voltage and can result in serious injury or death if tampered with during operation.
Conclusion
Troubleshooting a CO2 laser that refuses to cut can be a meticulous yet rewarding process. By methodically addressing potential issues, from optical components and alignment to power settings and material considerations, users can often identify and rectify the underlying problems. Regular maintenance, thorough inspections, and a clear understanding of the laser system's specifications are key to ensuring optimal performance. In the dynamic realm of laser technology, a systematic approach to troubleshooting not only resolves immediate concerns but also equips operators with the knowledge to prevent issues in the future. With diligence and a commitment to precision, users can harness the full cutting potential of their CO2 lasers and enjoy consistent, high-quality results in their various applications.
If you have any questions or concerns, please send us an email at support@aeonlaser.us for the fastest service. If your laser is malfunctioning, please submit a support ticket.
Happy Lasering!


