-

Getting Started 16
-

Maintenance 14
-

Troubleshooting 14
-

Repair 8
-

Laser 101 3
-

Materials 10
-

Accessories 20
-

Multi-Roller 7
-

LightBurn 9
Wireless Remote Control for AEON Lasers


Overview
What you will learn
In this guide, you will learn how to use a wireless remote controller accessory with your laser engraving machine.
When to do this
This guide can be referenced for the basic controls and use cases for the wireless remote controller.
What you need
- Wireless Remote Controller
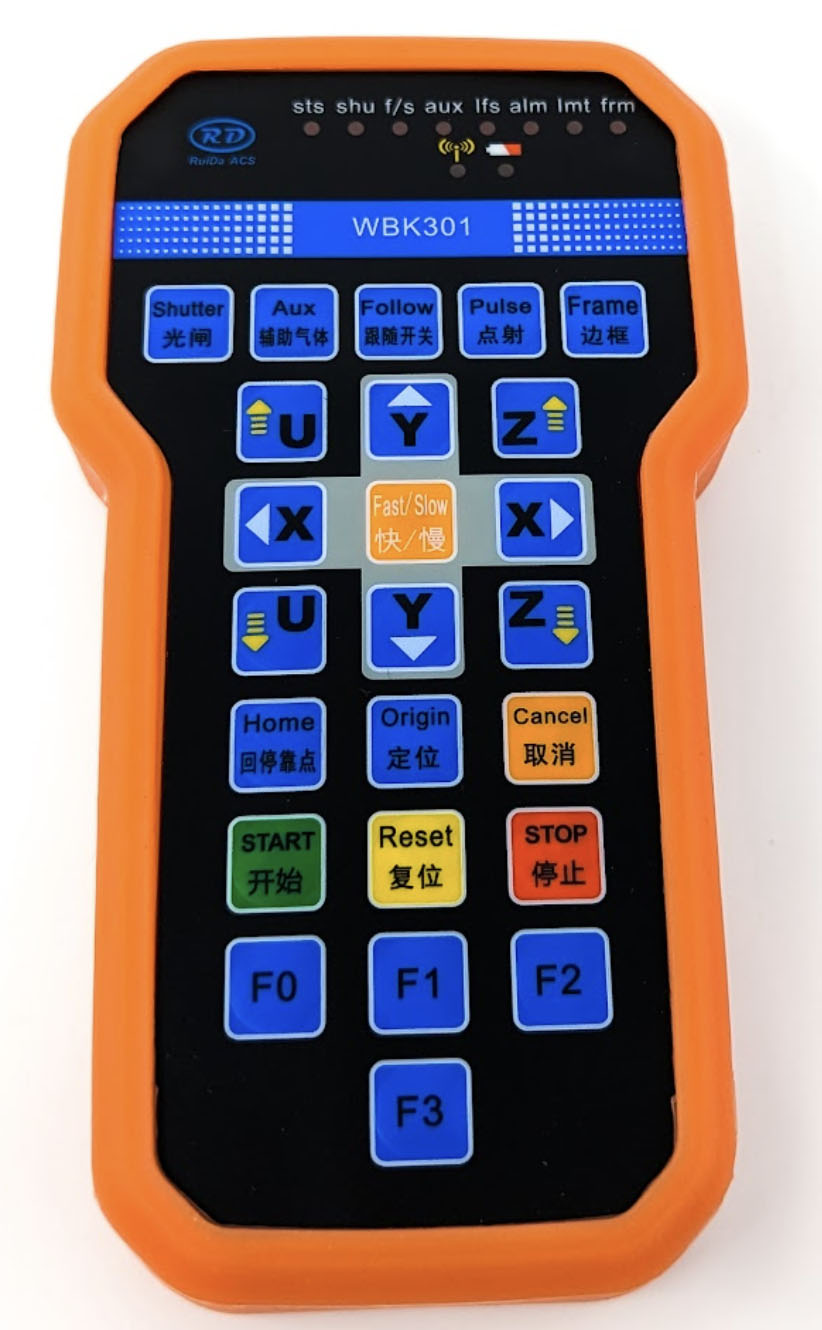
What is the Wireless Remote Controller?
The wireless remote controller is a handheld device that allows users to operate basic machine functions without being restricted to the main control keypad. It features buttons for adjusting laser bed height, moving the laser head, and starting or pausing a job. By providing greater mobility, the remote enhances convenience, making it easier to position materials, fine-tune alignment, and navigate the workspace efficiently.
Essentially, the wireless remote controller serves as a portable extension of the main control panel, enabling users to adjust the machine from different positions around the workspace. This flexibility eliminates the need to constantly return to the main keypad, allowing operators to move freely and make real-time adjustments with ease.
Please see the manufacturer's operating instructions for the wireless remote controller as well.
Wireless Remote Functions
While AEON lasers use a majority of the available buttons on the remote, they do not make use of all of them. The buttons and functions that are used are as follows:
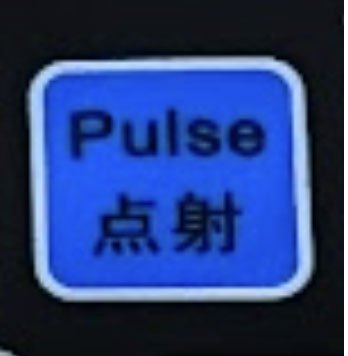
Pulse
The Pulse button will manually pulse the laser tube with the lid closed. This function is useful for things like alignment, as well as various troubleshooting tests.
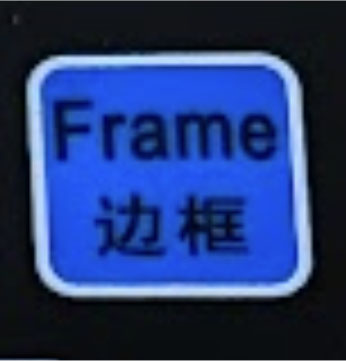
Frame
The Frame button will cause the machine to frame the design that is loaded and active on the controller. Framing is when the laser head moves around the perimeter of the design without firing, tracing an outline of the engraving area.
X, Y, Z, and U Buttons
The XYZU buttons will cause the laser to move along the specified axis.
- X Axis - Moves the laser head left and right.
- Y Axis - Moves the gantry forwards and backwards.
- Z Axis - Moves the bed up and down.
- U Axis
- For legacy MIRAs and NOVAs, the U button has no function.
- For REDLINE MIRAs and NOVAs, the U button spins a rotary attachment forwards and backwards.
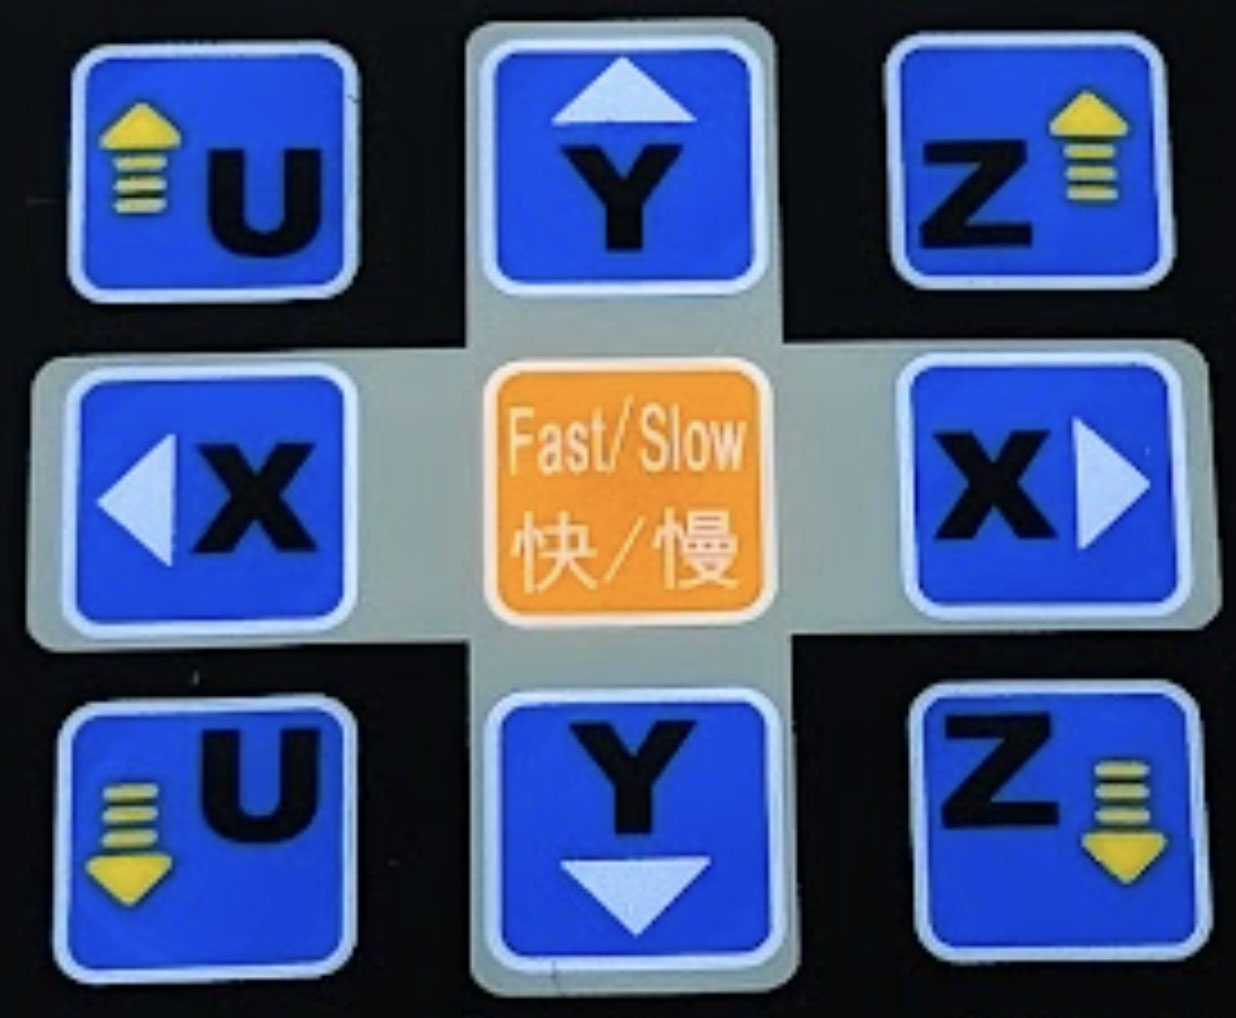
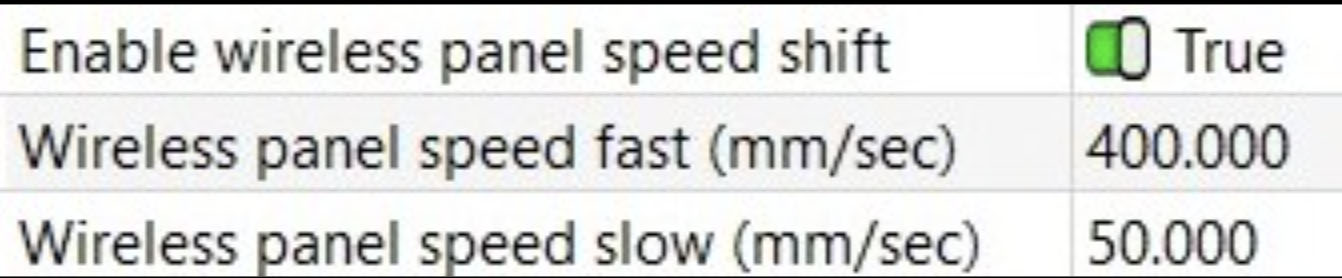
Fast/Slow
The Fast/Slow button will switch the laser head/gantry jog speed between two preconfigured speed settings. The factory fast speed setting is 400 mm/s, and the slow speed setting is 50 mm/s.

The speed settings for the Fast/Slow button can be reconfigured in the machine settings as desired.
Origin
This Origin button sets a user origin point at the current position of the laser head.

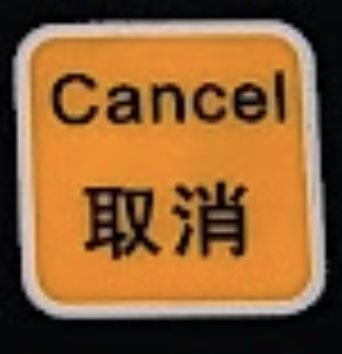
Cancel
The Cancel button will cancel an active selection on the main keypad, as well as return the laser head to the set origin point when the laser is idle. It functions the same way as the main keypad's ESC button.
Start
This Start button will cause the actively loaded job to start running. The lid must be closed for this to function properly.

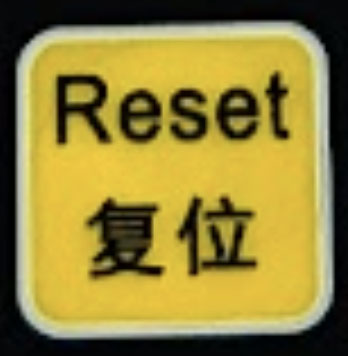
Reset
The Reset button will cause the machine, if idle, to reset; recompleting the initialization process
Stop
The Stop button causes an actively running job to stop running.

Adding a Remote - Wiring
If you wish to add a remote to your machine after purchase, the process is fairly simple. The process varies by the generation of machine, refer to the appropriate section below for reference if installing a remote to your machine.
CAUTION: Before doing any wiring, ensure the machine is OFF and UNPLUGGED.
Legacy MIRA and NOVA Models
- Remove the right side machine panel and locate the machine’s controller, pictured below.
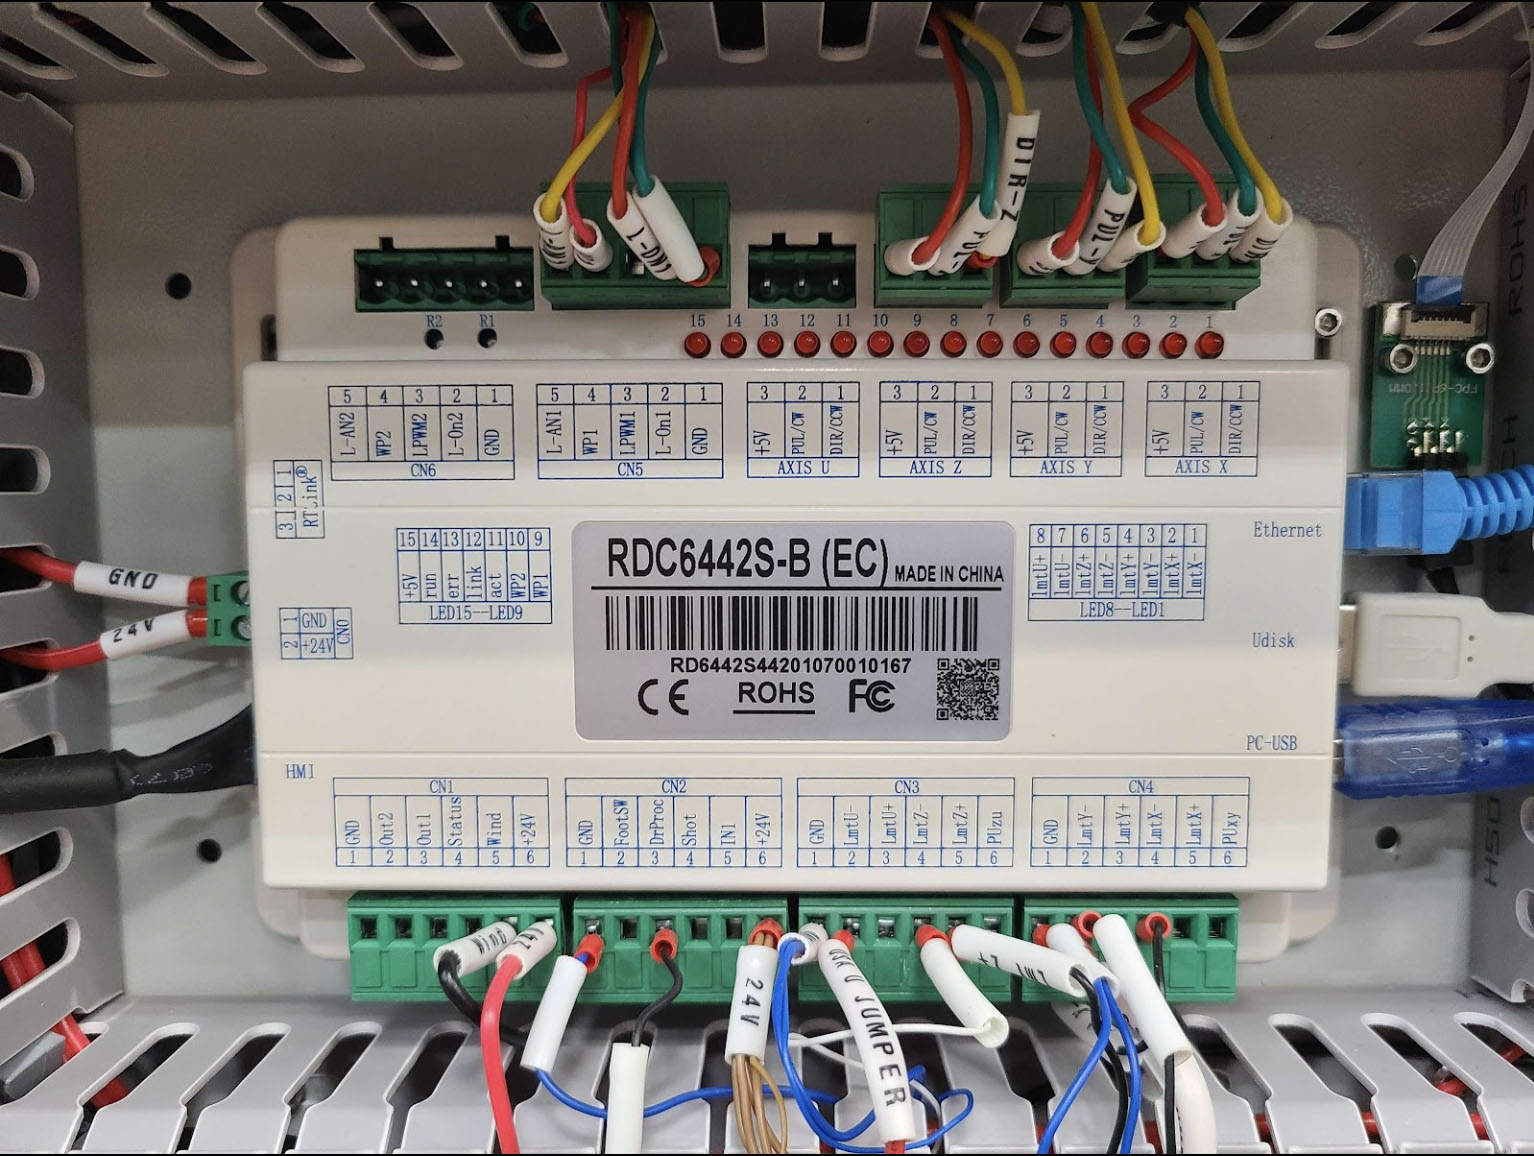
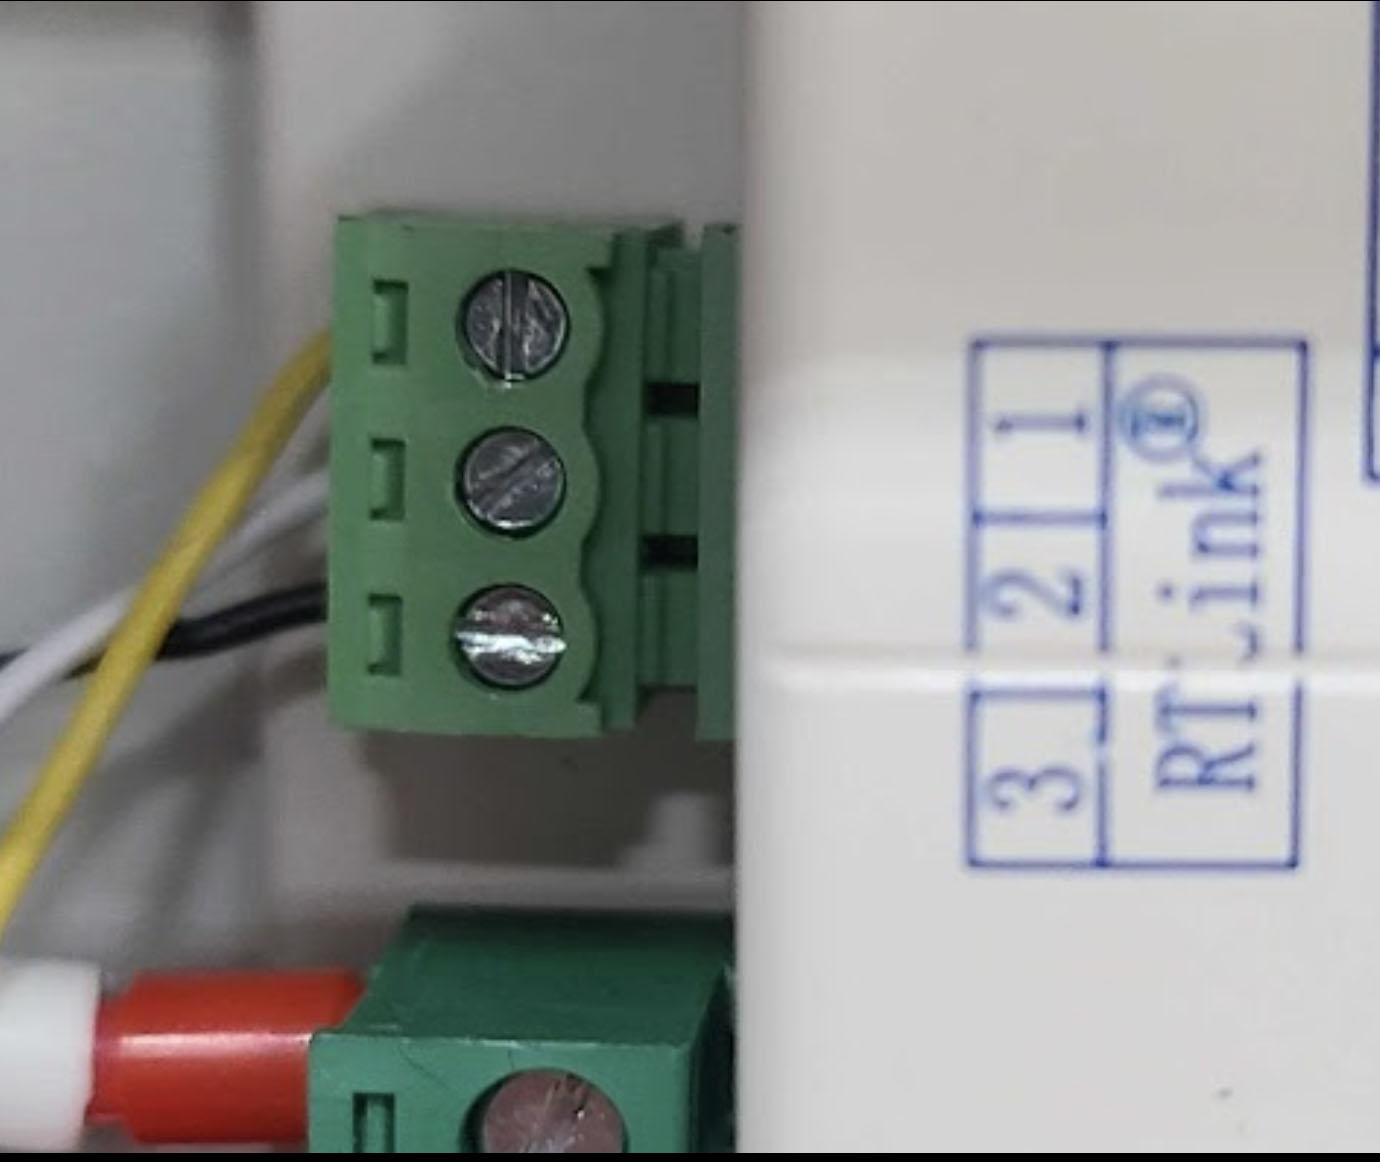
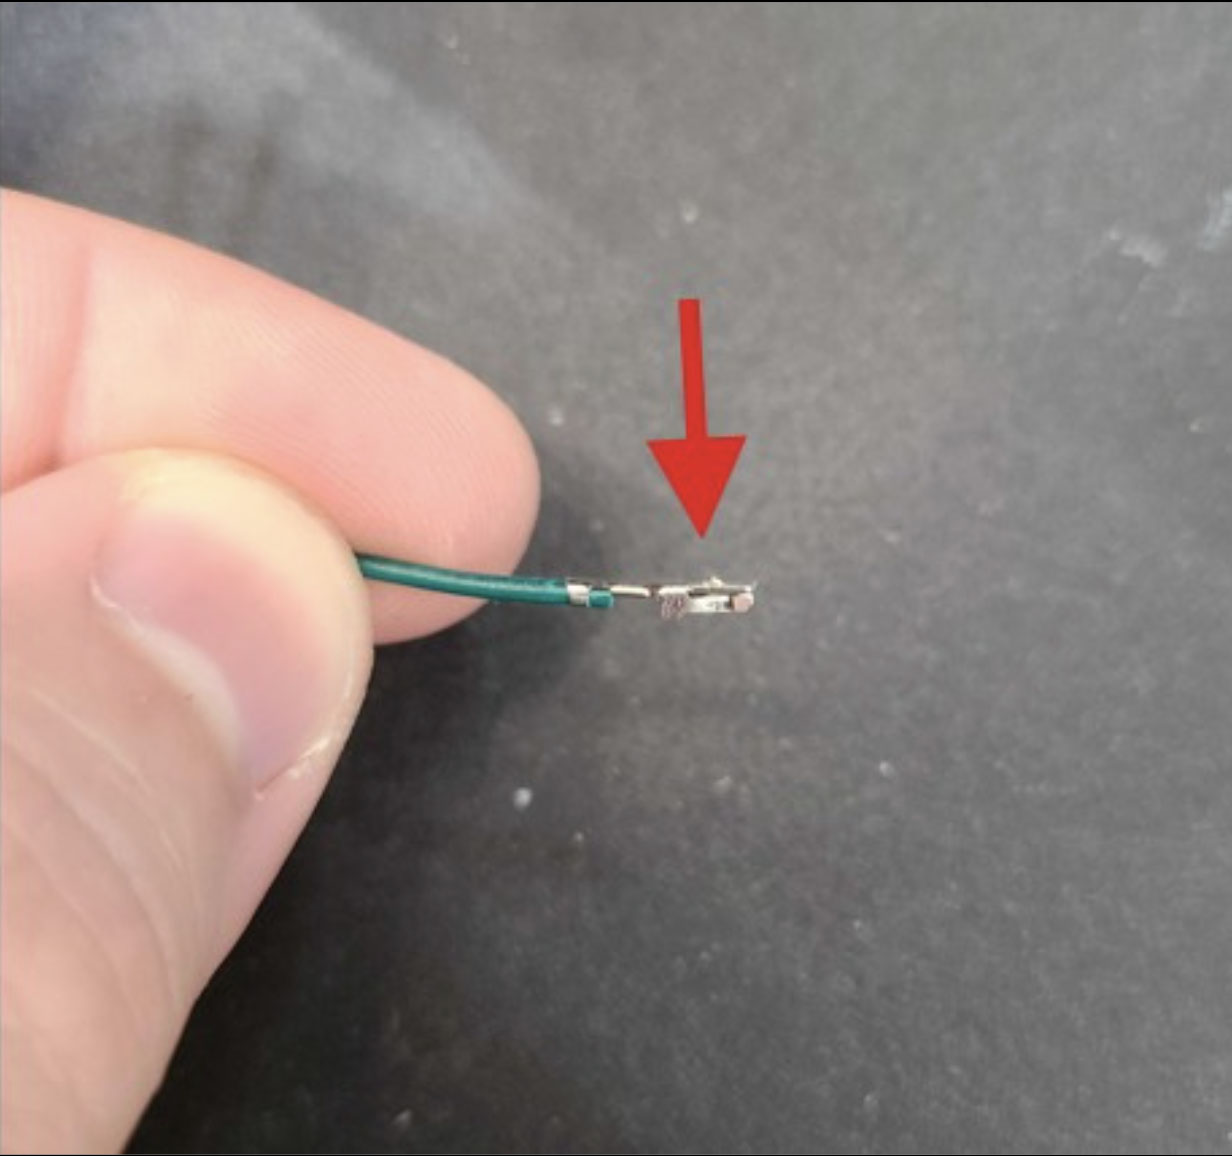
- On the controller, locate both the RT-LINK port and the AXIS U port. If necessary, remove any empty green terminal blocks from these ports by gently pulling.
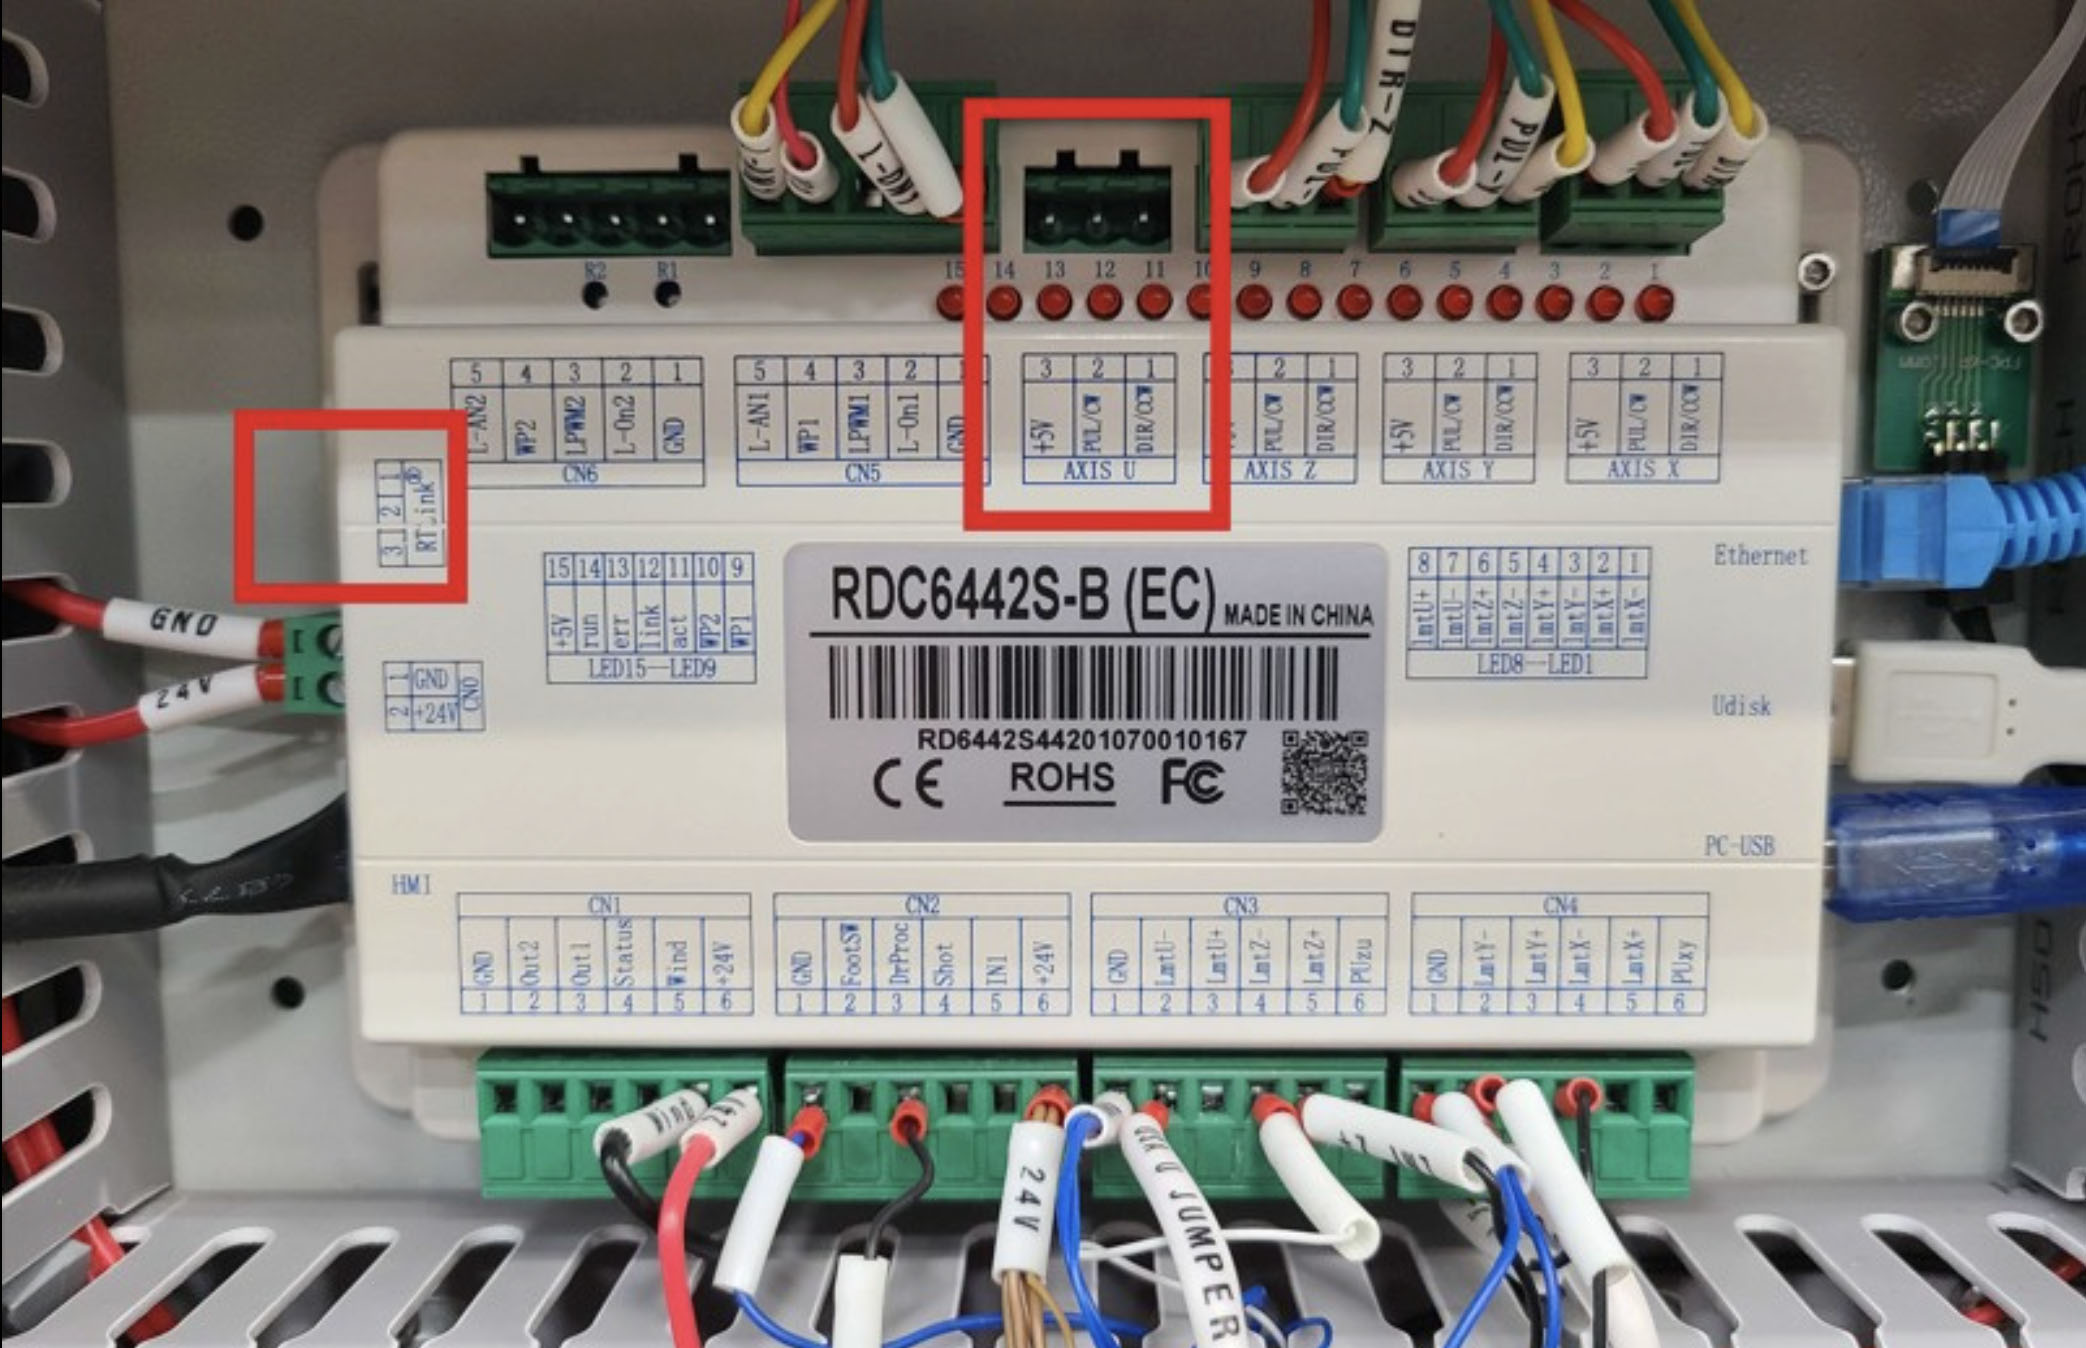
- Plug the large 3 pin terminal block with the red wire from the remote into the AXIS U port on the controller.
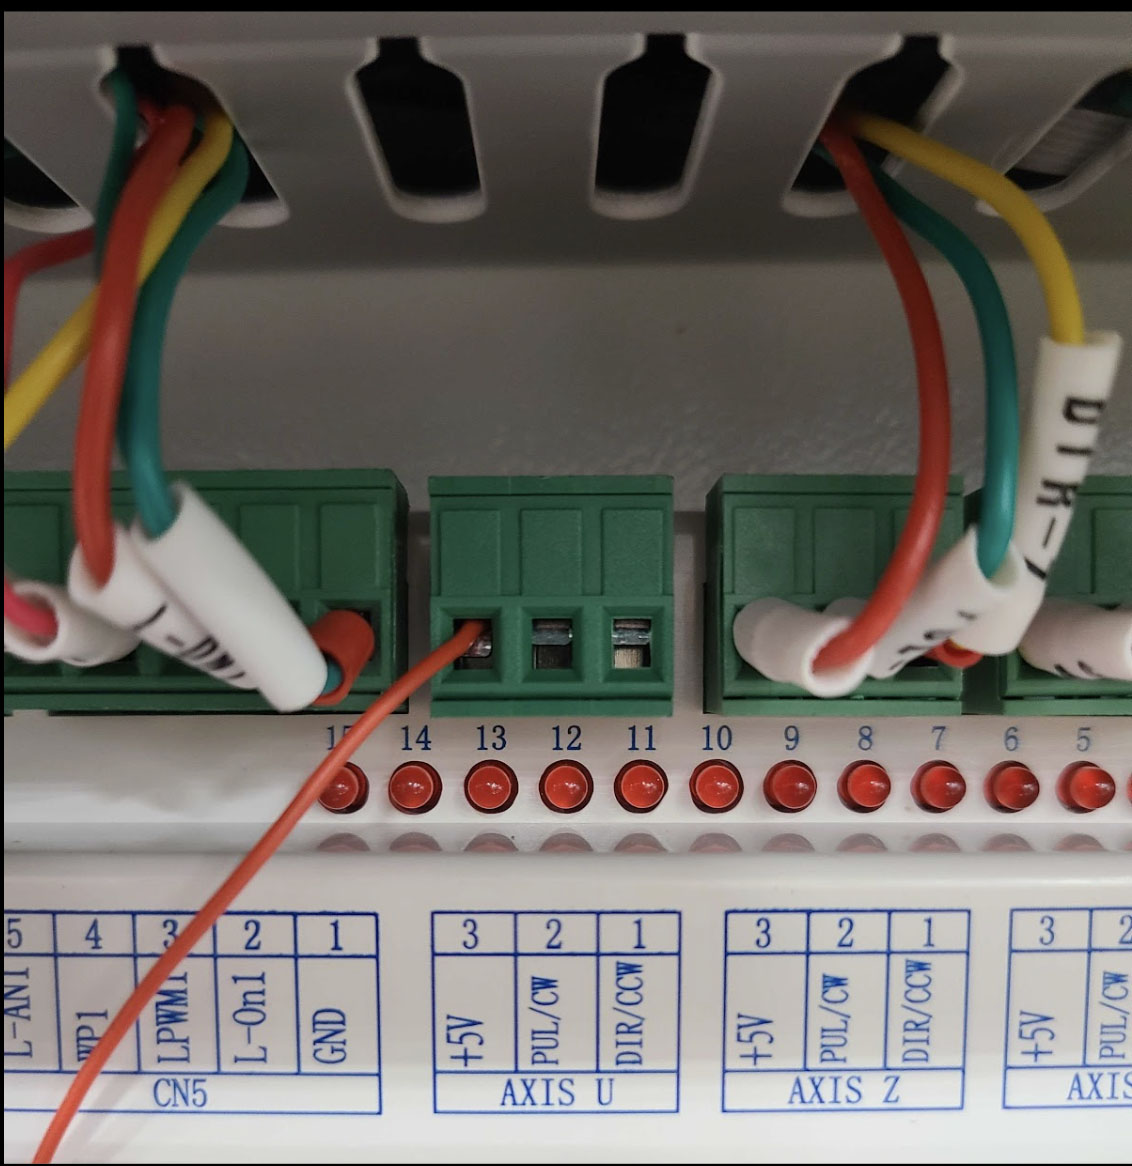
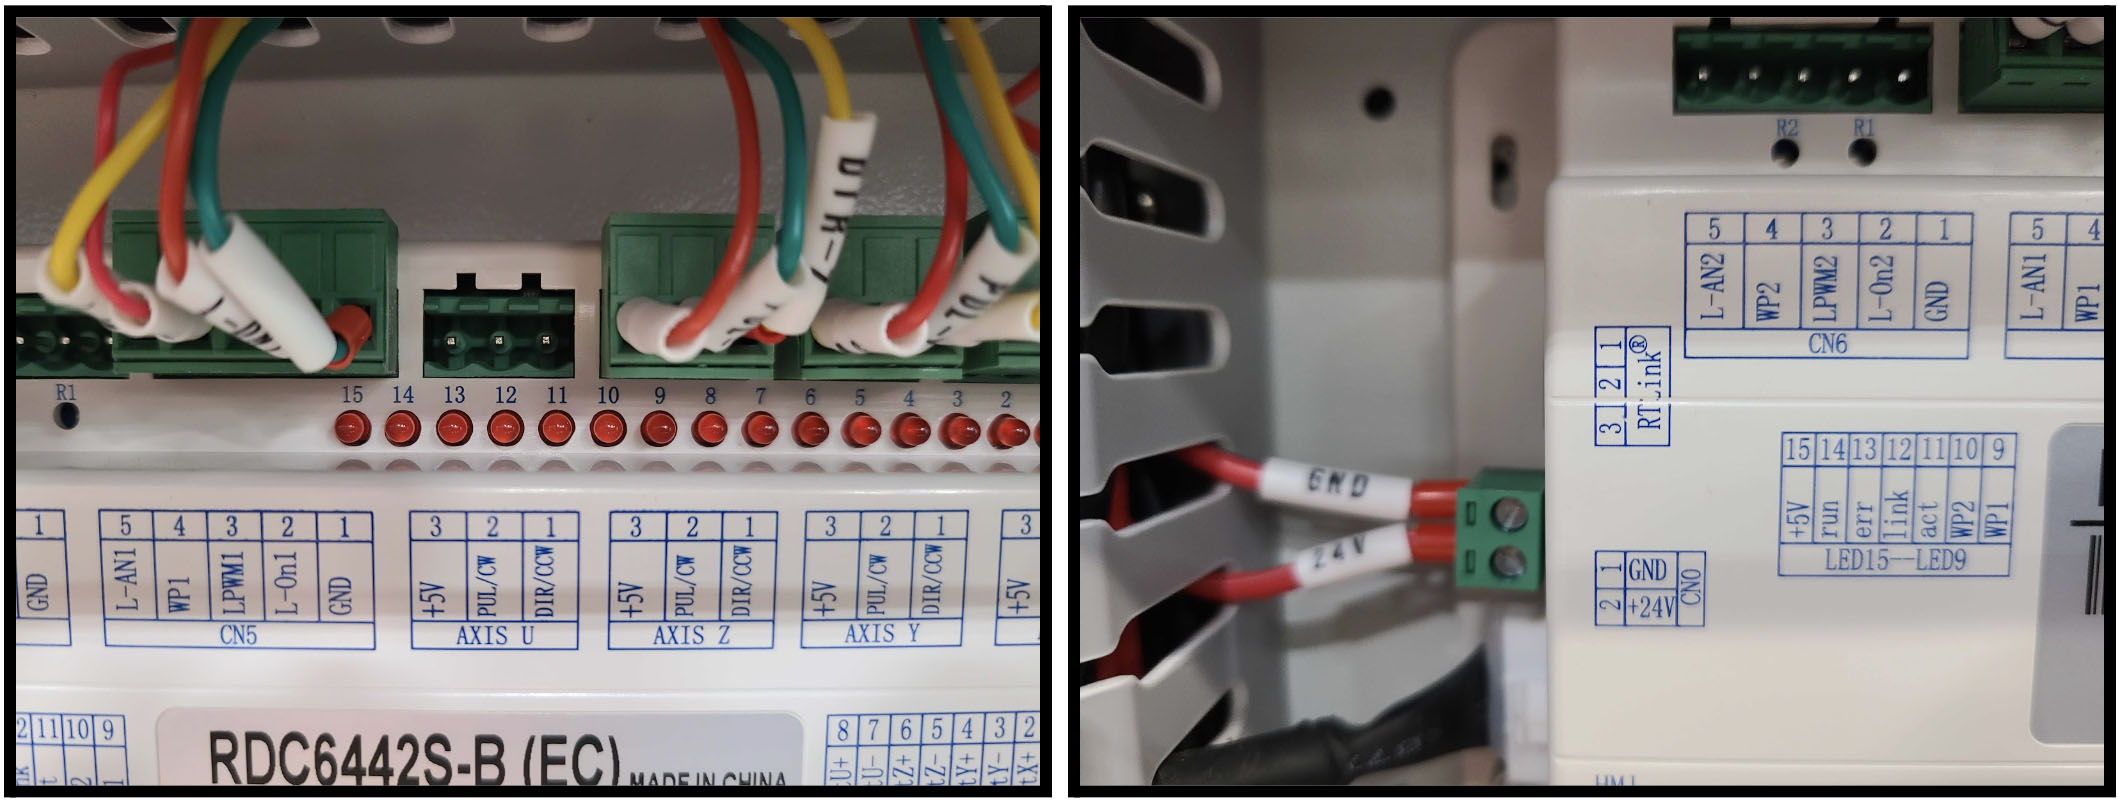
- If the AXIS U port has wiring in it already, the red wire can be removed from the remote’s terminal block and installed with the other red wire(s) on the AXIS U terminal block. Ensure it is secure and installed to the terminal labeled +5V.
- Plug the smaller 3 pin terminal block with the black, yellow, and green wire into the RT-LINK port.
- Ensure both terminal blocks are fully seated. Route any excess wire into the wire tracks as needed.
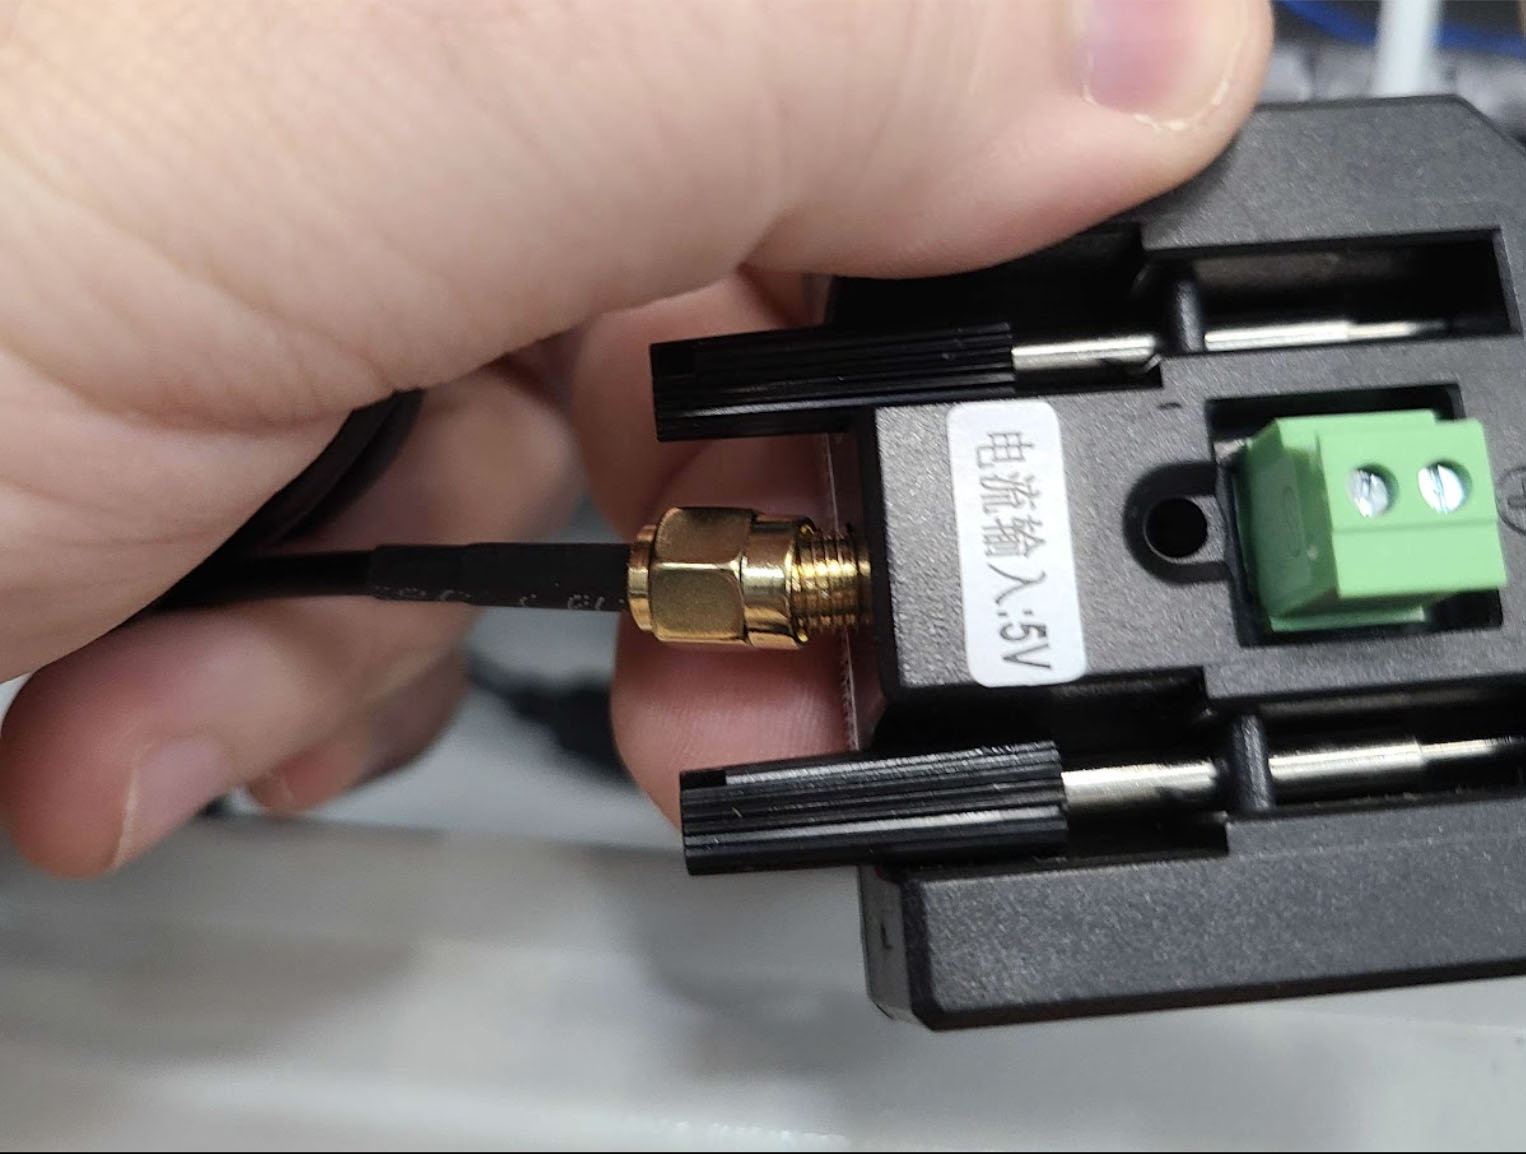
- Ensure the antenna is connected to the receiver. If it is not, screw the antenna to its connection point on the receiver.
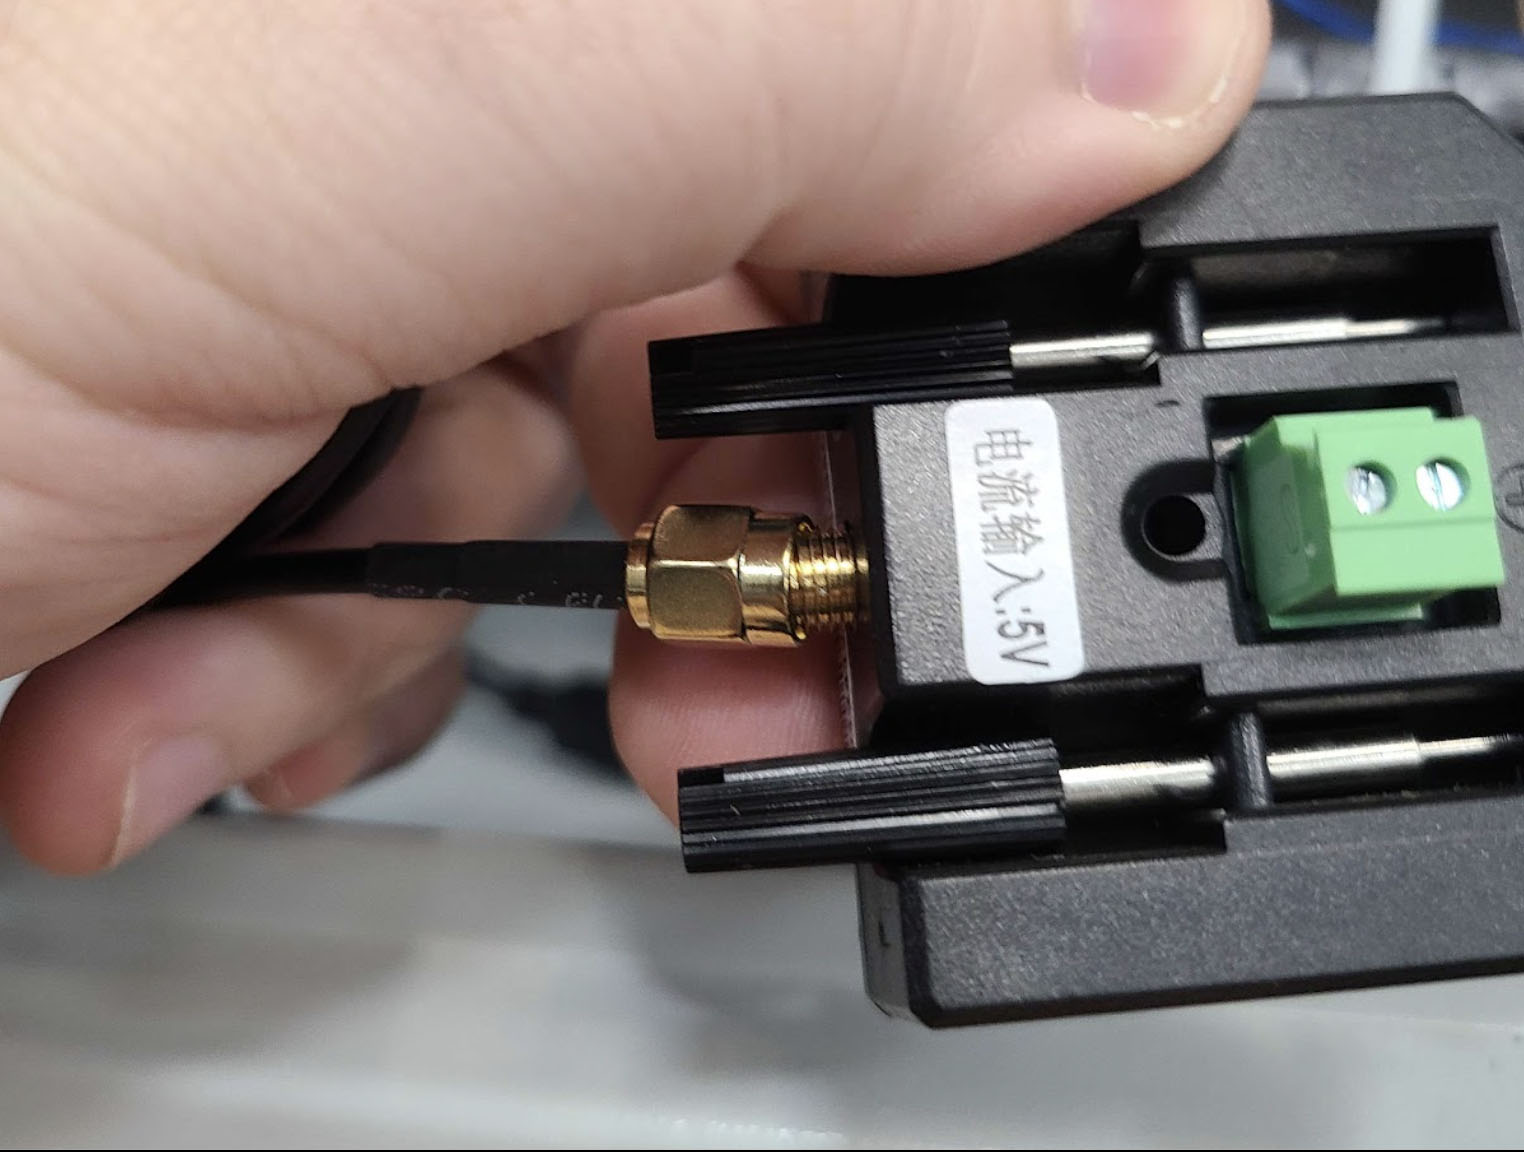
- Place the antenna in the cabinet, free from any obstructions. It has a magnetic bottom and will stick to the machine chassis. Reinstall the machine panel once complete.
That’s it! The remote will automatically connect and be ready to use once the machine is powered ON and completes the initialization process.
REDLINE MIRA and NOVA Models
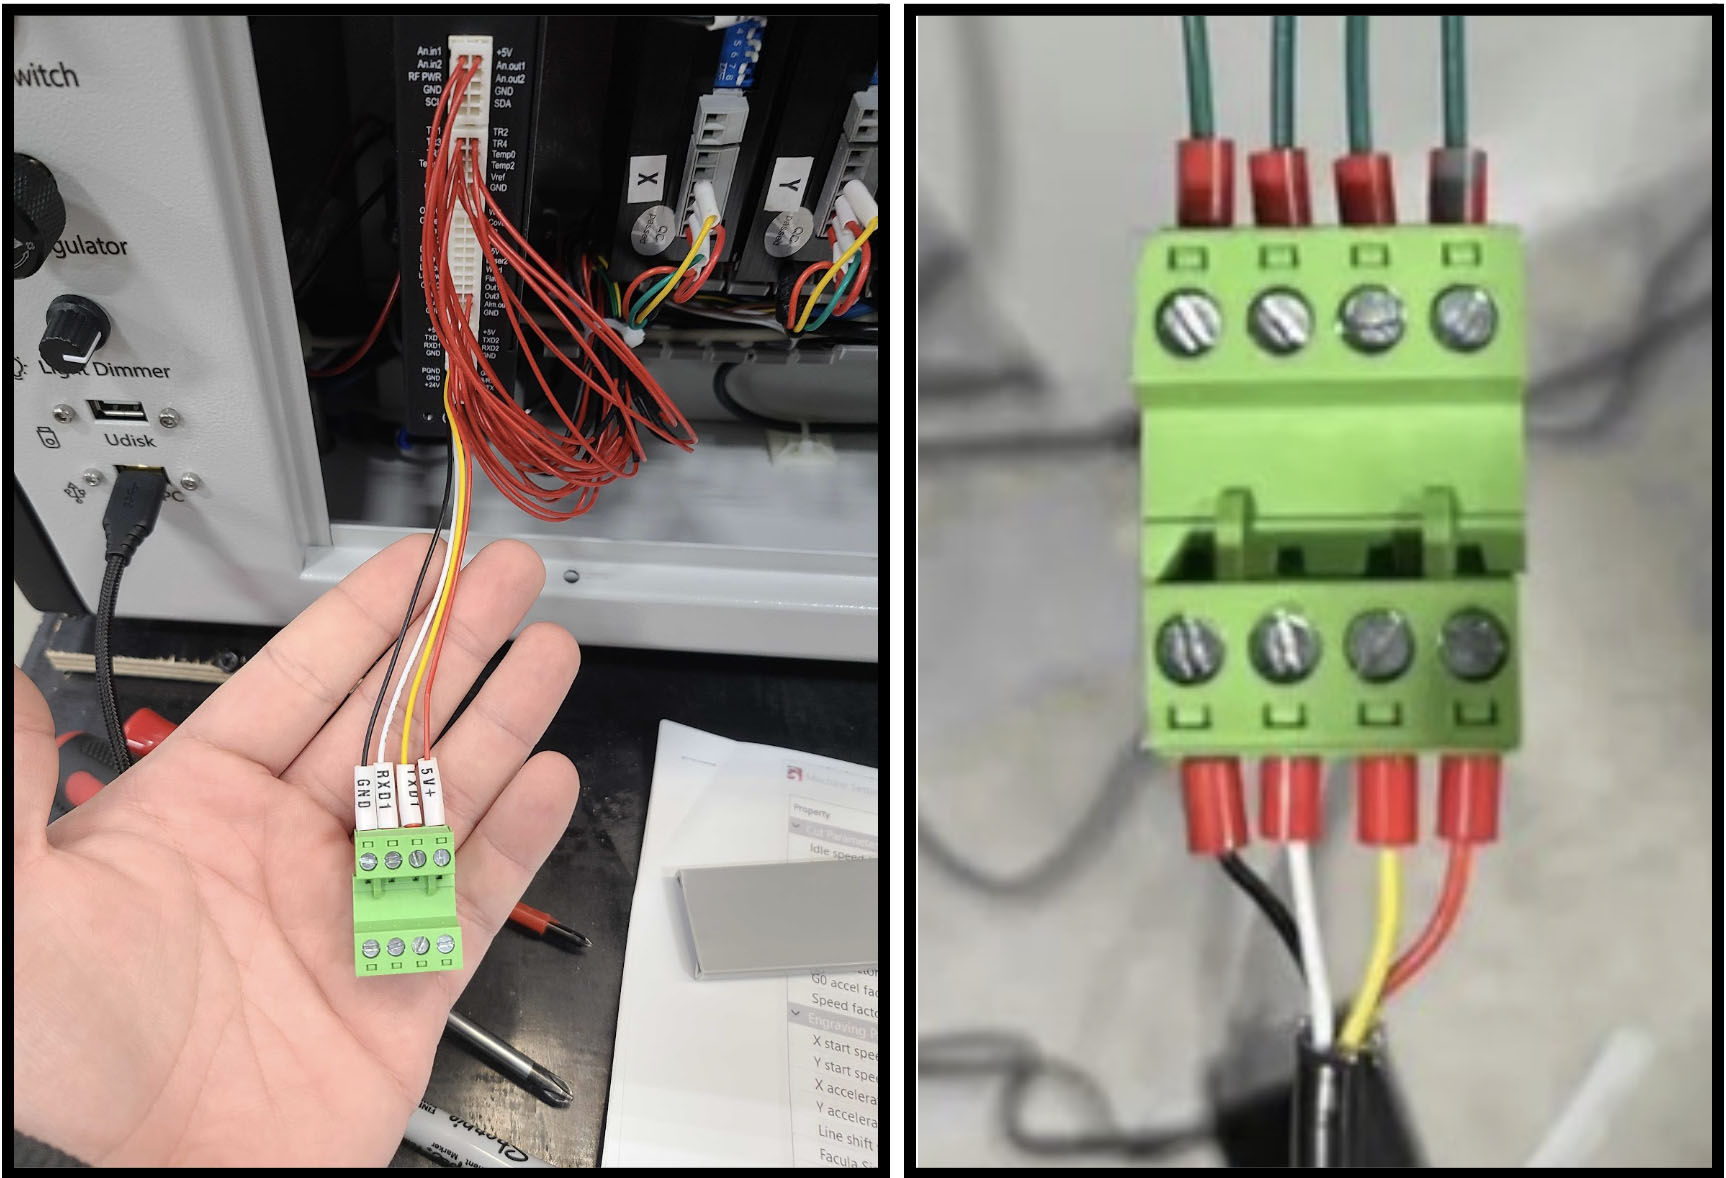
- Remove the right side machine panel and locate the machine’s auxiliary controller, pictured below.
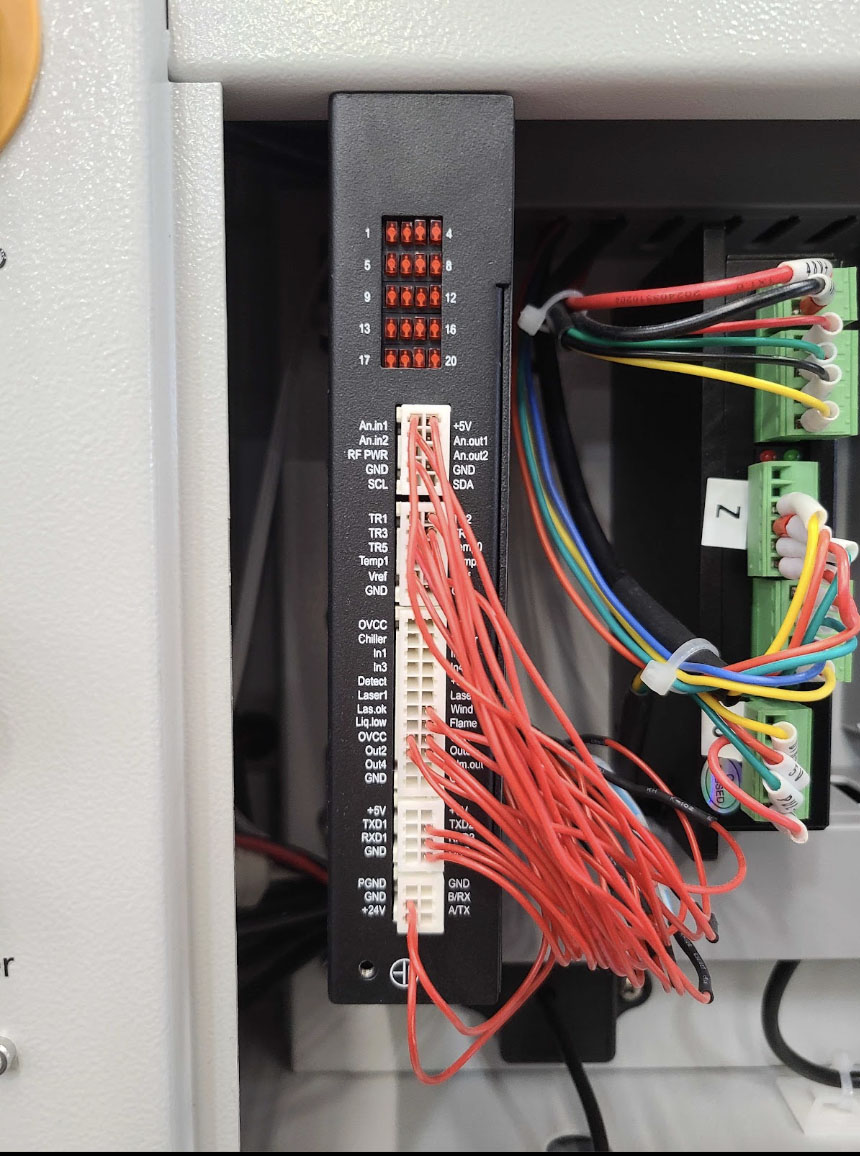
- Retrieve the remote, and look at the wiring. There should be 4 wires coming from a terminal block connection. These wires will be plugged into the auxiliary controller port shown below.
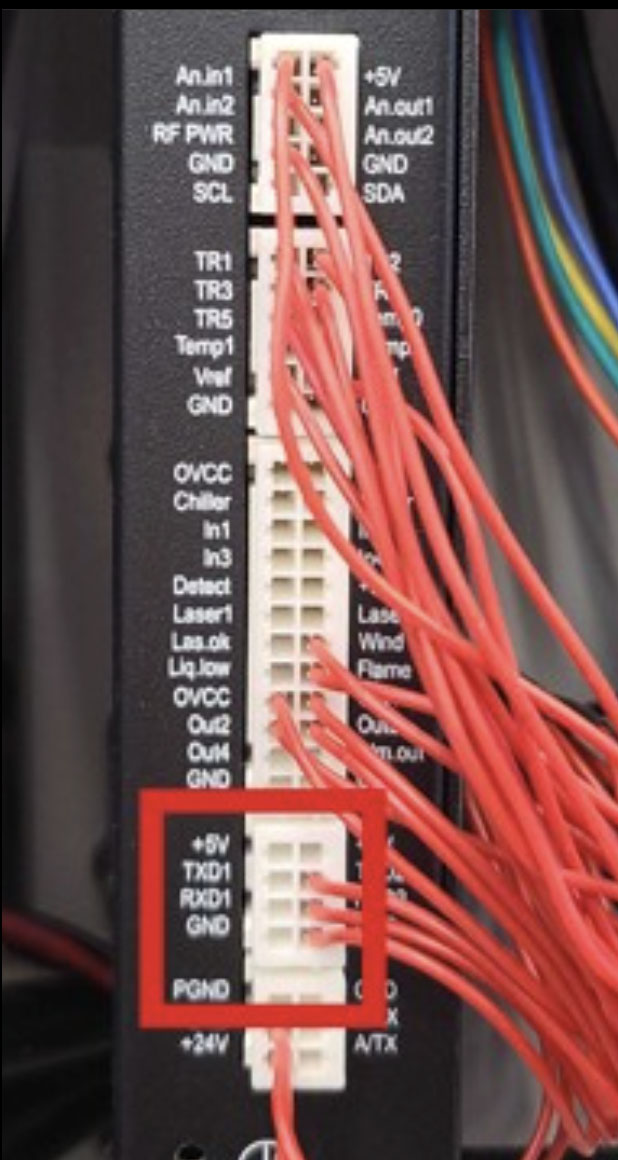
- Remove the plug from the auxiliary controller by gently pulling it out. Insert the wiring from the remote as shown below. The red wire will connect to +5V, the yellow wire will connect to TXD1, the white wire will connect to RXD1, and the black wire will connect to GND.
- The wire ends from the remote are keyed to only fit in one direction. After connecting a wire, gently tug on it to ensure it is fully seated. If the wire easily pulls free, try rotating the wire 180 degrees and reinserting. You should feel the wire lightly click into place.
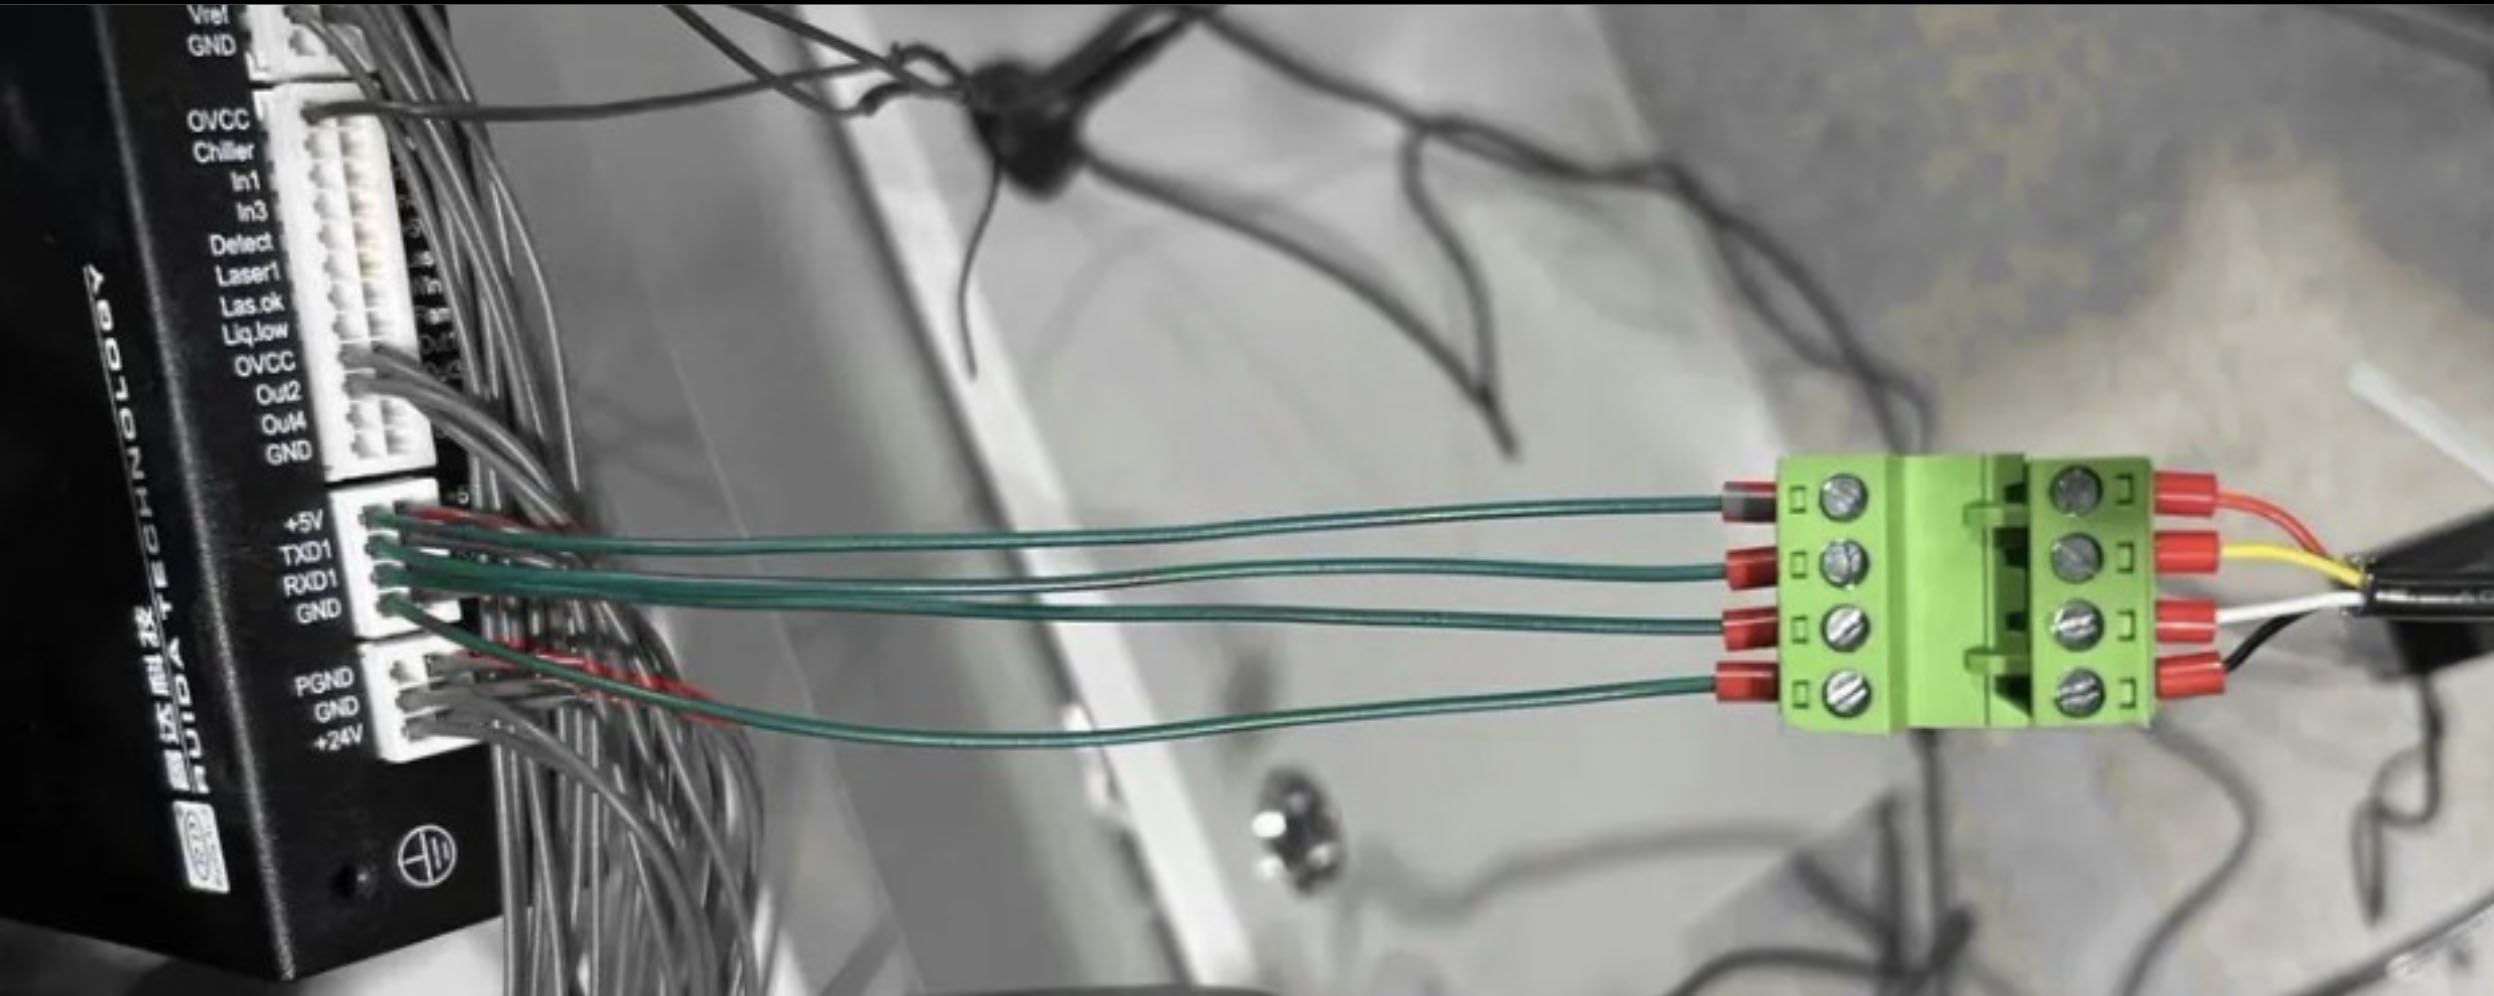
- REDLINE machines from Shipment 9 and later will have this wiring completed already, with an empty terminal block stored in the nearest wire guard. If your machine has this completed, simply connect the terminal block from the remote to this preinstalled terminal block.
- The wire ends from the remote are keyed to only fit in one direction. After connecting a wire, gently tug on it to ensure it is fully seated. If the wire easily pulls free, try rotating the wire 180 degrees and reinserting. You should feel the wire lightly click into place.
- Once all of the wires are connected, reinstall the port to the auxiliary controller.
- Ensure the antenna is connected to the receiver. If it is not, screw the antenna to its connection point on the receiver.
- Place the antenna in the cabinet, free from any obstructions. It has a magnetic bottom and will stick to the machine chassis. Reinstall the machine panel once complete.
That's it! The remote will automatically connect and be ready to use once the machine is powered ON and completes the initialization process.
Conclusion
The wireless remote controller for AEON laser engravers enhances convenience and flexibility, allowing users to operate essential machine functions without being tethered to the main control panel. Whether adjusting the laser head, aligning the machine, or framing a design, the remote streamlines workflow and improves efficiency. Proper installation and understanding of its functions ensure seamless integration with your machine. By following the steps outlined in this guide, you can confidently set up and use the remote controller to optimize your engraving process.
We are committed to making your experience with AEON Laser USA as seamless as possible. If you have any questions or concerns, please send us an email at support@aeonlaser.us for the fastest service. If your laser is malfunctioning, please submit a support ticket.
Did you find this document helpful? Let us know what you liked or what we can improve on by sending an email to helpusgrow@aeonlaser.us.
Happy Lasering!
DISCLAIMER: AEON LASER USA AND ENGRAVING MACHINES PLUS, CORP ARE NOT RESPONSIBLE FOR ANY DAMAGES OR INJURIES THAT MAY RESULT FROM FOLLOWING THESE SUGGESTIONS. USE CAUTION AT ALL TIMES.


