-

Getting Started 16
-

Maintenance 14
-

Troubleshooting 14
-

Repair 8
-

Laser 101 3
-

Materials 10
-

Accessories 20
-

Multi-Roller 7
-

LightBurn 9
3D Engraving on Metal with a Fiber Laser


Overview
What you will learn
In this guide, you will learn how to process an image and the basis behind identifying the settings to use for 3D style engraving into metal with your fiber laser.
When to do this
This guide can be used as a reference for the basics when it comes to 3D metal engraving technique.
What you need
- Computer with LightBurn
- Image(s) to Engrave
- Material to Engrave
NOTE: This guide was created with more advanced users of LightBurn and the machine in mind. The basic features and locations of tools and functions will be assumed to be known. If you are unfamiliar with LightBurn in general, check out the LightBurn website for additional information. You can also reference our article on LightBurn Basics. For more information on the machine in general, search through the rest of the Knowledge Base.
Introduction
3D engraving is a technique that involves carving or etching a design into a material, in this instance metal, to create a three-dimensional effect. Fiber lasers in particular have become a popular tool for this purpose, thanks to their efficiency, speed, and ability to work with a variety of metals. This article will explore the process of 3D laser engraving on metal using a fiber laser, providing insights into the types of images best suited for the technique, the importance of settings, and other critical considerations for achieving optimal results.
What is 3D Engraving?
Unlike traditional engraving, which produces a flat image, 3D engraving adds depth and dimension to a design by varying the depth of the engraving. This creates shadows and highlights, as well as a recessed or raised image. 3D engraving is often used in art, personalized gifts, jewelry, and signage to produce intricate, visually striking designs with a tactile quality. This effect is particularly striking on metals, where the reflective properties can enhance the visual impact of the engraving.
Learning the Fundamentals
Choosing the Right Image to Engrave
Like any engraving process, 3D engraving starts with selecting an image to engrave. Though this may seem like a fairly straightforward thing to do, selecting the right image takes careful consideration of a handful of factors. Not all images are suitable for this style of job, therefore the quality and suitability of the image attempting to be engraved are crucial in the 3D laser engraving process. Careful selection is necessary to achieve the best results. The following points are important to consider when selecting an image to engrave.
- High Resolution Images
- The image used for 3D engraving should be of high resolution. This allows for the software to capture fine details, which are translated to the engrave. Low resolution images will result in unclear results when engraving.
- A low resolution image can potentially be upscaled. Upscaling an image adds more pixels to the image, which will add depth, detail, and sharpness to the image when engraving. There are a plethora of free and paid softwares that can do this, though an image that is natively high resolution will yield better results.

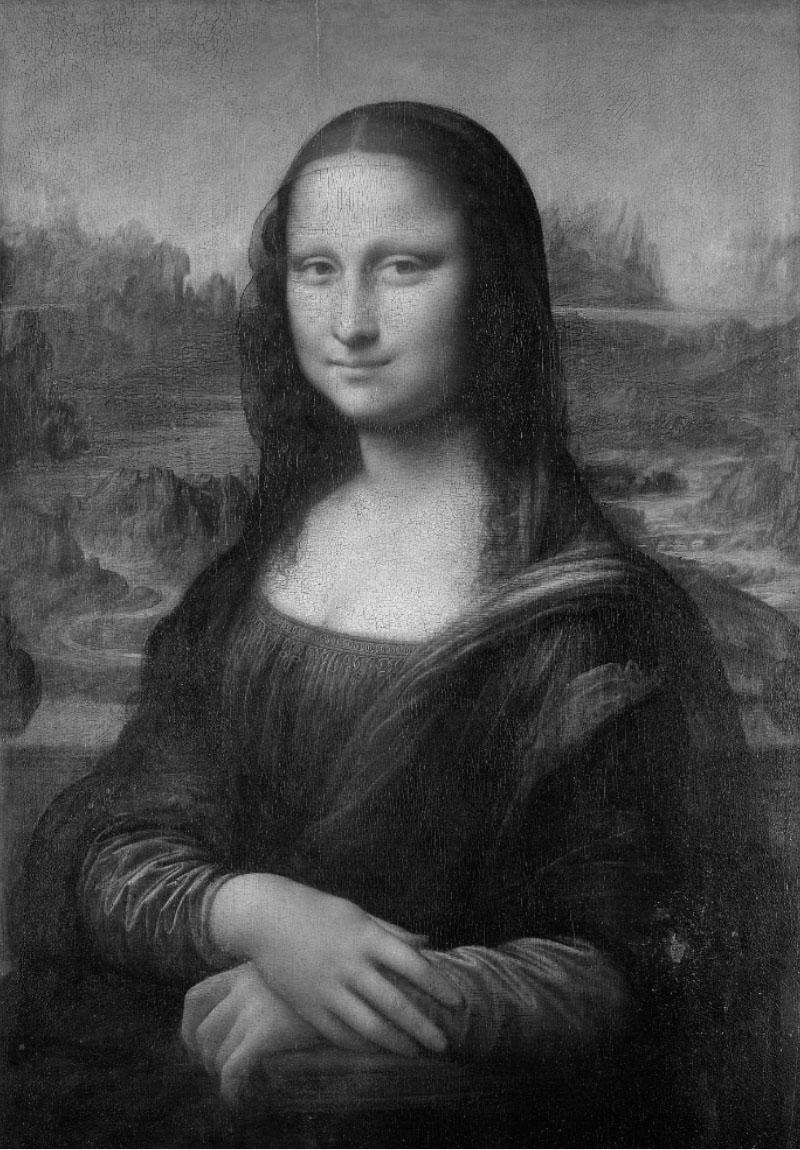
Left: low resolution; Right: high resolution - Grayscale Images
- For 3D engraving, some sort of grayscale image is generally preferred, if not outright necessary. The shades of gray in the image are translated into different depths during the engraving process. Darker areas are engraved deeper, while lighter areas are engraved more shallowly or not at all. This creates the desired 3D effect.
- An image that is grayscale can produce a 3D effect if configured properly on the software side of the process, though it is not the ideal form for the image to be. Extra processing can be done to a grayscale image to convert it into a 3D depth map for increased variance in depths when engraved.
- 3D Depth Maps
- 3D depth maps are grayscale images used to represent the depth information of a three-dimensional scene or object, and are the ideal image type when trying to perform 3D engravings. Each pixel in a 3D depth map corresponds to a specific point in the scene, and the brightness of that pixel indicates its distance from a reference point, typically the viewer or a camera. The darker the pixel, the further away the point is; conversely, lighter pixels represent points that are closer.
- Darker areas correspond to deeper marking, while lighter areas represent shallower marking. Using a well-constructed depth map ensures that the laser engraves the material at varying depths, accurately translating the design into a three-dimensional form. Depth maps are particularly useful for creating complex, textured engravings and are essential for achieving a true 3D effect in the final product.

- Simple vs. Complex Designs
- While fiber lasers are experts at handling intricate designs, overly complex images with too many fine details might not translate well into a 3D engraving. Simplified designs with clear contrasts between light and dark areas often produce the best results.
Configuring Settings
Now that the fundamentals of selecting an appropriate image for 3D engraving are understood; it is time to go over another piece of the puzzle, configuring settings.
The success of 3D laser engraving on metal hinges on the correct adjustment of various laser settings. Each setting affects the engraving process in different ways, and understanding these effects is crucial for achieving the desired outcome.
When performing 3D engravings on metal, a significant amount of material is removed throughout the process. Achieving the desired depth to create the 3D effect can often require jobs that last several hours. It is crucial to fine-tune the settings to ensure optimal results.
- Material Removal Passes
- A majority of the passes run while performing 3D engraving jobs will be set with the intent of removing as much material as possible, known as “Material Removal Passes”. This is how the machine creates the 3D effect, by removing significant amounts of the material.
- Generally, material removal passes will be on the lower end of speed and frequency settings, with high power settings. The 3D effect will happen over the course of many passes, with an average of 100 to 200 passes needed to provide the desired depth of the engrave, depending on factors like machine wattage, material type, etc.
- Clean Up Passes
- A “Clean Up Pass” will remove excess char or discoloration from the metal as it is being engraved, without digging deeply into the material. Clean up passes can be set to run after the desired amount of material removal passes. This type of pass is recommended to help reduce on finishing work and cleaning the material once the job has completed.
- A good rule of thumb for approximating a clean up passes settings is that the values will generally be a much higher speed and frequency setting than the material removal passes, with a much lower power setting.
- LightBurn has an integrated clean up pass feature in the layer settings when doing the “3D Slice” mode of engraving. It can be set to clean the whole image, or only the most recently engraved slice, based on personal preference of the final look/result.
- Speed and Power
- The engraving speed is another critical factor. Slower speeds allow the laser to impart more energy into the same area, resulting in more depth when engraving. However, slower speeds can also result in excessive heat buildup, potentially damaging the material. Conversely, too fast a speed may result in a shallow or incomplete engraving.
- Laser wattage will significantly change the power setting used. A 30W laser will inherently need a higher power setting than a 50W laser to get the same level of depth when engraving.
- Both speed and power will also change based on the type of material being engraved. A polished copper will not use the same settings as a matte brass.
- Both power and speed will need to be adjusted based on the style of the pass, as detailed above.
- Frequency
- At lower frequencies the laser emits fewer pulses per second, which means each pulse has more energy. This allows for deeper penetration into the material, making it ideal for removing more material and adding depth to an image.
- At higher frequencies the laser emits more pulses per second, with each pulse having less energy. This results in finer, smoother engravings with less material removal per pulse, making it ideal for a quick clean up pass to clean the surface of the material.
- Frequency will need to be adjusted based on the pass type, as detailed above.
- Focus
- Proper focus is crucial in 3D engraving. Due to the nature of 3D engraving, it is ideal to focus slightly into the material, as the image will have depth to it. Being perfectly focused on the surface will cause deeper layers to be out of focus, therefore losing detail.
- The best focus while performing a 3D engraving is to have the perfect focal point slightly INTO the material. This depth will vary depending on the depth of field the installed lens has.
- Generally, being around 0.5 mm focused down into the material will yield a good result, though this will require some guess and check work to fine tune.
- Lines Per Inch (LPI)
- Having an appropriate LPI value when doing 3D engraving with a fiber laser is essential for achieving high-resolution, detailed, and smooth engravings. It allows for better depth control, enhances the surface finish, and ensures that the final product accurately reflects the intended 3D design.
- >While a higher LPI value will increase overall engraving time, the improved quality and precision make it a critical parameter in achieving the best possible results when 3D engraving.
- A standard range of LPI values for 3D engraving is from the high hundreds (800+) to the low thousands (1200). An LPI value in this range provides for a high detail engraving.
- Image Mode - 3D Slice
- The image mode determines how the laser will process the image while engraving. Fiber lasers have access to the “3D Slice” mode in LightBurn, which is specifically designed to perform 3D engravings.
- 3D Slice mode enables the “Number of Passes” option to divide the file into X number of slices, based on the pass count. The additional number of layers provides increased depth to the image, as well as detail.
- Other image modes, like “Grayscale” can potentially output a similar result, though they generally will not produce the same level of depth and detail.
- See LightBurn’s article on 3D Slice mode here for additional information.
- Passes
- Multiple passes are essential when performing 3D engravings on metal. Doing multiple passes ensures that the engraving achieves the desired depth, maintains fine details, produces a smooth finish, and allows for careful control over the entire process.
- For intricate 3D designs, each pass will remove material from specific areas of the coin, gradually building up the depth and detail of the design. This layering approach helps to preserve the sharpness and precision of fine details, which might be lost if the engraving were attempted in a single, deeper pass.
- An average number of passes in 3D Slice mode will be 100 to 200, depending on the level of detail in the image. This high number of passes will also increase overall job time, as mentioned previously.
Making a 3D Engraved Coin - Example Job
In this section, we will walk through an example of 3D engraving on a copper coated steel core coin blank. Based on the guidance and techniques discussed earlier, optimal settings were determined through testing on a spare coin.
While testing for material removal pass settings, a 10mm square was run with various settings configurations until a sufficient depth was achieved in the quickest amount of time. The values found were recorded as seen below.
NOTE: The test settings were found using a much lower pass count, for the sake of time and material conservation.
While testing for clean up pass settings, a 10mm square was run with the found depth settings from the initial testing. A clean up pass with twice the speed, a higher frequency setting, and a significantly lower power setting was used after 3 material removal passes. The values found were recorded as seen below, which yielded the cleanest surface.
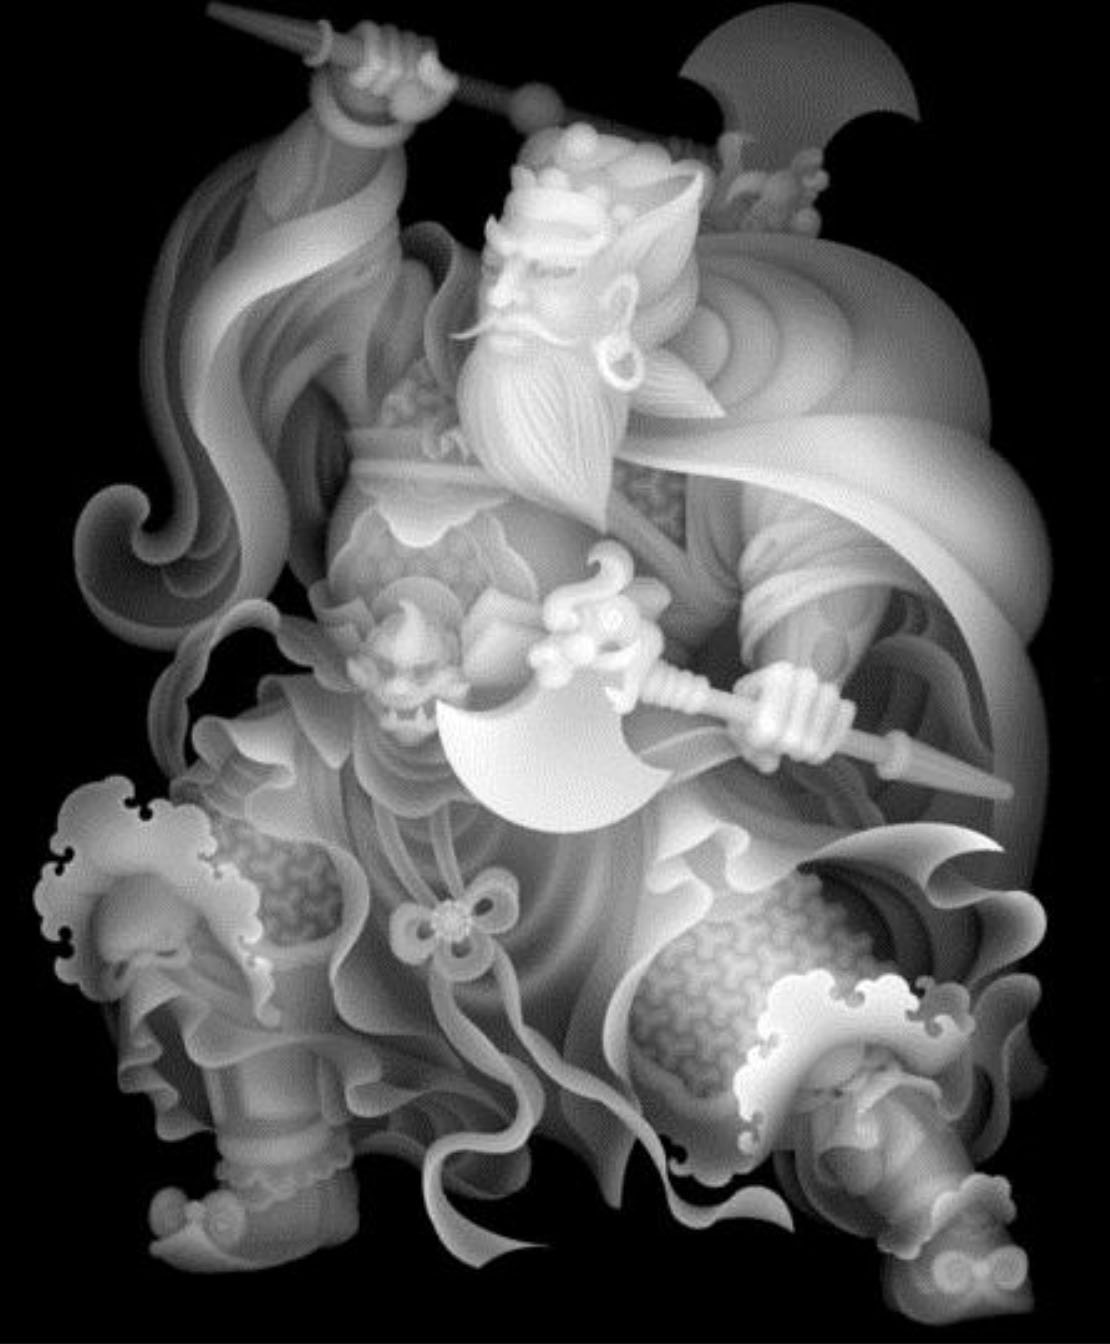
A suitable depth map was found online and then applied to the coin using the identified settings. The final settings and results are provided below.
Machine Type:
- 30W Raycus
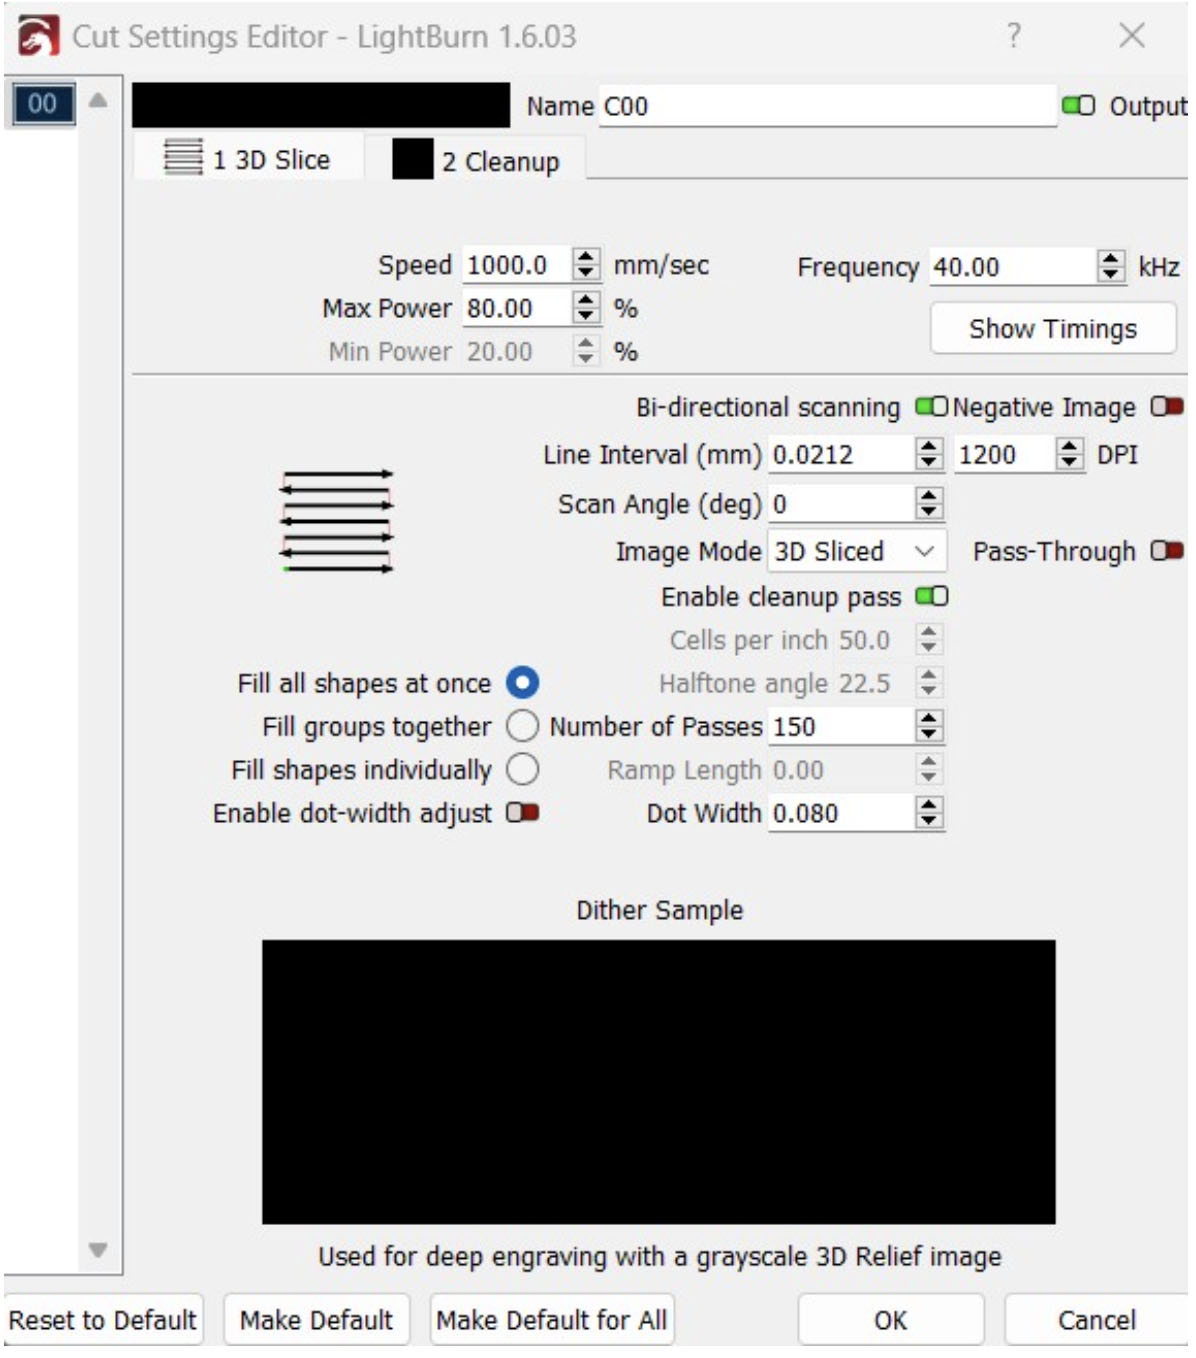
Material Removal Pass Settings:
- Speed: 1000 mm/s
- Frequency: 40 kHz
- Power: 80%
- LPI: 1200
- Bi-Directional Fill: Enabled
- Cross Hatch: Disabled
- Fill All Shapes at Once: Enabled
- Image Mode: 3D Slice
- Clean Up Pass: Enabled
- Number of Passes: 150
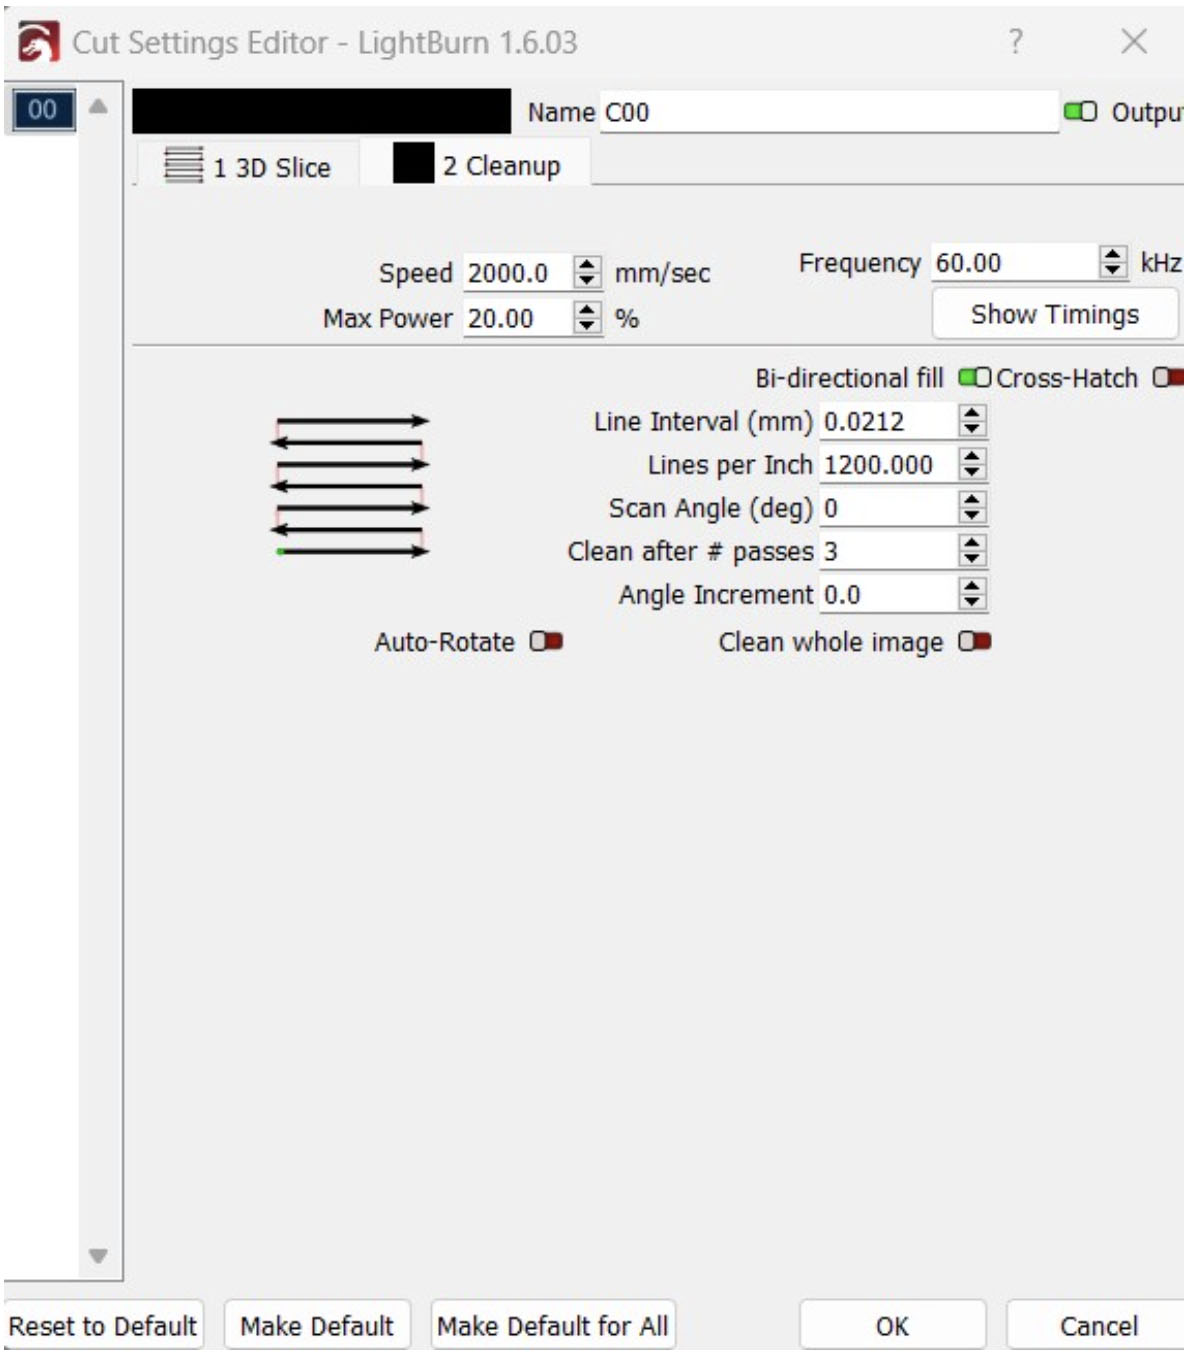
Clean Up Pass Settings:
- Speed: 2000 mm/s
- Frequency: 60 kHz
- Power: 20%
- LPI: 1200
- Bi-Directional Fill: Enabled
- Cross Hatch: Disabled
- Clean After # Passes: 3
- This means the clean up pass will run after every 3 material passes.
- Clean Whole Image: Disabled
- This is personal preference. Cleaning the whole image each clean up pass will make the final result have less dimension overall.
Here is the result!
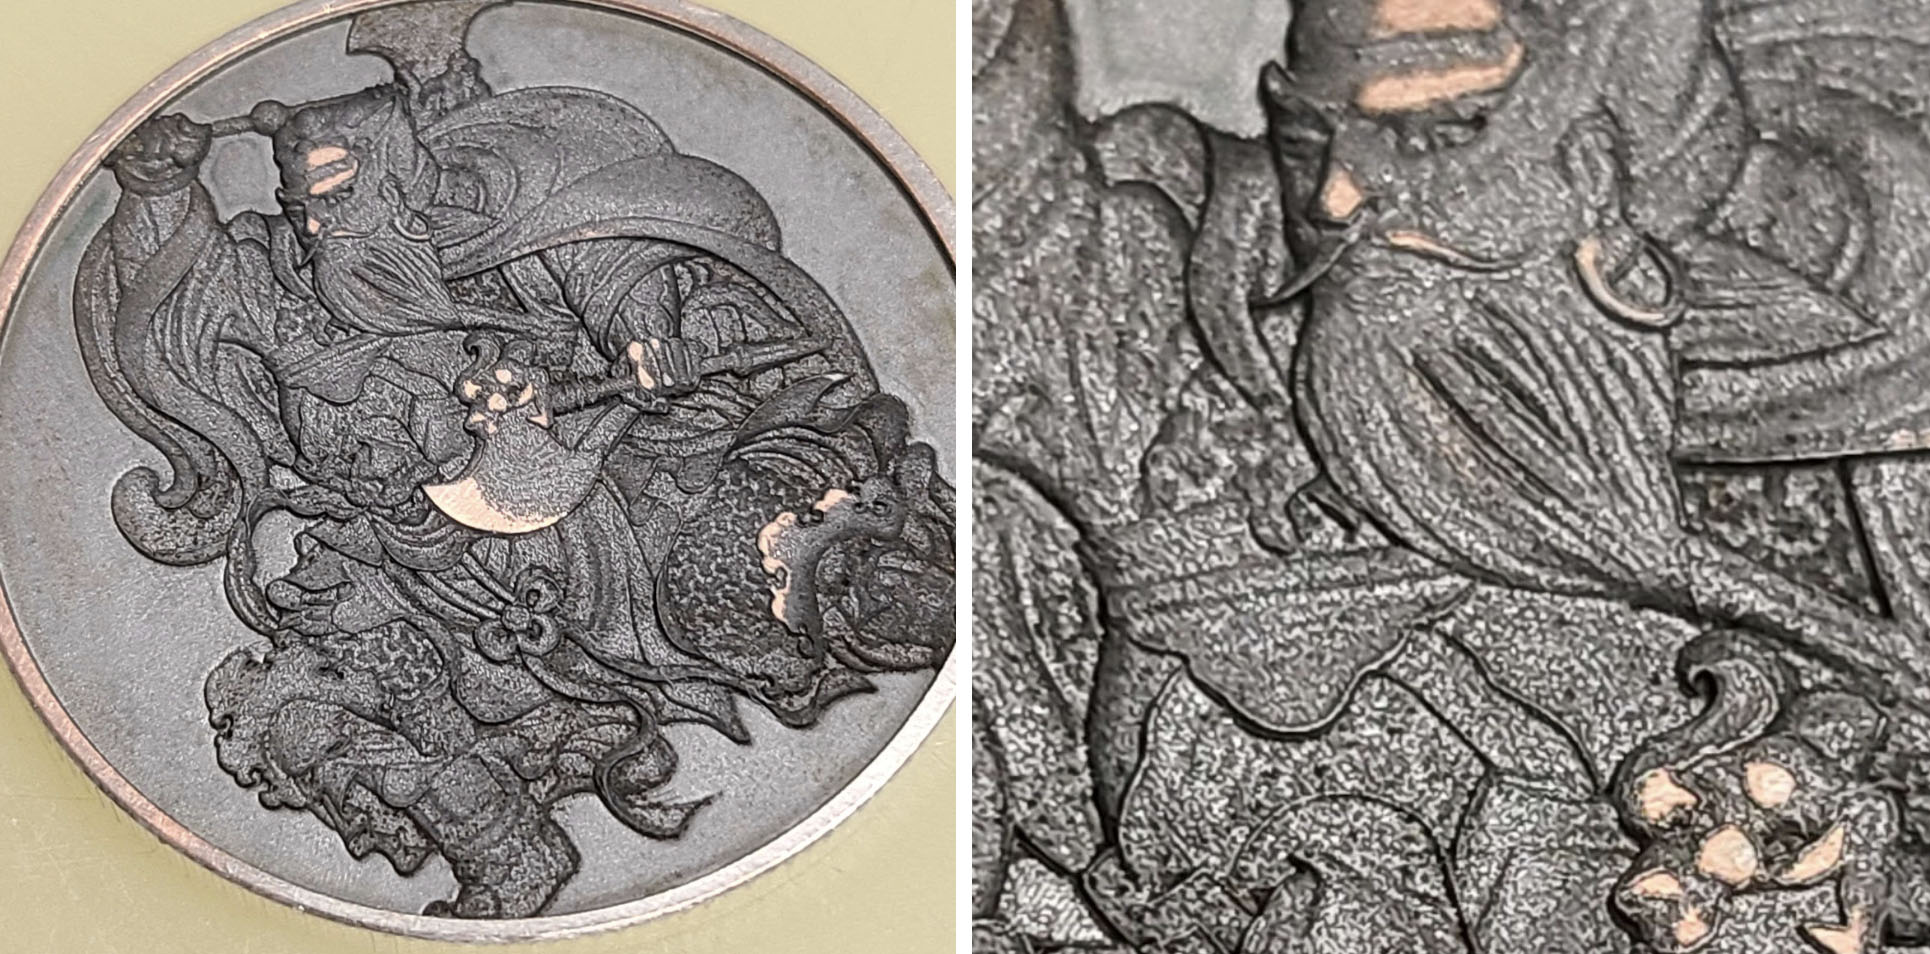
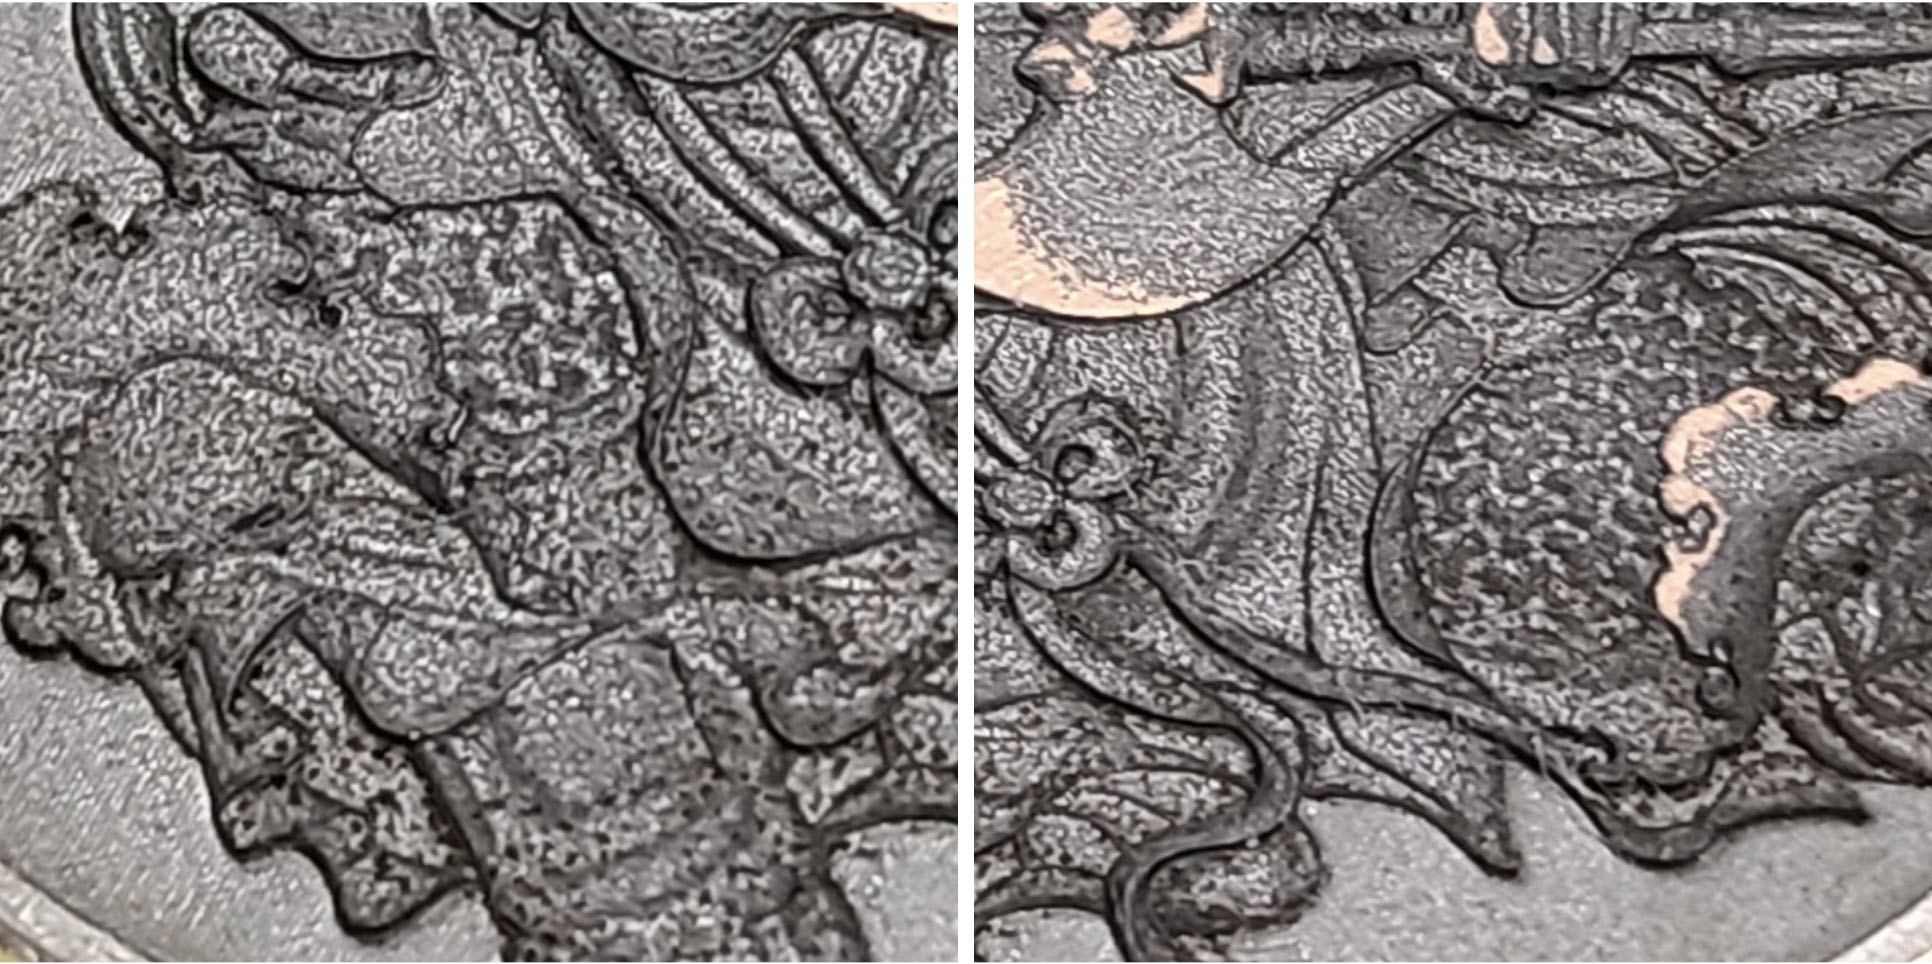
Something to note about this result, enabling the clean up pass to go over the full image as opposed to the setting used would have removed the copper coloring on the high points that the laser did not remove.
That's it! By keeping the points covered in this guide in mind, you should be well on your way to making advanced 3D style engravings in metal!
If you have any questions or concerns, please send us an email at support@aeonlaser.us for the fastest service. If your laser is malfunctioning, please submit a support ticket.
Did you find this document helpful? Let us know what you liked or what we can improve on by sending an email to helpusgrow@aeonlaser.us.
Happy Lasering!
DISCLAIMER: AEON LASER USA AND ENGRAVING MACHINES PLUS, CORP ARE NOT RESPONSIBLE FOR ANY DAMAGES OR INJURIES THAT MAY RESULT FROM FOLLOWING THESE SUGGESTIONS. USE CAUTION AT ALL TIMES.


