-

Getting Started 16
-

Maintenance 14
-

Troubleshooting 14
-

Repair 8
-

Laser 101 3
-

Materials 10
-

Accessories 20
-

Multi-Roller 7
-

LightBurn 9
Optimizing Acrylic Settings


Overview
What you will learn
In this guide, you will be provided with a collection of settings when working with acrylic. This document will cover etching, scoring, cutting, and engraving; where both tips and general information will be discussed. Any settings provided should be considered suggestions, where the user may need to pursue further testing to find the optimal settings for their specific machine.
When to do this
The aim of this document is to provide the user with a reference when optimizing their settings for acrylic material. This document should be resourced when initially setting up your machine or before starting a production run with acrylic material.
What you will need
- Acrylic Material
- Computer
Preface
This guide will cover an array of general concepts and settings when working with acrylic. It is written following the steps and methods outlined through the Scientific Method. Note that throughout this document, it is assumed that the user has a basic understanding of machine settings and laser terminology. For general information on finding settings, see our AEON Laser Knowledge Base article on Understanding Materials and Settings.
The following parameters outlined are purely representative and should serve as an example for how the user can effectively optimize their machine for acrylic-based projects. It is possible that your specific machine will have variations in the settings needed to achieve the best result. As a basic principle, slower speeds and higher power levels will result in deeper engraving or cutting, and vice-versa. These settings can be adjusted by the user to find the results that work the best for them.
Contact Paper
When working with acrylic, it is likely that a protective layer of contact paper will be adhered to the base material. Contact paper can help prevent defects, like scorching or burn marks. It also helps mitigate dust and debris accumulation on the material or engraved product. When using contact paper, the user will have to properly compensate for an extra layer of thickness that the contact paper adds. Contact paper thickness generally ranges between 0.0001” - 0.001” (0.00254 mm - 0.0254 mm). If the machine is calibrated for working with bare acrylic- or inadequately compensated for contact paper- the user risks job integrity via penetration depth or adhesive residue on the final product. Fire is also a major hazard at higher power levels when using contact paper. In summation, speed and/or power settings will need to be adjusted accordingly for situations where contact paper may affect the process.
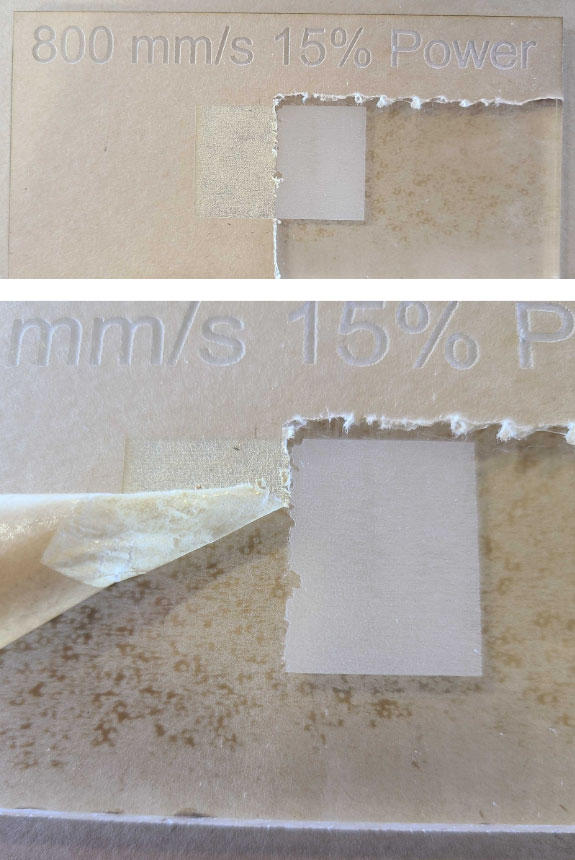
Working with or without contact paper should be done at the user’s discretion. It will primarily affect processes using lower powers or higher speeds, like etching or engraving as pictured above.
Relative Speed & Power Level Reference Table
| Scale | Speed Range (mm/s) | Power Level Range (%) |
| CUT | 5 - 50 | 70 - 100 |
| LOW | 100 - 500 | 0 - 30 |
| MID | 500 - 800 | 30 - 70 |
| HIGH | 800 - 1200 | 70 - 100 |
Etching
When optimizing parameters for an etch job, the goal is to find a balance between speed and power that minimally penetrates the material to meet etching specifications (generally 0.0001” - 0.0005” (0.00254 mm - 0.0127 mm) material penetration depth). Note that contact paper can have a significant impact on the engrave at such shallow levels. Be sure to adjust your machine settings accordingly.
- To accommodate the extremely shallow depths associated with etching, we suggest using MID to HIGH speeds with LOW power levels.
- Ensure that “Mode” is set to “Fill” in LightBurn whenever etching is the desired result.
Engraving
When engraving, the goal is to find a balance between speed and power that can effectively penetrate the material (depths > 0.005” (0.127 mm)). Lower speeds will generally produce cleaner results, but at the cost of time. Faster speeds reduce production times, but inherently risk a loss of overall product quality. Experimentation may be required to find the ideal parameters. Contact paper could potentially present an issue when attempting a shallow engraving, but the effects are likely to be minimal in comparison to etching.
- Engraving will penetrate the material to a greater extent than etching. The parameters for engraving can be wide, as many combinations between speed and power exist that can effectively cut through material. The full range of LOW to HIGH speeds and powers will produce an engraving result on acrylic.
- Shallow engraving would be best achieved with MID to HIGH speeds and LOW to MID power. Deep engraving would be best achieved with LOW to MID speeds and MID to HIGH power.
- Ensure that “Mode” is set to “Fill” in LightBurn whenever engraving is the desired result.
Scoring
Scoring settings are highly dependent on the wattage of the laser tube used. For example, a 100 W tube will be able to cut through an ⅛ “ acrylic block much faster than a 60 W tube, such that speed and power will need to be adjusted accordingly. Scoring generally incorporates shallow cuts into a material that do not fully sever the material into multiple pieces.
- Slow speeds are ideal when scoring to ensure line quality is optimal. Scoring too fast can result in “wobbles” in the cut lines, as well as additional undesired outcroppings. CUT speeds to the extreme low end of LOW speeds are suggested as a starting point.
- Power should be in LOW to MID range, depending on the desired depth of the score.
- Sometimes “pits” will form in the material at the start and end points of the lines, where the laser first pulses. This can be compensated for by setting the “min” power value in LightBurn at a lower value. Generally, a difference of 5-10% lower will remedy pitting.
- Ensure that “Mode” is set to “Line” in LightBurn whenever scoring is the desired result.
Cutting
When cutting, the ideal parameters are highly material thickness and laser tube wattage dependent. There is generally a singular speed that works best for a particular thickness or material, acrylic included. The goal when cutting is to ensure the edges have a relatively smooth finish.
- To achieve the best finish and edge appearances when cutting acrylic, we suggest using CUT speeds and power. Thicker acrylic will cut better at the lower end of the CUT speed spectrum, and thinner acrylic will generally cut fine at the higher end of the spectrum.
- Keep in mind that the speed or power required to cut through materials is extremely thickness dependent. For example, a thinner piece of material can be cut at a greater speed with the same power that was used for a thicker one, or with reduced power at the same speed. If using varying thicknesses of acrylic, the user should test the quality vs speed of cutting at each level to find what works best for them.
- Ensure that “Mode” is set to “Line” in LightBurn whenever cutting is the desired result.
Conclusion
By following the outlined suggestions and methods, you’ll be able to calibrate your machine to achieve optimal results when working with acrylic. Keep in mind that the settings provided are purely suggestive and should be tailored to your specific machine through further testing. Remember to always consider the impact of variables like contact paper, tube wattage, etc. and adjust accordingly to yield the best results. With careful experimentation and by adhering to these guidelines, you’ll be able to maximize the quality and precision of your acrylic-based projects.
If you have any questions or concerns, please send us an email at support@aeonlaser.us for the fastest service. If your laser is malfunctioning, please submit a support ticket.
Did you find this document helpful? Let us know what you liked or what we can improve on by sending an email to helpusgrow@aeonlaser.us.
Happy Lasering!


