-

Getting Started 16
-

Maintenance 14
-

Troubleshooting 14
-

Repair 8
-

Laser 101 3
-

Materials 10
-

Accessories 20
-

Multi-Roller 7
-

LightBurn 9
Understanding Materials and Settings for a CO2 Laser


Overview
What you will learn
In this guide, you will learn the basics of being able to find the settings to use with your CO2 laser.
When to do this
The aim of this document is to provide a foundation from which to adjust and refine your settings, based on your specific needs. Whether you are brand new to the laser world, or even if you're experienced with laser engraving or cutting, you can reference this guide for some fundamentals of the settings identification process..
What you need
- Notebook
- Scrap Material
- Computer with LightBurn
- Patience
Introduction
When it comes to finding the right settings, one size does not fit all. What might work well for one person, might not transfer over to another, even with the exact same machine. Small variances in the laser tube, optics, beam path, material, and even in the climate can lead to inconsistent results. Understanding what your machine is capable of is paramount to being able to find the proper settings to use. Learning how to conduct your own proper experiments is key.
The Scientific Method
Asking for settings can be very tempting at first. However, to truly master your laser, you’ll have to take a trip back to your school days and visit your old friend the Scientific Method.
In a typical application of the scientific method, a researcher develops a hypothesis, tests it through various means, and then modifies the hypothesis on the basis of the outcome of the tests and experiments. The key is to only change one variable at a time, analyze the results, and then draw your conclusions. Trial and error can be frustrating. Even if you get lucky, the success is short-lived. The sooner you start forming your own hypotheses and conclusions, the sooner you will achieve mastery of your laser.
Skillfully operating a laser is very much about knowing how to control the way a certain piece of material burns. The more control you have over the burn, the better the results. Knowing what variables to adjust and when is a rite of passage to becoming proficient with your laser. Keep the Scientific Method in mind when trying to identify the proper settings.
What Can a CO2 Laser Do?
Before even thinking about settings, it is important to have a fundamental understanding of how the machine functions. At its core, the machine uses electricity to generate light. That light is then focused, and the machine uses the focused light to vaporize the material that is in its path.
5 Ways a CO2 Laser Processes Material
There are 5 possible outcomes you can achieve with a laser, all of which are simply burns of various depths. There are a few exceptions to the rule, but this is a great place to start!
- Engraving - Removal of material by means of vaporization to where a depression is left behind. The depth is controlled by either adjusting the intensity of the laser beam and/or speed at which it passes over the material.
- Ablating - Removal of the surface layer of a coated material by means of vaporization, such as burning the anodized or painted layer off of the surface of a steel tumbler. The result is relatively smooth with great contrast and little to no surface penetration.
- Etching - A splintering effect that results in a superficial finish that is sometimes rough or grainy to the touch. Commonly a technique used to mark glass or metal with the aid of some metal marking spray or tape.
- Cutting - Severing a piece of material so that it becomes multiple pieces.
- Scoring - Creating a fine groove for an outline. Essentially, a cut that intentionally did not fully pass through the material.
Limitations of CO2 Lasers
Every CO2 laser we offer can engrave, ablate, etch, cut, and score. The only limitations you will experience in this regard is how thick of a material your machine will be able to effectively cut, and what type of material it is.
Keep a Log
Quite a bit of trial and error can go into finding the perfect settings, especially for items that tend to melt easily. When you do find that perfect combination, write it down. Keep a spreadsheet or journal with the following information each time you run a new material test:
- File Name
- Material Type (SKU/Source)
- Material Thickness (in/mm)
- Focal Lens (in/mm)
- Focus Depth (mm)
- Speed (mm/s)
- Power (X%)
- Lines Per Inch (LPI)/Interval
- Air Pressure (PSI)
LightBurn also has an integrated feature in their digital settings library to log settings used.
Materials
Now that we have our critical thinking hats on and understand the machine a bit, we need to pick out what kind of material to use. Consider things like how you want the final product to look and if the material is able to be worked with a CO2 laser. Always consult the material’s Material Safety Data Sheet (MSDS) before using it to ensure the proper precautions are taken if necessary.
Material Characteristics
A material’s characteristics and composition are very important to keep in consideration when finding the proper settings to use. Acrylic will behave differently than wood, and wood will behave differently than stone. Each material will have its own quirks and kinks that will need to be ironed out to get the perfect result. There are several different variables to consider when selecting a material to work with, and all of these different variables will lead to variations in the amount of energy needed to engrave or cut.
It is also important to remember that every batch of material could be different than the previous one. For example, this happens often with things like plywood. Changes in the adhesive used to bind the ply together can cause the settings found for the same material previously to not give the results you are used to seeing.
The main variables to consider are as follows:
- Chemical Composition - The chemical composition of a material plays a significant role in how it reacts to laser energy. Materials with complex chemical structures, such as polymers or composites, may exhibit different engraving behaviors compared to simple materials like wood.
- Absorption Properties - The ability of a material to absorb laser energy at the wavelength emitted by the laser system is crucial for efficient engraving. Materials that absorb laser light effectively allow for better energy transfer and more precise engraving. CO2 lasers operate at a wavelength of around 10.6 micrometers (µm), which is most effectively absorbed by materials that are darker in color. As a result, darker colored materials tend to absorb more laser energy and may require lower laser power levels for engraving, while lighter colored materials may require higher power levels.
- Thermal Properties - The thermal properties of a material, including thermal conductivity, melting point, and vaporization point, etc. affect how it responds to the heat generated by the laser beam. Materials with low thermal conductivity may be more susceptible to heat damage or melting during laser engraving.
- Surface Finish - The surface finish of a material, including its smoothness, texture, and porosity, influences engraving quality and resolution. Smooth, uniform surfaces typically yield better engraving results with sharper details and finer lines.
- Density and Density Variations - The density of a material and any variations in density across its surface can impact how it engraves. Materials with uniform density typically engrave more consistently, while variations in density may result in uneven engraving depth or quality.
- Additives and Coatings - Materials may contain additives, coatings, or surface treatments that affect their laser engraving behavior. These additives can influence absorption properties, thermal conductivity, surface texture, and overall engraving quality.
- Moisture Content - The moisture content of a material can affect its engraving behavior, particularly for organic materials such as wood, paper, or textiles. High moisture content can lead to steam generation, charring, or uneven engraving, so properly dried materials are preferred for laser engraving.
There are a lot of different materials that the laser can be used on. Each material will react differently depending on its own composition, settings used, etc. as well. Some commonly used materials can be seen below.
Laserable Materials
| Material | Cut | Engrave | Ablate/Etch |
| Acrylic | ✓ | ✓ | ✓ |
| Aluminum * | ✕ | ✕ | ✓ |
| Stainless Steel * | ✕ | ✕ | ✓ |
| Glass | ✕ | ✓ | ✓ |
| Granite | ✕ | ✓ | ✓ |
| Brick | ✕ | ✓ | ✓ |
| Slate | ✕ | ✓ | ✓ |
| Misc. Stone | ✕ | ✓ | ✓ |
| Rubber | ✓ | ✓ | ✕ |
| Paper | ✓ | ✓ | ✕ |
| Wood ** | ✓ | ✓ | ✕ |
| Cork | ✓ | ✓ | ✕ |
| Textiles | ✓ | ✓ | ✕ |
| Plastic *** | ✓ | ✓ | ✕ |
| Ceramic | ✕ | ✓ | ✓ |
| Tile | ✕ | ✓ | ✓ |
| Leather **** | ✓ | ✓ | ✕ |
| Food | ✓ | ✓ | ✕ |
| Bone | ✕ | ✓ | ✕ |
* CO2 lasers only mark metals when anodized or treated.
A CO2 laser cannot engrave metal, but you can use a marking spray to create designs on metal. After the marking spray is applied to the metal, the laser fuses the spray to the surface which creates a dark marking. You can engrave on any coated metals as well, like powder coated tumblers.
** Hardwoods, like mahogany, will be difficult or not possible to cut.
*** WARNING: Plastics can release toxic gasses when cut or engraved. Because many plastics are dangerous to cut, it is important to know what kind you are planning to use. When in doubt, Google the name of the manufacturer or material + "MSDS" to find the Material Safety Data Sheet for that material.
**** WARNING: Chromium tanned leather and some artificial leather can release toxic gasses. Ensure the leather used will not produce toxic gas. When in doubt, Google the name of the manufacturer or material + "MSDS" to find the Material Safety Data Sheet for that material.
WARNING: If you are not sure what a material is, don’t use it! Using a laser on material that is not laser safe can create fires and toxic gas, which can be harmful or even DEADLY if inhaled. ALWAYS consult the MSDS of a material before attempting to cut or engrave it with your laser.
Unsafe Materials
The following list shows some known materials that are unsafe or impossible to use with a CO2 laser. They pose SERIOUS personal health, machine health, and/or environmental risks. Always consult a material’s MSDS before using it to ensure the proper precautions are taken if necessary.
❌ Materials Containing Chlorine or Chloride
This includes things like PVC (Poly Vinyl Chloride), vinyl, etc. When they are subjected to the high temperatures of a laser beam, they release chlorine gas and harmful particulates into the air. Inhaling these fumes poses serious health risks to anyone exposed to them.
The release of toxic fumes and particulates from cutting or engraving chlorine based products can also have environmental implications, contributing to air pollution and potentially harming ecosystems if not properly contained and mitigated.
❌ Chromium Tanned Leather / Artificial Leather
Hexavalent chromium, also known as hexchrome, is a toxic compound that can be produced during the tanning process of leather. When hexavalent chromium-treated leather is subjected to the high temperatures of a laser beam, it releases harmful fumes and particulates into the air. Inhaling these fumes poses serious health risks to anyone exposed to them.
❌ Resin-Based Materials
This includes things like fiberglass, carbon fiber products, etc. When resin is subjected to the high temperatures of a laser beam, it releases toxic fumes containing volatile organic compounds (VOCs), including formaldehyde and other harmful chemicals. Inhaling these fumes poses serious health risks to anyone exposed to them.
Some types of resin, particularly those containing flammable additives or accelerants, can pose a fire risk when exposed to the intense heat of a laser beam. The cutting or engraving process generates heat, which may ignite the resin or nearby combustible materials.
The release of toxic fumes and particulates from cutting or engraving resin can also have environmental implications, contributing to air pollution and potentially harming ecosystems if not properly contained and mitigated.
❌ Plastics
This includes things like ABS (acrylonitrile butadiene styrene), HDPE (milk bottle plastic), polystyrene foam, polypropylene foam, etc. When plastic is subjected to the high temperatures of a laser beam, it releases toxic fumes containing volatile organic compounds (VOCs), including chlorine, cyanide, and other harmful chemicals. Inhaling these fumes poses serious health risks to anyone exposed to them.
Some types of plastic, particularly those containing flammable additives or accelerants, can pose a fire risk when exposed to the intense heat of a laser beam. The cutting or engraving process generates heat, which may ignite the plastic or nearby combustible materials.
The release of toxic fumes and particulates from cutting or engraving plastic can also have environmental implications, contributing to air pollution and potentially harming ecosystems if not properly contained and mitigated.
❌ Metal
CO2 lasers operate at a wavelength of around 10.6 micrometers (µm), which is not effectively absorbed by most metals. Metals have high reflectivity to CO2 laser light, meaning that the laser energy is mostly reflected rather than absorbed by the material. As a result, CO2 lasers are not efficient at cutting or engraving metal.
Due to the high reflectivity of metal, attempting to engrave or cut metal with a CO2 laser can potentially damage the laser optics and other components as well.
❌ Highly Reflective Material
This includes things like thick polycarbonate, lexan, graphite, mirrored surfaces, etc. Like metal, due to high reflectivity, attempting to engrave or cut reflective materials with a CO2 laser can potentially damage the laser optics and other components as well.
WARNING: If you are not sure what a material is, don’t use it! Using a laser on material that is not laser safe can create fires and toxic gas, which can be harmful or even DEADLY if inhaled. ALWAYS consult the MSDS of a material before attempting to cut or engrave it with your laser.
Settings
Now that we have both an understanding of the machine and the material we picked, it is FINALLY time to think about settings. At its core, the settings determine how long the laser beam is over the material. This is achieved by adjusting the 4 main variables detailed below. Settings are what is used to control the burn. The more you fine tune the settings, the more controlled the burn will be.
Variables
There are 4 variables that should be considered prior to initiating a job. Only when you understand how and when to adjust these, is true mastery of the laser possible. Those 4 variables are Speed, Power, Lines Per Inch (LPI)/Interval, and Focal Depth.
Speed (mm/sec)
Speed refers to how quickly the laser head moves across the material's surface while cutting or engraving. Higher speed settings mean the laser moves faster, covering more distance in the same amount of time. Lower speed settings result in slower movement. Speed is most commonly measured in mm/s for our machines.
High speeds (600 mm/s and above) generally lead to lighter engraving, as the laser spends less time on each spot. Medium speeds (100 mm/s to 600 mm/s) produce deeper and more intense engraving because the laser spends more time on each area, allowing for greater material removal. Low speeds (50 mm/s or less) are best for cutting.
Example: Imagine moving your hand over a candle. The slower you move your hand across it, the more you’ll start to feel the heat. Move it too slow, and you’ll surely get burned. Move it too fast, and you won’t feel the heat at all.
Power (% and Wattage)
Power determines the intensity of the laser beam. It controls how much energy the laser delivers to the material. Higher power settings mean more energy, while lower power settings mean less energy. Power is measured in wattage (W), but software will control the output wattage as a percent of the total possible wattage available.
- I.e 50% power with a 60W tube is about 30W output.
Higher power settings result in deeper engraving and more material removal, creating darker and more pronounced marks. Lower power settings produce lighter engraving, suitable for shallow marks or delicate designs.
Example : Picture the Lo and Hi settings on a stove. The higher you set it, the faster your food begins to heat up, thus the faster it will begin to cook. However, if it gets too hot too quickly, there goes your dinner. It’s all about finding the right temperature.
Lines Per Inch/Interval (mm)
LPI refers to the number of laser passes made per inch during engraving.
Interval refers to the physical spacing between lines in an engrave.
LPI and Interval have an inverse relationship. As LPI increases, the Line Interval will decrease, as there is less space between the lines that are being engraved. Ultimately they are two ways to measure the same thing, which is line density and resolution. LPI tends to be easier to use and understand.
Higher LPI settings produce finer detail and smoother engraving, as the laser makes more passes, covering the surface more densely. Lower LPI settings result in coarser engraving with less detail, suitable for faster engraving or larger designs.
Example : Imagine you’re painting a room. As you swipe left to right, you want to intentionally overlap the previous pass to ensure full coverage. However, if you stay in one spot for too long, the area will become oversaturated.
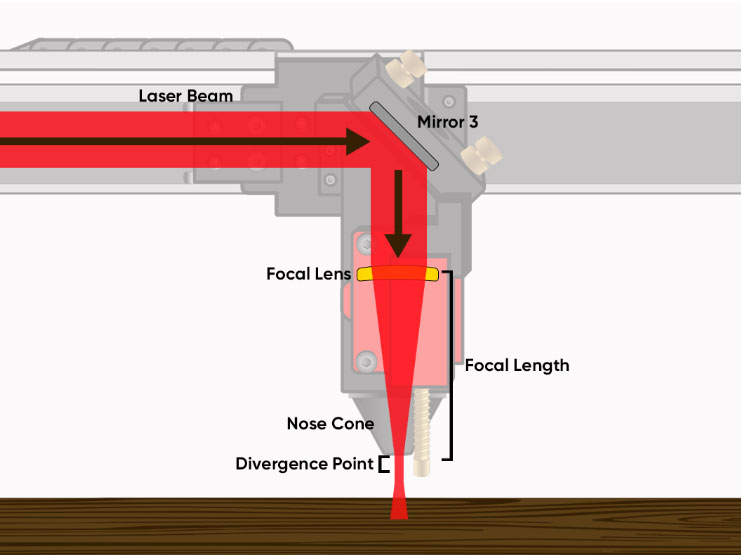
Focal Depth (mm)
Focal depth, also known as focal length or focus distance, determines the distance between the laser lens and the material's surface. It controls where the laser beam converges to its smallest point, known as the focal point, which ultimately determines the achievable resolution of an engraved image. It also determines how much heat is being concentrated into a single point or spot.
Correct focal depth ensures that the laser beam is focused precisely on the material's surface, resulting in optimal engraving quality. Incorrect focal depth can lead to blurred or distorted engraving, as the laser beam may converge above or below the material's surface.
There is a use case for slightly defocusing (2 mm or less up or down). It is common when ablating powder coating from a metal cup. Because the dot size increases when not in focus, it helps smooth the edges of an engrave. This is particularly useful with coated metal, which is less forgiving than other materials. This can also be useful when cutting thick material. Placing the focal point inside of the material will allow for more total power transfer and easier cutting.
The shorter the focal distance of a lens, the tinier the dot size becomes, and the more pulses you can fit into a small area. This is good for applications like fine detail engraving. The larger the focal distance of a lens, the larger the dot size becomes, and will spread power over a larger area. This is good for applications like cutting thicker material.
Example : Remember holding a magnifying glass up to the sun as a kid? If you held it at just the right distance from a pile of leaves, the sunlight would concentrate into a tiny enough point to where a fire would start. The intense spot of light is the focal point, and the distance from the magnifying glass to the leaves is the focal depth.
How to Get the Results You Want
Different settings combinations will lead to different results. Changing even just one setting can yield a wildly different result than the original settings used, so it is important to test only one variable at a time when trying to fine tune settings. Each setting interacts with the others differently as well, understanding how the settings interact is paramount to mastering the machine. Ultimately, it will take some trial and error to find what settings you like best.
Speed and Power
Speed determines how quickly the laser will either trace an outline, or scan a filled shape or image. Power determines the amount of energy the tube will output. The combination of these settings are interconnected and will determine how deep you get into the material.
Remember, the speed will directly influence how long the material will have to absorb the heat from the laser beam. Slowing down the speed gives it more time to burn, while speeding it up, gives it less. In essence, both increasing speed and/or lowering power will yield a more shallow and lighter engraving or shallow scoring. Decreasing speed or increasing power will do the opposite, and yield either a deep, dark engrave or allow for cutting.
Arrays & Wide Format
High speeds are only useful when covering large areas due to what is called over-scanning. All CO2 lasers we offer must have space to overscan.
Example: A car has to travel a certain distance before it can achieve top speed. It then requires a certain distance to come to a complete stop. Hence, the higher you set your fill speed, the greater the distance traveled, and the more space needed to stop.
LPI/Interval
Once you’ve determined the speed and power, fine tune your results by adjusting the LPI/Interval. An LPI of 300 (0.085 mm) yields a fairly decent amount of detail. For even greater detail, try an LPI of 400 (0.064 mm). However, for materials that are sensitive to heat, try going with a bit less, like an LPI of 200 (0.127 mm). Sometimes an LPI upwards of 800 (0.032 mm) is necessary to get silky smooth edges to your engrave.
Feathering
For heat sensitive materials like glassware and tumblers, try dispersing heat by taking the laser beam slightly out of focus. By lowering the bed 1-2 mm, the spot size will increase, thus helping to spread the heat out a bit. While this does in fact reduce the resolution, in some cases it’s the only way to keep sensitive material from melting.
Focus at Core
For improved cutting, focus the laser at the core of the material rather than at its surface. After focusing to a normal setting, use the manual focus gauges and the machine’s Z Move function to raise the material closer to the laser head by a quarter to half of the material’s thickness. This will ensure the most powerful part of the beam is being placed INSIDE the material. Doing this allows for a greater area to stay in focus for cutting. This technique is particularly useful for thicker materials.
Engraving, Ablating, and Etching
Start with a relatively quick speed (300-800 mm/s) and adjust the power until the depth you desire is reached.
A speed of 300 mm/s is usually a great place to start. Unless you have an item with a large surface area to engrave, a higher speed will actually take longer. If at max power, you’re still not achieving the desired depth, try lowering speeds or increasing LPI.
Cutting
Speed and power settings are dependent on the wattage of the tube in the machine. For example, a NOVA14 and a MIRA9 are vastly different in total available workspace, but if both machines have a 100W laser tube installed, they will likely have the same general settings when cutting.
When cutting thick materials (¼” and above), a medium to high power setting of 60-90% and a low to medium cut speed setting of 5-20 mm/s is usually in the ballpark. For cutting thinner materials (approx. ⅛” and below), try starting with a more conservative low to medium power setting of 30-60% with medium to high cut speeds around 10-30 mm/s.
How fast can you go when cutting with different tube wattages?
- 40W CO2 tubes tend to cut best at the lower speed range with the power range detailed earlier based on thickness of material. The max thickness cutting potential for a tube of this wattage is about ¼”.
- 60W CO2 tubes tend to cut best at the lower speed range with the power range detailed earlier based on thickness of material. The max thickness cutting potential for a tube of this wattage is about ⅜”.
- 80W-100W CO2 tubes will likely stay towards the low to mid teens for speed settings with the power range detailed earlier based on thickness of material. The max thickness cutting potential for a tube of this wattage is about ½”.
- 130W-150W CO2 tubes will be able to go towards the upper end of the speed range with the appropriate power range. The max thickness cutting potential for a tube of this wattage is about ⅝”.
NOTE: Different materials will cut differently. ¼” acrylic would cut more easily and consistently than something like a ¼” hardwood, which would struggle to cut properly even with a high wattage tube.
LightBurn Settings Locations
There is certainly no shortage of settings in LightBurn. For the purpose of this guide, we will briefly cover the “Cuts/Layers” window, as this is where all of the settings discussed previously will be input.
For more information, visit the LightBurn website, or see our AEON Laser Knowledge Base article on LightBurn Basics.
Cuts/Layers Window
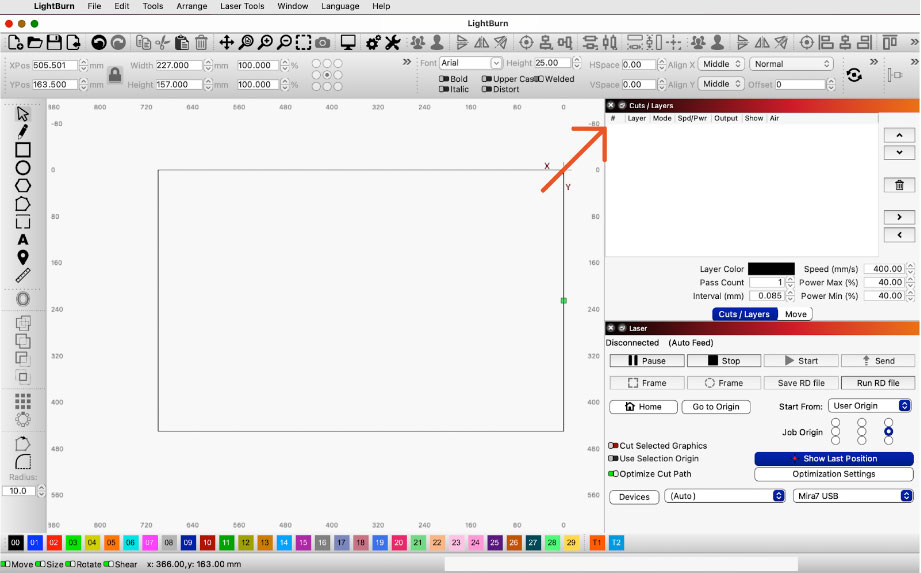
The Cuts / Layers window is used to organize all of the layers for a particular job, and the order in which they will be processed. A single click on a layer allows you to quickly edit the main settings, directly from a summary of parameters below. Double-clicking on a layer, will open the “Cut Settings Editor”, where you can edit both main and more advanced settings.
Layers
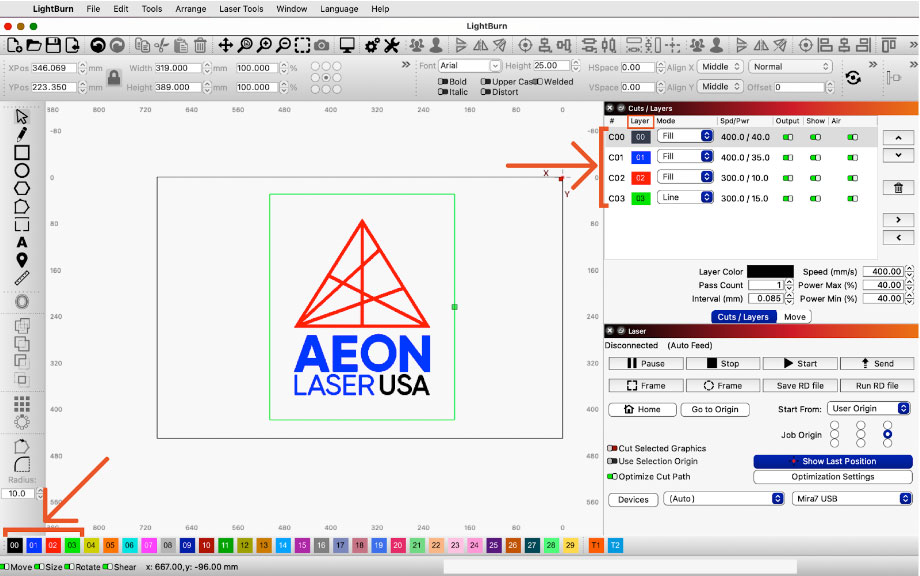
It’s not uncommon to incorporate a variety of settings into a single job. Perhaps you would like to engrave various depths or perhaps engrave just one portion and fully cut out another. Assigning different settings to specific parts of your design can be easily done with the use of different layers. You can then assign a set of parameters to decide how and in what order each layer will be handled.
The color palette at the bottom of the LightBurn window is used to assign a set of specific parameters to all or parts of your design. Each color is its own layer.
You can program up to 30 unique layers. If it becomes difficult to tell layers apart, right click over the swatch in the Cuts/Layers window, and the portion of the drawing associated with that layer, will blink.
Example: Imagine you’re making a sandwich. Each layer is applied in a particular way and in a particular order. Once all the layers are complete, you can then decide to remove the crust or even cut it in half. It’s that simple.
Mode
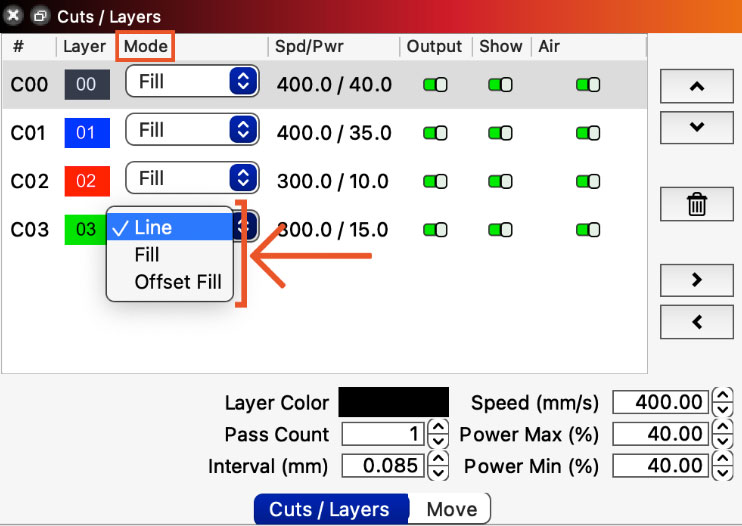
Mode tells the laser whether to follow the outline of a shape (Cut/Score), sweep to fill the inside (Engrave), or do both.
Line mode is used to cut or score a vector graphic, which is a type of image that is solely composed of lines and curves.
Fill mode is used for engraving a vector graphic. Instead of outlining the image like a line would, fill mode fills the space between the lines by using parallel strokes.
Offset Fill mode is like Fill mode, but instead of using parallel lines to fill the shape, it will follow the outer lines of the shape. This mode is not suggested for use with a CO2 laser.
Speed (mm/sec)
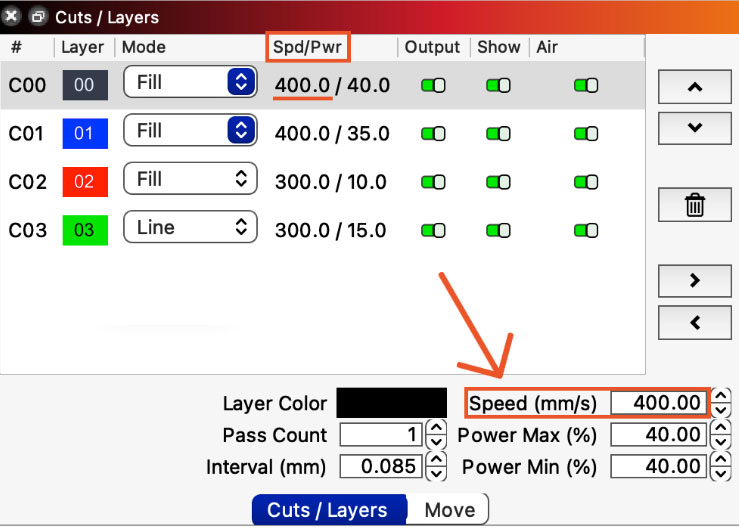
Speed determines how quickly the laser will either trace an outline, or scan a filled shape or image.
Speed will generally be measured in mm/s. Be careful that you are not accidentally set to in/s, as exceeding the physical limitations of the machine could lead to component failures.
Example: 300 mm/s is about half a mile an hr. 300 in/s is about 20 mph.
Power Max (%)
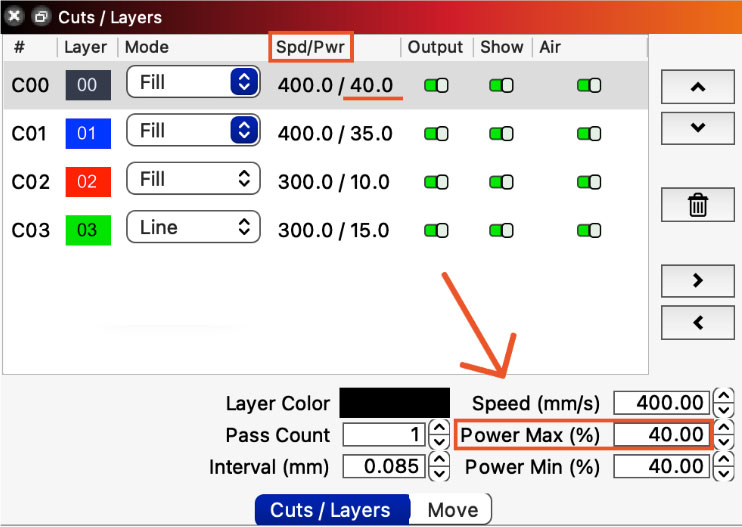
The power the laser will fire at once the speed set for that particular layer is reached.
For engraving (i.e. fill mode), the laser head will over-scan to ensure the set speed is reached prior to firing the laser. However, when Scoring or Cutting, the speed will naturally vary, and the power along with it.
Power Min (%)

The power the laser will fire at when decelerating for curves or corners on a particular layer.
Generally, min and max power should be the same. However, a lower min power helps reduce uneven cut depths by adjusting the laser power to make up for changes in speed.
Example: When driving a car, you must adjust your speed often. Slowing down as you take bends, and speeding back up along straightaways. A laser is no different. Adjust the min power according to the needs of the file.
Interval (mm)
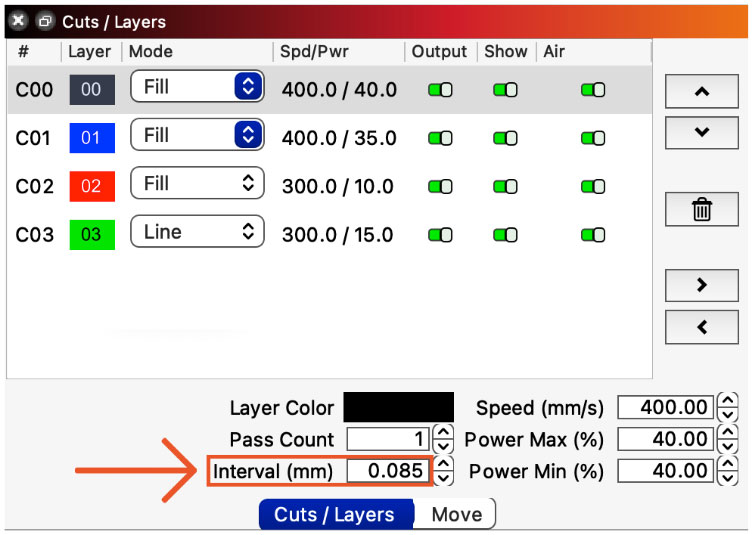
The tighter the spacing, the higher the resolution will be, but the longer it takes to complete the job.
LPI can be found in the advanced settings from double clicking on the layer.
Pass Count

Pass Count sets the number of times you wish to repeat the design associated with the current layer.
This is really only helpful for deep engravings and cuts that require more than one pass. For best results, it’s best to refocus the laser between passes.
Show & Output

Show allows you to choose which layers are visible on the screen.
Output allows you to choose which layers are visible to the laser.
When working with a single design that incorporates various types of material, the ability to output specific layers is really helpful. Hiding layers from view is also a big help when layers begin to overlap one another.
Conclusion
Mastering the intricacies of materials and settings is paramount for achieving exceptional results in laser engraving. Understanding the composition, properties, and behavior of various materials allows you to harness the full potential of your machine. By carefully adjusting settings such as speed, power, LPI, and focal depth, you can tailor the engraving processes to suit the unique characteristics of each material, unlocking unparalleled precision and creativity. With a combination of knowledge, experimentation, and attention to detail, you can elevate your craft to new heights, transforming ordinary materials into extraordinary works of art!
If you have any questions or concerns, please send us an email at support@aeonlaser.us for the fastest service. If your laser is malfunctioning, please submit a support ticket.
Did you find this document helpful? Let us know what you liked or what we can improve on by sending an email to helpusgrow@aeonlaser.us.
Happy Lasering!


