-

Getting Started 16
-

Maintenance 14
-

Troubleshooting 14
-

Repair 8
-

Laser 101 3
-

Materials 10
-

Accessories 20
-

Multi-Roller 7
-

LightBurn 9
Lifting, Turning or Moving your MIRA


Read through these guidelines fully before attempting to move or lift the machine through tight spaces, turning the machine onto its side, lifting with a shoulder dolly, or lifting onto a stand or workbench.
Disclaimer: These are suggestions. AEON Laser USA is not responsible for any damage or injury that may occur from moving the machine.
Preparing to Maneuver Through Stairways, Hallways and Doorways
🛠️ Tools needed
- Scissors
- Bucket
- Strap or rope
If your MIRA7 or MIRA9 needs to travel through a stairway, hallway or doorway, it will likely need to be tipped on its side. Follow the instructions below to prepare the machine before moving it.
- Using a pair of scissors, cut and remove the black shrink wrap surrounding the laser along with the foam padding beneath it.
⚠️CAUTION ⚠️Avoid cutting along the top of the machine as the lid and keypad can be easily scratched.
- Once all the packing material has been removed, open the lid and use the scissors to cut and remove the zip tie(s) being used to secure the tool kit.
Note: Cut only the ziptie holding the tool kit. Do not cut or remove any of the other zip ties as they will still be useful during the tipping and moving process.
- Remove all loose items inside the machine, including the honeycomb table and blades.

Laser, with accessories, honeycomb table, and blades - Locate the water chiller at the rear of the machine. Open the WATER OUTLET and drain any water.
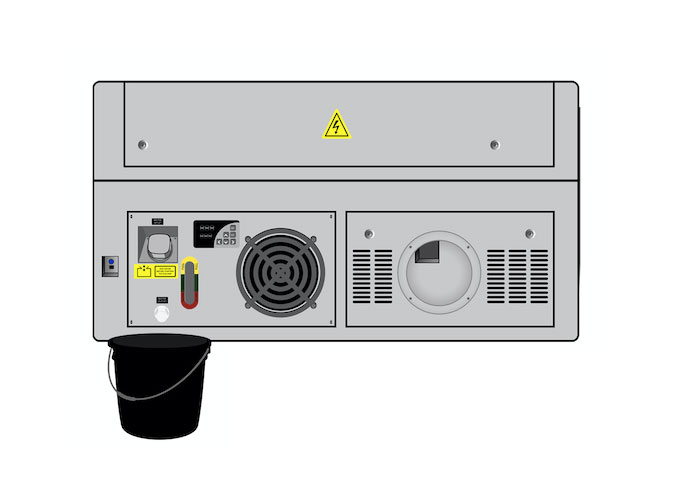
Rear of machine, bucket - If you choose to remove the chiller, follow the instructions for MIRA 7 or MIRA9.
⚠️CAUTION ⚠️To prevent damage, remove the water chiller before tipping it on its side.
- Close the lid and ensure that all hatches and doors are properly closed and locked.
- Secure the lid to keep it from opening; preferably with strap or rope.
Machine, secured with straps - Now you're ready to lift or tip the machine on to its side.
Tipping the Machine onto its Side
🛠️ Tools needed
- 2 ratchet straps
- Furniture dolly
- Five healthy and reasonably fit people
- Sheet of foam (optional)
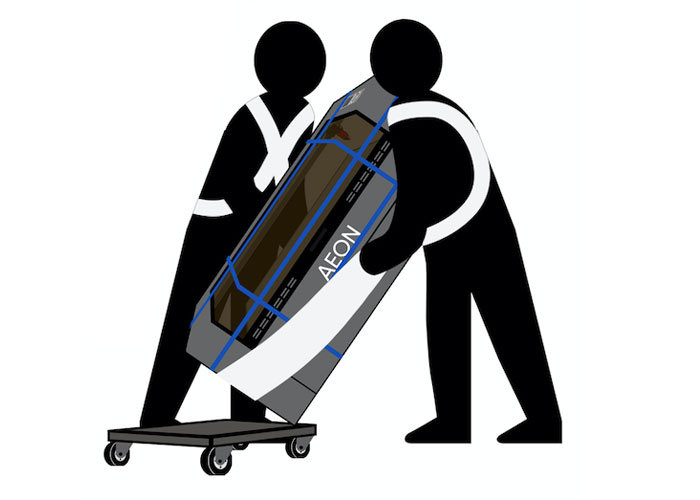
- Using 2 ratchet straps, secure a furniture dolly to the left side of the machine.
⚠️CAUTION ⚠️ To prevent cosmetic damage, avoid over tightening the ratchet straps and place a piece of foam padding between the machine and the ratchets and/or hooks. Also, ensure the furniture dolly is carpeted or place a thin layer of foam between the machine and the furniture dolly as well.
- Recruit five healthy and reasonably fit people to help tip the machine onto its left side.
- Position the two strongest people at each corner of the right side of the machine so that they’re facing each other. Their job is to lift the machine upwards.
Lifting with a Shoulder Dolly
Shoulder dollies are a great way to move large and heavy objects, however it’s important to follow these best practices to avoid injury or damage to the machine.
Shoulder dolly If lifting with a shoulder dolly:
- Place the lifting strap beneath the left side of the machine from front to back.
- Run the strap underneath the dolly as well.
- For additional strength, position a third person on the right side of the machine facing towards the left.
⚠️CAUTION ⚠️ Never grab or lift the machine by the tube extension.
- Position two more people at each corner of the left side of the machine so that they’re facing each other. Their job is to remain low and ensure the furniture dolly does not roll once the machine reaches a 45 degree angle and the load is shifted onto just two wheels.
⚠️CAUTION ⚠️ Avoid standing on the left side of the machine as it presents a crushing hazard should it accidentally tip beyond 90 degrees and fall in the opposite direction.
- On the count of three, have the three people on the right side of the machine lift straight up as a team, using only their legs and buttocks muscles, all while the two people on the left side of the machine ensure the furniture dolly does not roll out from beneath the load.
⚠️CAUTION ⚠️ To avoid injury, place your feet as close to the machine as possible, shoulder width apart, and confirm that everyone is in position and has a good grip on their corner. Before you count off, take a moment to make sure everyone is on the same page and knows exactly when to lift. As you lift, maintain your head and back upright, and keep your abdominal muscles tight.
- Carefully finish tipping the machine until all 4 wheels of the furniture dolly have made contact with the ground.
⚠️CAUTION ⚠️ Do not leave the machine unattended at this stage. There should always be at least two people with their hands on it at all times.
- Now you're ready to roll!
Next Steps
Once your machine is in front of your stand or workspace, continue to:
Lifting your MIRA onto a Stand or Workbench


