In this guide, you will learn the essentials required to start working with your UV laser. This includes getting the workspace ready before delivery, setting up the machine once you receive it, and the first steps when powering on your machine.
When to do this
This guide is intended for beginners first receiving and/or working with their UV laser machine. Read through these guidelines fully before attempting to set up your machine.
What you need
Included Laser Components
Allen Keys
USB Stick
USB Cord
Power Cord
UV Protective Goggles
M8 x 10 Hex Bolts (4)
Thumb Screws (4)
2 gallons of Distilled Water or Reverse Osmosis Water (for 10 Watt or 15 Watt Models)
DISCLAIMER: AEON LASER USA AND ENGRAVING MACHINES PLUS, CORP ARE NOT RESPONSIBLE FOR ANY DAMAGES OR INJURIES THAT MAY RESULT FROM FOLLOWING THESE SUGGESTIONS. USE CAUTION AT ALL TIMES.
Prepare Your Workspace
Before your machine arrives, it is recommended you make sure that the workspace the machine is going to be stationed in is properly configured. Getting the following things done before the machine arrives will ensure you can get it up and running ASAP after receiving it.
Safety
Emergency Kit Checklist
Certified UV Safety Glasses or Goggles (proper safety glasses will come with the machine)
Halotron Fire Extinguisher
Smoke Alarm
Fire Resistant Gloves
Eye Wash Station
First Aid Kit
VOC Detector
Fire Extinguishers
Fire extinguishers are an absolute necessity. Not only can the materials being engraved catch fire, but the gasses released as the material is being vaporized can also ignite as the laser beam passes through them.
We recommend a Halotron fire extinguisher. Halotron extinguishers are usually more expensive but offer certain advantages should you ever need to use an extinguisher. The Halotron extinguisher discharges a clean, easily removable substance that is not harmful to the mechanics or wiring of the laser system.
A multi-purpose dry chemical fire extinguisher can be acquired as a more affordable alternative, however, a dry chemical extinguisher discharges a sticky and corrosive powder that is very difficult to clean up. The powder released can also damage some internal components of the machine.
Eye Wash Station
Always have access to running water, or preferably an eye wash station, in case particulate matter gets into your eyes. Single-use gravity-fed eyewash stations are inexpensive and easy to set up in any location. An eye wash station is a proactive safety measure that helps protect you from eye injuries and facilitates the prompt response needed, in case of an accidental exposure to hazardous substances.
Processed Material Handling
Keep finished product and scrap material out of your living spaces if at all possible. Processed materials can give off gasses and volatile organic compounds (VOC). While some VOCs are relatively harmless, others can have adverse health effects. Short-term exposure to high levels of certain VOCs may cause irritation of the eyes, nose, and throat, as well as headaches and dizziness. Long-term exposure to some VOCs may be associated with more serious health issues. Regular monitoring with VOC detectors helps identify sources of contamination, prevent exposure to harmful levels of VOCs, and promote overall safety and well-being.
WARNING: Processed materials can continue to give off gas and volatile organic compounds (VOCs) long after being lasered. We recommend having some large storage bins to temporarily store finished products and scrap pieces of material.
Electrical
The AEON ST5J UV Laser requires a standard 15A 120V outlet and 15A breaker for the 5W model. With a power draw of about 2A, it can be used with most standard and/or shared outlets.
For the 10W or 15W models, the power draw needed to support the water cooling system will be higher, so having a dedicated breaker for your laser and chiller is highly suggested. Ensure the circuit you plan to connect to is properly wired and grounded, and is done so in accordance with any local codes or regulations. Any wiring added to your home should be done by professionals.
Ventilation
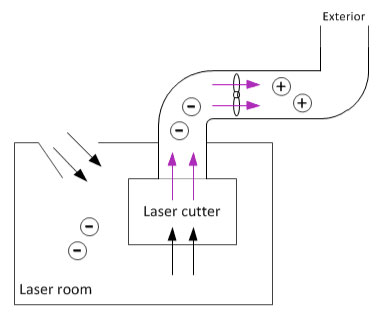
Take the time to prepare your environment with a proper ventilation system ahead of the arrival of your machine. Decide on how the fumes generated while using the machine will be extracted, either by venting outdoors or using a fume extractor.
Option 1: Venting Outdoors
Ensure your exhaust system is set up to where it can deliver the utmost efficiency. Keeping the exhaust duct length and number of bends to a minimum will help to promote maximum airflow. Seal any joints along the exhaust run to prevent fumes from escaping.
NOTE: Always ensure that fumes are being vented upwards and away from neighboring living spaces. The higher you position the exhaust hose outlet, the less chances there will be of inadvertently polluting your garden, pets, and the entire neighborhood.
Ensure there is an adequate source of make-up air in order to reintroduce clean air back into your workplace.An insufficient amount of make-up air can create negative pressure in your workplace, which reduces the efficiency of the fan. Ensure your make-up air is being drawn from a location opposite the laser. Otherwise, fumes will get pulled right back inside your workplace.
Option 2: Fume Extractor
If you are using a fume extractor, there is no need to worry about ducting, replacement air, or harming the environment. Choose the proper fume extractor for your UV laser. Matching your fume extractor capabilities to your laser's specifications and your unique application(s) is fundamental to maximizing the performance of the laser and the life of your filters.
Temperature Control
For any 5W UV models the laser will be fan-cooled, whereas the higher 10W and 15W models necessitate water cooling.
As a general premise, these lasers work best in environments with a normal room temperature range, between 60 - 90℉ (15 - 32℃). However, keep in mind that the temperature you will set the working area to will vary as to reflect the local conditions and location of the machine.
In instances of extreme temperatures, disconnect the exhaust duct hose from the machine. This will prevent direct exposure to any outdoor environmental air, which could compromise the laser's performance.
UV Laser Overview
Ultraviolet (UV) lasers operate at a wavelength of approximately 355 nanometers, which is much shorter than the wavelengths used by more traditional laser types. This shorter wavelength allows for high precision and minimal thermal impact on materials, making UV lasers ideal for delicate materials or more detailed work.
Unlike most laser types that require high power, UV lasers are designed to be highly efficient with minimal power consumption. They can effectively work at lower power settings while still achieving high precision and efficiency. You will notice that your UV laser uses less electricity and produces less heat as compared to its counterparts.
Precision and Detail
UV lasers offer superior precision due to their shorter wavelength.
They can create finer details and cleaner edges with minimal thermal distortion.
Material Compatibility
UV lasers are suitable for a wide range of materials, including those that are heat-sensitive or prone to burning with traditional lasers, as well as more reflective materials (i.e. polished copper, glass, etc.).
Ideal for applications such as engraving, micro-machining, and surface marking.
Safety and Observability
Use UV protective eyewear and follow safety protocols to prevent accidental exposure.
Keep pets out of view of the laser while it is running. UV lasers can indeed harm an animal's eyes, just as they can harm a human's eyes.
Assembly Instructions
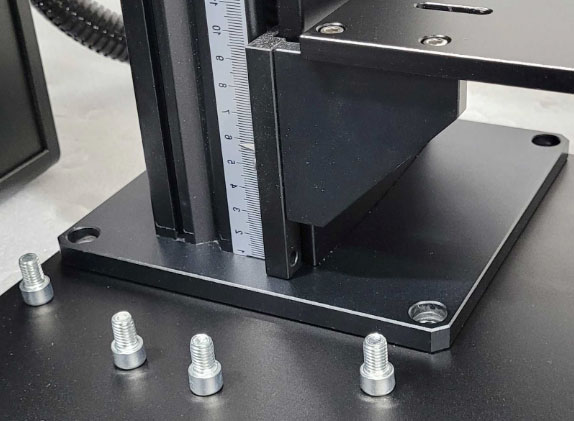
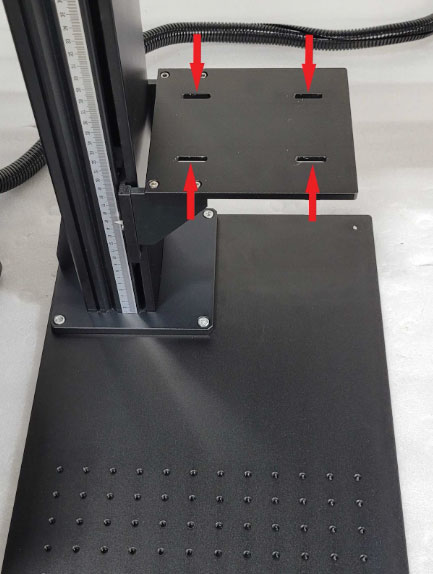
Use four M8x10 hex bolts to fix the vertical column to the work table.
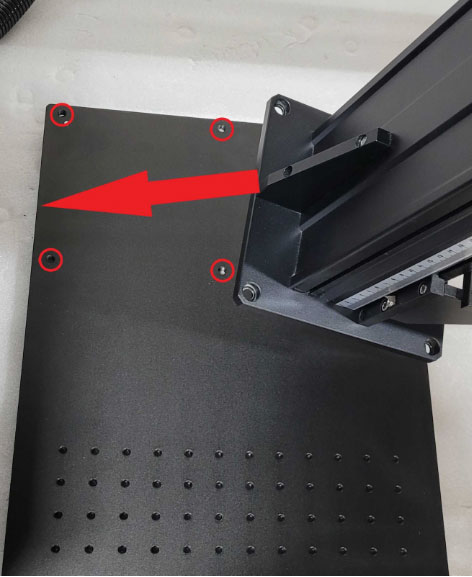
Position the light path over the arm that extends from the vertical column. Insert the threaded rods under the light path into the slotted holes.
NOTE: When positioning the light path onto its mounting location, ensure the fiber optic cable extending from the rear does not become twisted or kinked.
With one hand always supporting the light path near the galvo head, position the light path as close to the vertical column as the slots will allow. Retrieve the four thumb screw knobs and screw them into the threaded rods with your fingers, to secure the light path in place.
NOTE: Check to see if the threaded rods feel loose in their mounting positions prior to installing the thumb screw knobs. Carefully set the light path on the table with the threaded rods positioned upward. With your fingers or an Allen key, ensure that the threaded rods are still securely threaded into the light path.
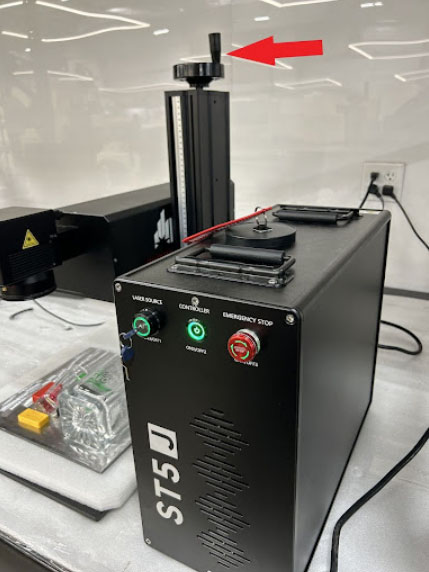
Power the Machine ON
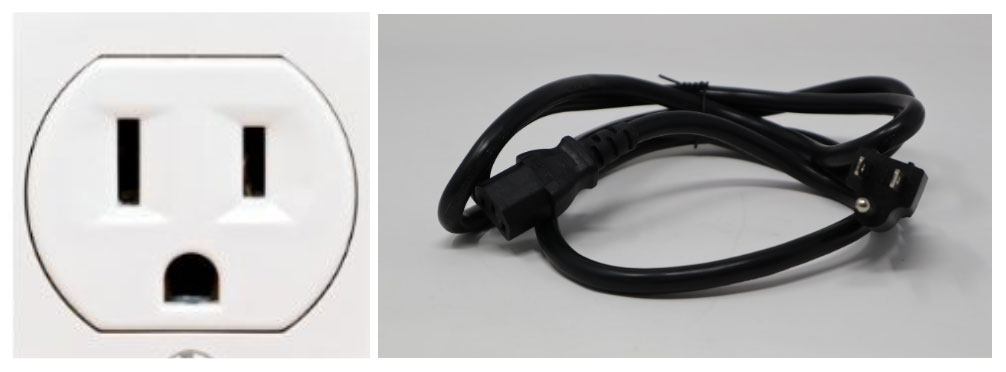
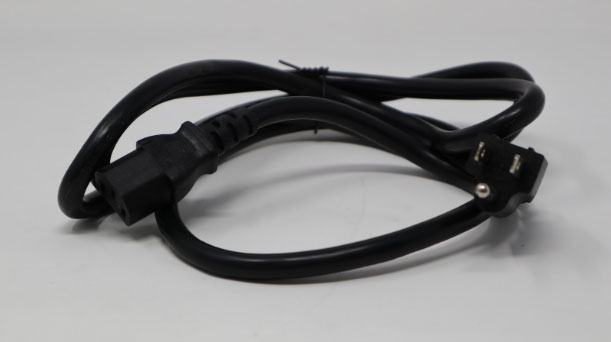
Locate the power cord.
Connect the power cord to the back of the machine and into the outlet that was installed for the machine before arrival.
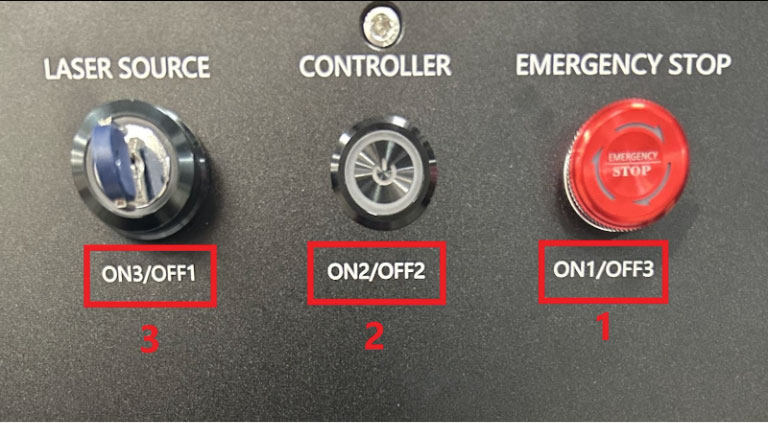
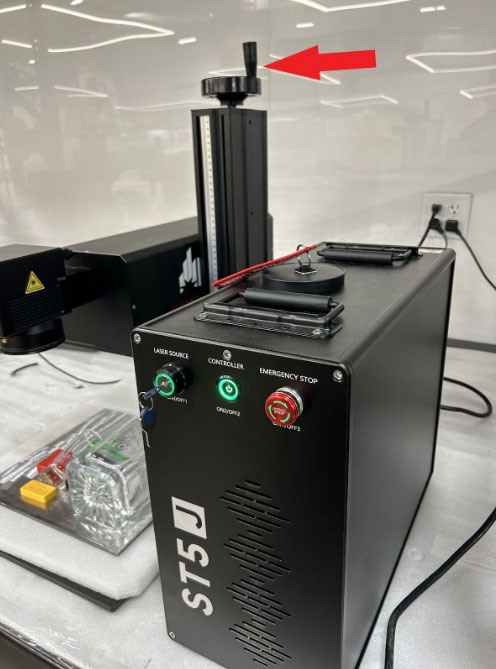
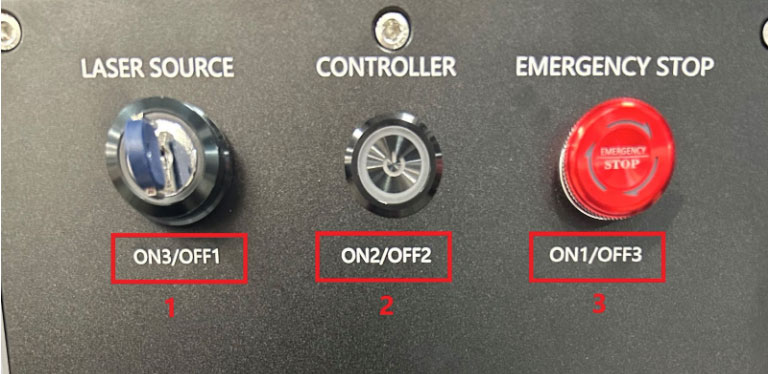
To turn on the laser marker with the following sequence:
Rotate the red Emergency Stop in the direction of the arrow to pop out the Emergency Stop button.
Press the Controller Switch in.
Turn the Laser Source ON.
WARNING: Failure to power the laser ON or OFF in the proper sequence can lead to component damage and potentially personal injury. Follow the labeled sequence when powering ON or OFF the machine.
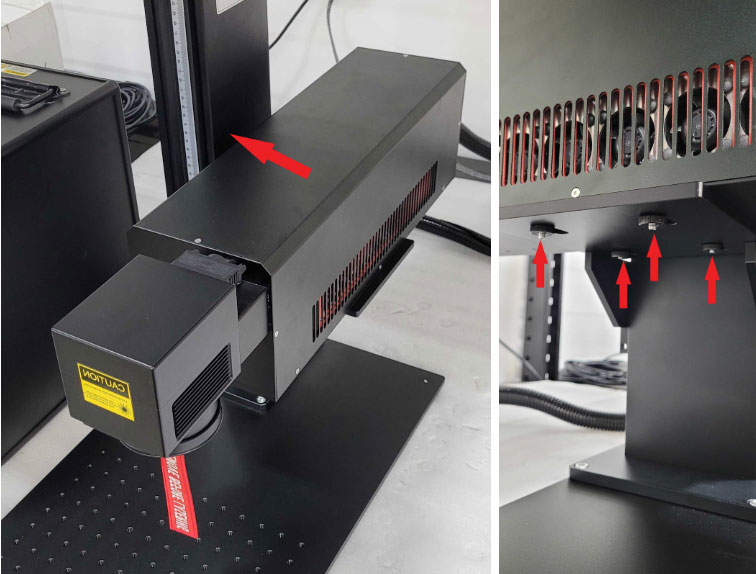
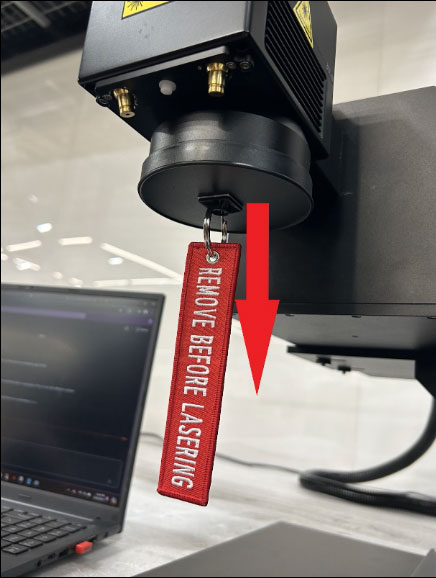
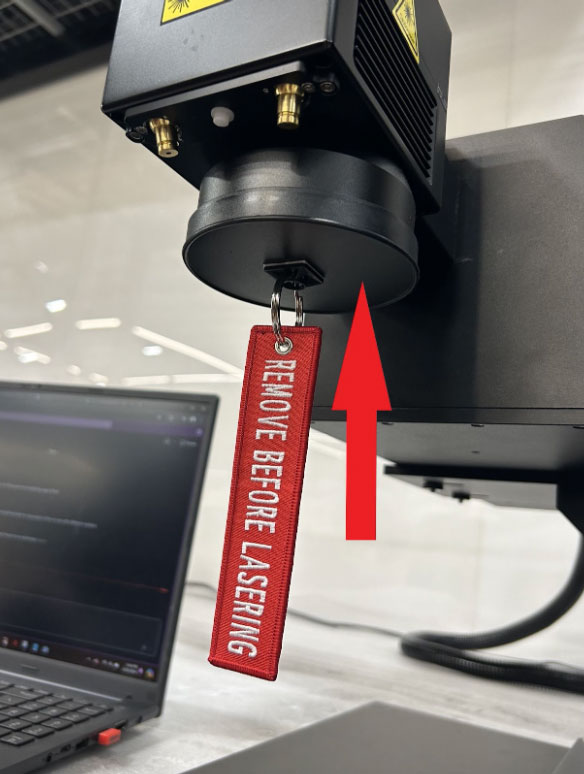
Remove the lens cap from the lens by gently pulling downwards.
After Power ON
Control Computer Installation
The computer being used to run LightBurn should not be placed more than 15 feet (4.5 m) away from the UV laser marking device to avoid possible interference to the signal in its line. Familiarize yourself with your software's image design features and laser control settings before beginning operation of the laser itself.
Setup LightBurn - Device Profile
Locate the USB drive that came with the UV laser and insert it into your computer with LightBurn installed and open.
To import the appropriate settings that will come with your USB:
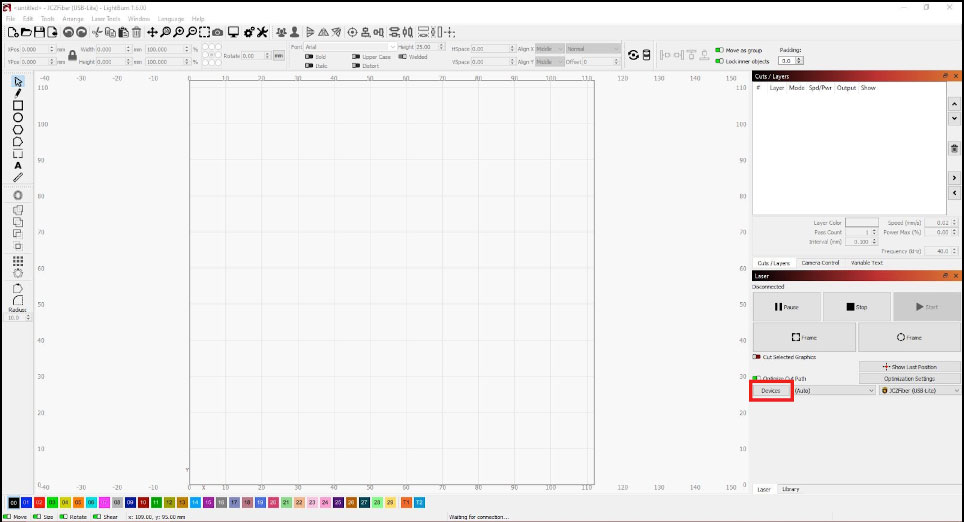
In LightBurn, select Devices.
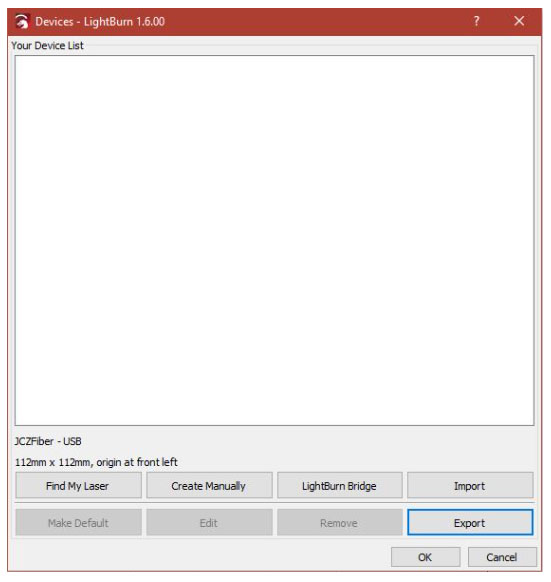
Select Import.
Find the .lbdev device profile file and select Open.
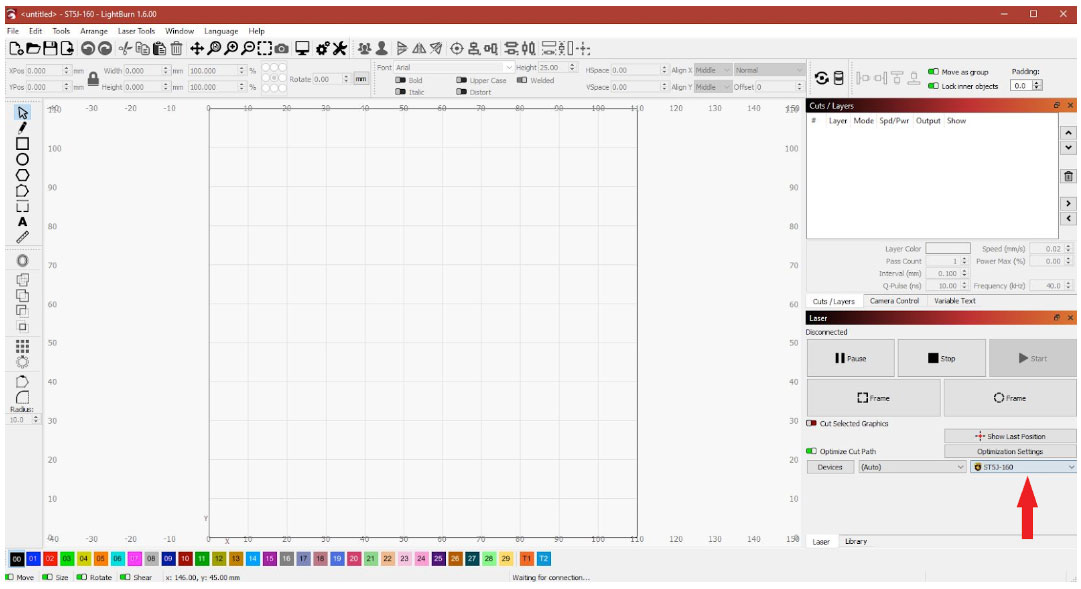
Locate the drop down menu to the right of the Devices button, then select the newly imported device profile and hit OK.
Running Your First Job
By now, you should have:
The machine assembled and set up in its happy home
Exhaust hosing run
LightBurn setup and ready
There is only one more thing to do, and that is to run your first job!
UV Lasers Basic Settings Options
Focus
Working with the correct focus is critical when performing jobs with your UV laser, as it significantly affects the precision and quality of your work. Due to their shorter wavelengths, UV lasers have a smaller focal spot size compared to traditional laser types. This allows for finer details and higher accuracy when engraving or etching, but also means it is that much more important to precisely adjust your focus. You should regularly check and adjust the focus to ensure maximum performance - especially when switching between different materials or thicknesses.
Speed
The speed settings for UV lasers can reach a maximum of 7000 mm/s. This high speed is particularly beneficial for rapid processing of materials without compromising on precision. Compared to traditional fiber lasers, UV lasers maintain high precision even at maximum speeds due to their shorter wavelength, which allows for finer control and less thermal distortion. Adjusting the speed according to the material and desired outcome is crucial in achieving the best results.
LPI/Interval
LPI settings in UV lasers determine the resolution and quality of the laser engraving or cutting. Higher LPI settings provide finer detail and smoother edges, which is particularly useful for detailed work. UV lasers, with their precise control and minimal heat impact, can achieve higher LPI settings more effectively than traditional fiber lasers. Users should adjust the LPI based on the requirements of their specific project, keeping in mind that higher LPI may increase processing time but will result in superior detail and quality.
Frequency
One of the most distinctive features of UV lasers is their frequency. They operate at a wider range of frequencies than traditional lasers. Generally, UV lasers produce a non-observable ray, meaning that the ray is not visible to the naked eye. This is an important safety feature, but also requires the users to rely on more non-traditional methods to frame a job on a workpiece and monitor the laser during operation. The operational frequency range of the machine is 10 - 100 kHz.
Q-pulse
UV lasers utilize a technology known as Q-switching to produce high-intensity, short-duration pulses. The Q pulse allows the laser to deliver a concentrated burst of energy in a very short time frame. This results in precise material removal with a minimal heat affected zone (HAZ), making it ideal for applications that require fine detail and minimal thermal damage. The operational range of the machine is 1 - 20 nm/s.
Examples
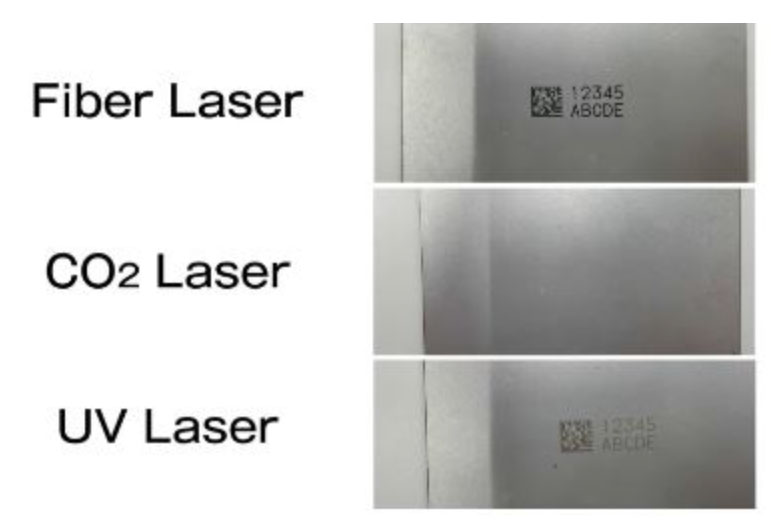
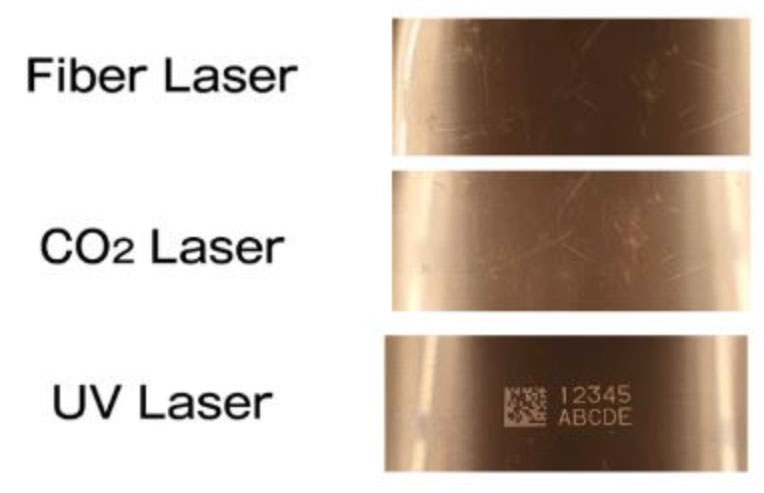
As the wavelength of UV lasers is relatively short, they are inherently absorbent. This makes them highly material dependent and most ideal for jobs requiring high contrast or minimal product damage. The metal examples below demonstrate the capabilities of different laser sources when marking different materials. This better highlights the material dependency of lasers as related to wavelength absorbance - and why it's important to consider what materials you'll primarily be working with before investing into a particular laser type.
Monitor Closely: Keep a close eye on the laser operation, especially during the initial runs as to make any necessary adjustments.
Safety First: Be sure to wear the appropriate PPE and follow all safety guidelines.
Have Test Material: Finding the right settings can be a frustrating and arduous process, and can quickly burn through material. Having extra material on hand to practice with can be a life saver. Take your time when finding settings, and stay patient.
Material Dependance
As visualized in the “Examples” section above, the marking capabilities and results produced with your UV laser can vary greatly depending on the material being marked. Different materials have unique properties that influence how they interact with the laser - affecting quality, clarity, and durability of the markings. For instance, metals, plastics, ceramics, and glasses would all respond differently under the same power, Q-pulse, speed, or frequency settings. This is why it's so important to conduct preliminary tests when working with a new material, before committing to full-scale production runs.
First Marking Job Procedures
WARNING: Failure to follow the proper guidelines associated with this machine can result in property damage and personal injury. Never run the laser system unattended or without the proper personal protective equipment (PPE).
IMPORTANT NOTE
When configuring your machine for any material, we want to aim for parameters that allow for the shortest work time that also yield the cleanest results.
This guide will cover the process that was used to find the best settings for etching glass. The testing procedures and conclusions covered are purely representative and serve as an example for how the user can effectively optimize their UV settings.
Even materials in the same category can have different compositions, as well as different impurities that can completely change the result. Furthermore, it is more than likely that each user's machine will have slight variations inherently.
Focusing
When working with your UV laser, having the correct focus is critical to ensuring the best quality in your work. Having the right focus ensures that the job has the best possible clarity for your engraves, sharpness in the resulting product, and consistency throughout the entire engrave. Always keep focus as a priority during your jobs, as even the slightest deviations can totally change the resulting product.
To properly focus your machine, ensure it is connected to a computer, the machine and laser markers are on, and the test or scrap material is laid out flat on the workbench.
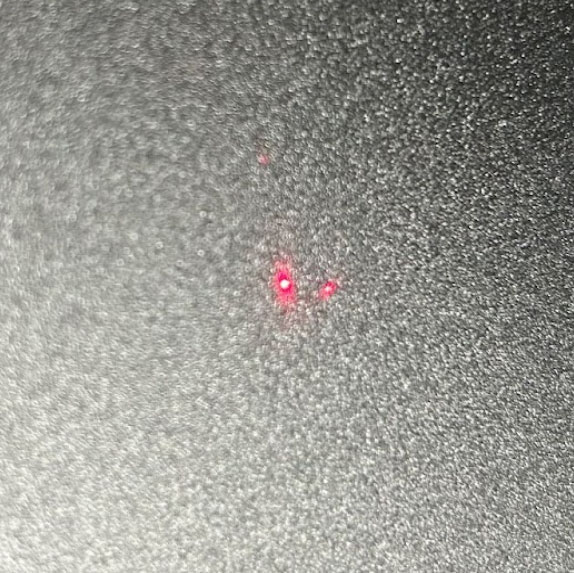
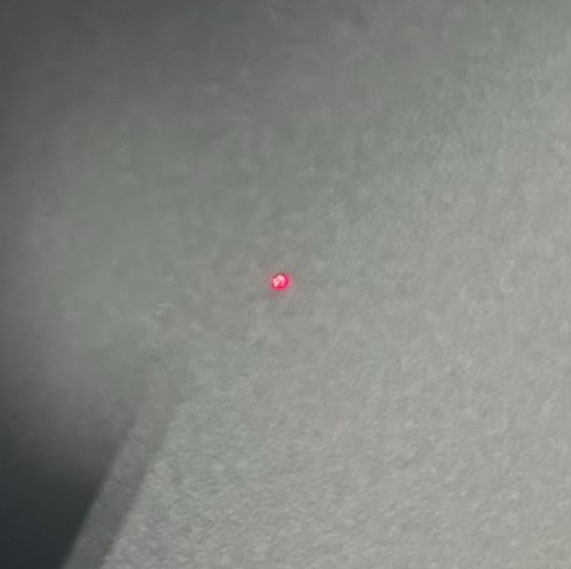
At first, the beam will be divergent and appear as two separated dots on the working material.
The focus wheel can then be used to adjust the laser head along the vertical axis.
When properly focused, the two red beams will converge and become one. The laser is now in focus relative to this specific piece of material. Whenever switching to a separate piece, ALWAYS be sure to check and readjust focus as needed. Even a difference of 1 mm can throw the entire job off.
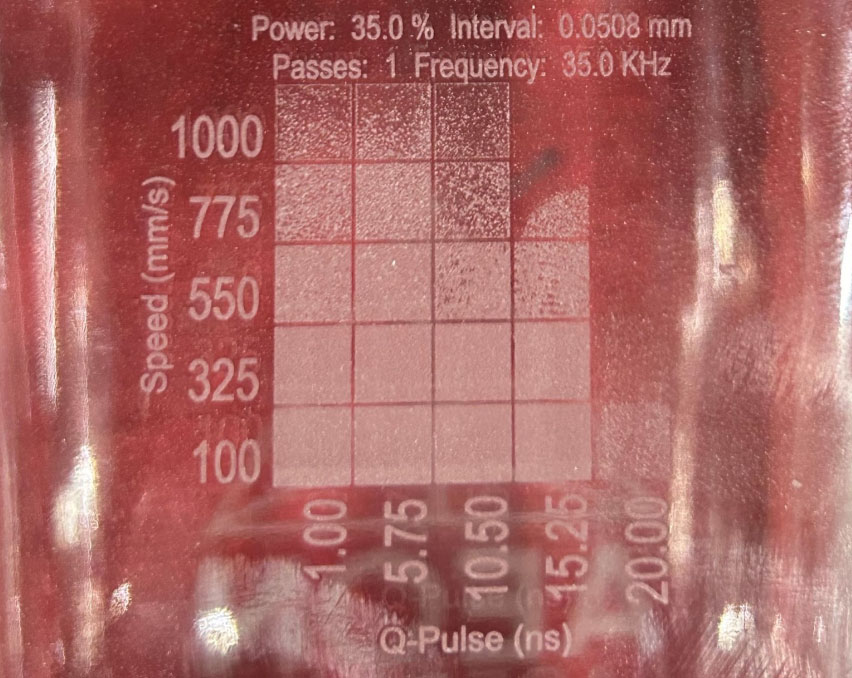
Testing to Find Settings
One option to ensure your laser has the most ideal parameters set for marking your material is to use the embedded materials test tool in LightBurn. For a more detailed breakdown of LightBurn's integrated material test. We will highlight the process we used below:
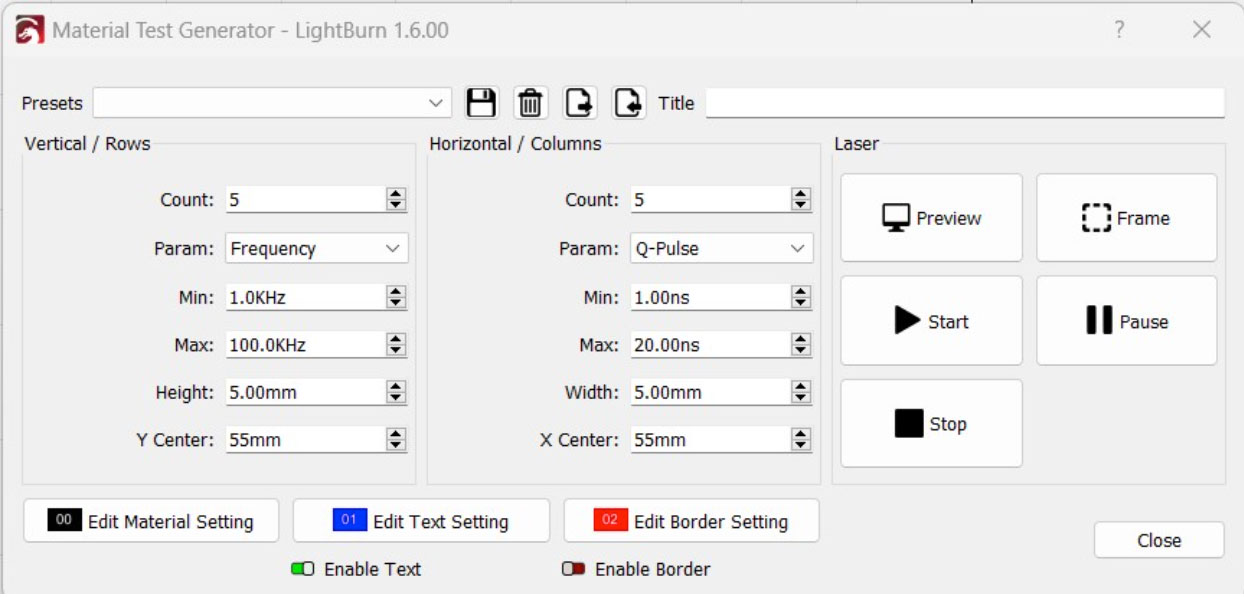
In LightBurn, select the “Laser Tools” tab. Select the “Materials Test” option from the dropdown.
Select the parameters you wish to test from the available dropdown menus.
The main settings to test with a UV laser are speed, interval, frequency, and Q-pulse.
Frequency and Q-pulse will lead to the greatest changes in results, so we chose them as our 2 variables to test for this portion.
Configure the remaining test settings to your preferred test range.
NOTE: Keep the limitations of the machine in mind when setting test values. The maximums can be found in the basic settings overview section above.
Place the desired test material onto the laser bed. Ensure that the material is properly in focus.
For transparent materials, like glass, use a piece of paper resting on the material's surface to properly set focus.
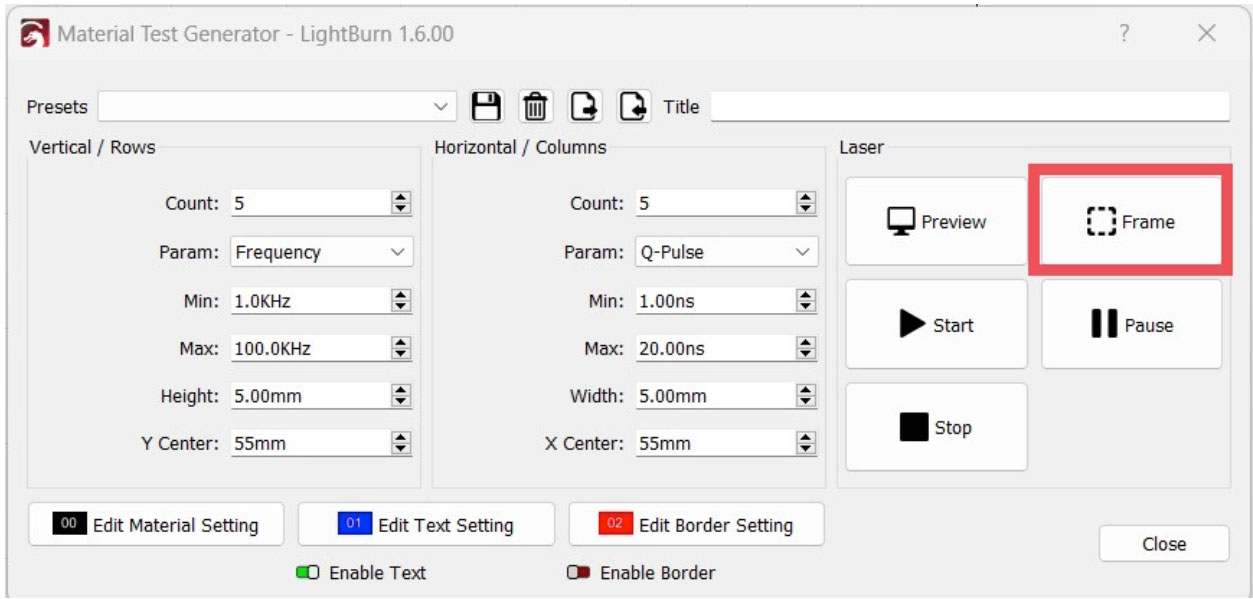
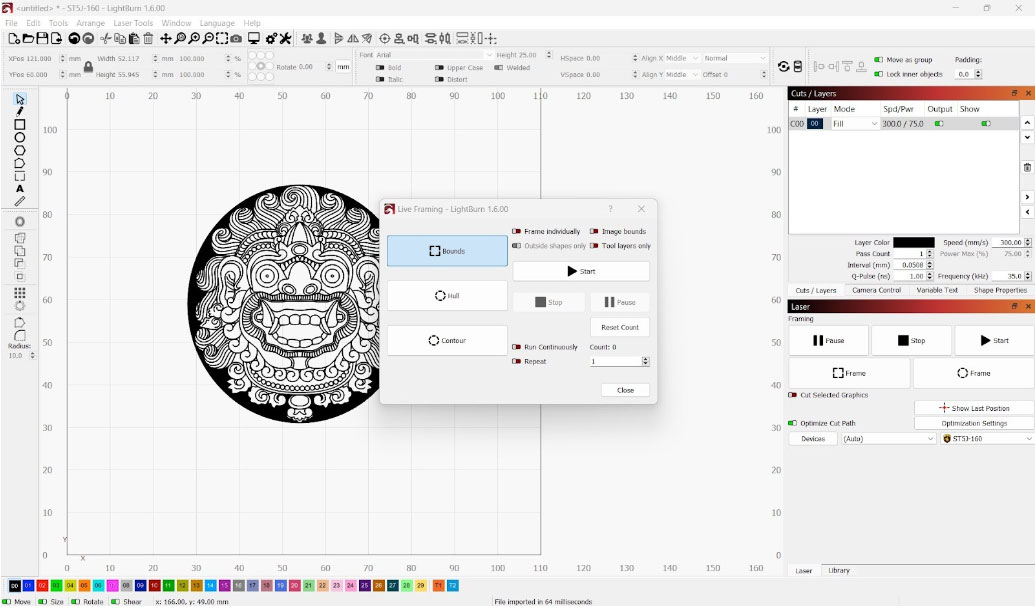
Press “Frame” in LightBurn to test that the image bounds are set to adequately fit within the perimeter of the physical test material.
A count of 5 will produce a 5x5 grid that is approximately 4”. If the frame is going over the edges of the material, adjust the count to better fit the material size.
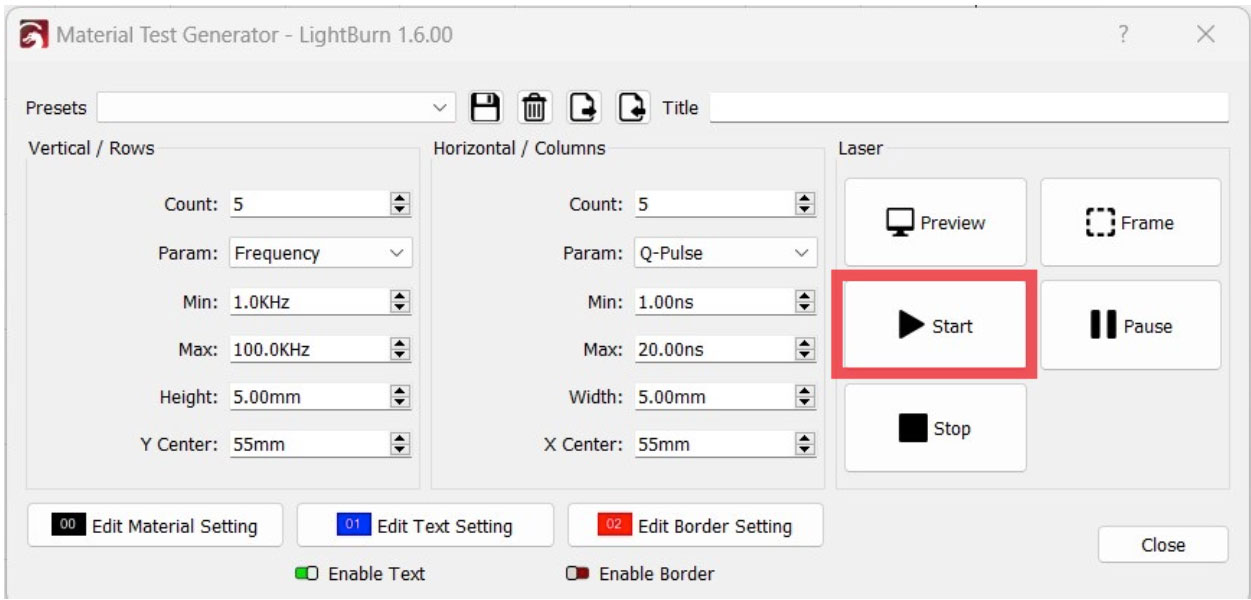
Once bounds are set, hit “Start” in LightBurn. Observe the results.
It is likely that some of the test file will not mark properly, but that is ok! Let the job run to completion before moving the material to see the results.
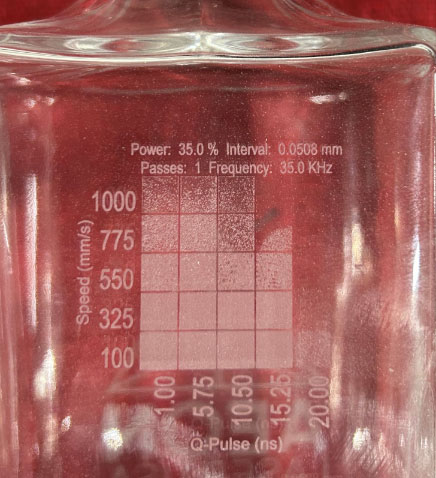
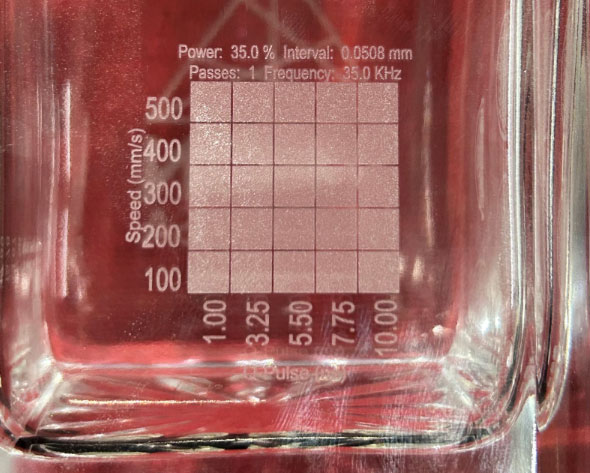
You may find that your first test isn't marking exactly how you'd like. In this situation, you may find that certain sections mark well while others don't, as seen in the image below on the left. In this case, it is fine to either use the parameters that actually marked the object, or to adjust the settings range that is being tested accordingly until the desired outcome is achieved (see example below).
Performing the First Job
When first going through the process below, treat it as a trial run and be sure to work with scrap material that can be discarded.
CAUTION: Be sure that the computer is near the machine and stays plugged in at all times, whether during a trial run or actual production. In the case that connection is suddenly lost, the information will transfer in realtime and the job will instantly stop.
Procedures
Customize your workpiece size and layers. For more details on Cuts & Layers configuration, see either our LightBurn Basics guide or LightBurn’s Cut and Layers guide on basic software features and controls if you are unfamiliar with the process.
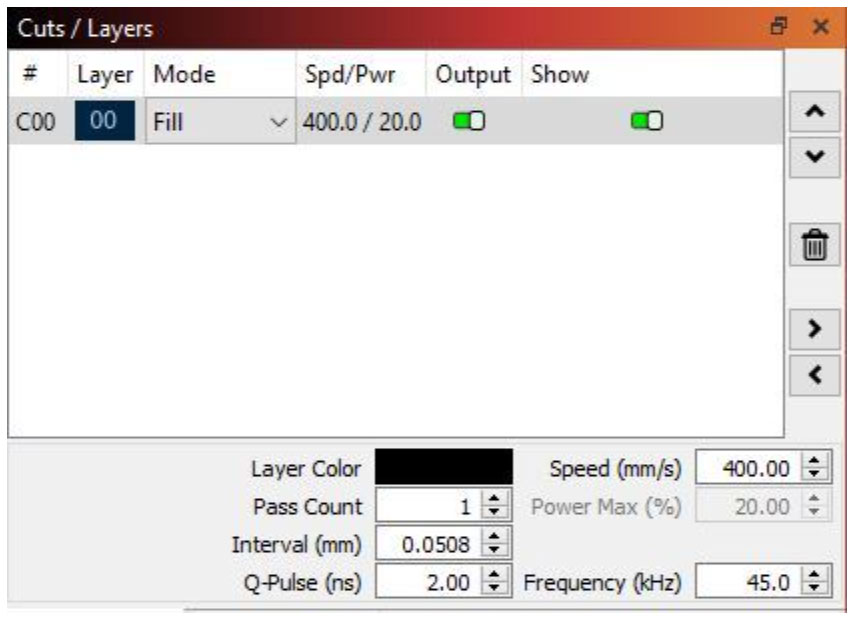
Customize the various settings in the Cuts/Layers window. The parameters we found to be the best for engraving on a glass lantern can be seen below:
In the Laser window, select Frame.
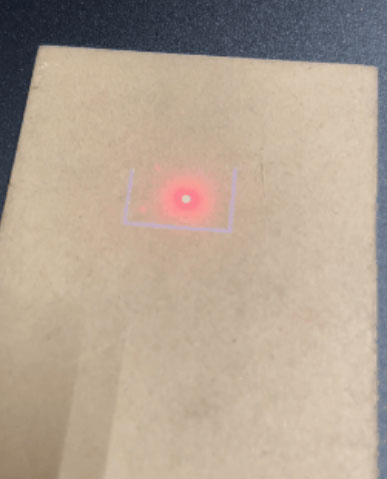
The design will be displayed in a blue light on the work table, showing where the laser will fire.
Place the material in the designated frame, then adjust the laser focus using the manual control. Ensure the appropriate PPE is worn and body parts are away from the laser path, then press Start to begin.
The laser is invisible. If adjustments are needed during the test focusing process, fire the laser while adjusting the z-axis manually, with an abundance of caution.
CAUTION: Do not attempt to adjust the focus during actual production runs, as this can ruin the work. The marking will become cleaner at the correct working height. Take note of the distance from the laser head to the material for future reference.
When calibrated, replace the testing material with the actual material desired to be engraved. Always be sure to recheck focus. Once focus is determined, press Start to engrave your pattern.
Examine the quality of your first run and adjust the laser parameters in LightBurn or on the machine as necessary to create your desired effect.
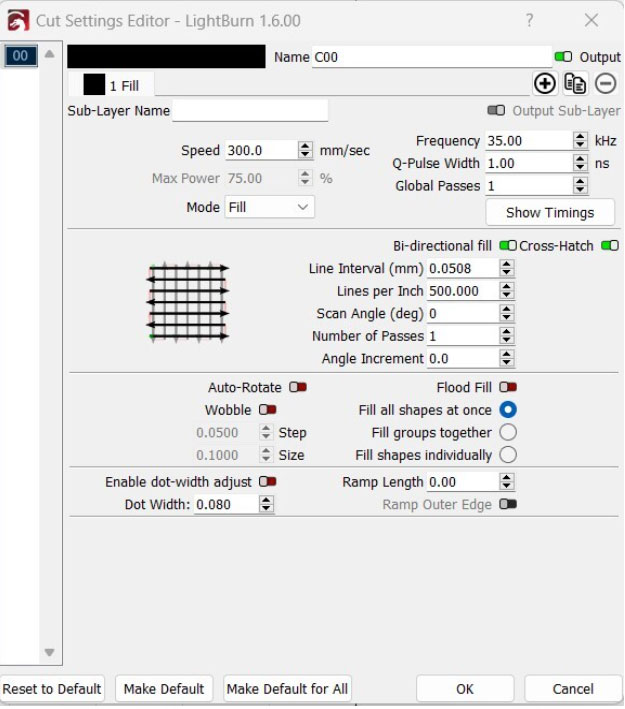
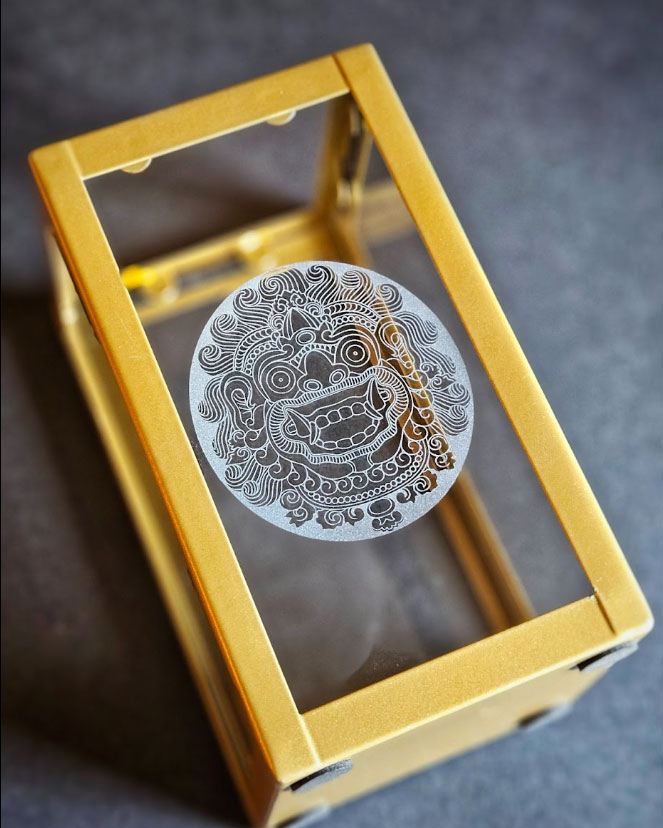
Example Project
The settings used for the results seen above are as follows:
Speed: 300 mm/s
Frequency: 35 kHz
Q-Pulse Width: 1 ns
LPI: 500
Cross-Hatch & Bi-Directional Fill: Enabled
Fill All Shapes at Once: Enabled
Mode: Fill
Passes: 1
Overall, while the testing procedure shown in this section focused on glass, the same principles of trial and error with your machine parameters will apply to any material type. By systematically adjusting the laser settings and carefully observing the results, you can identify the most ideal settings for any material. Remember, ensuring your laser is in focus before beginning any work is vital to achieve the best results. This methodical approach will help you master the use of your UV laser across a wide range of materials, ensuring high-quality and consistent markings every time.
Powering OFF
When you have finished using your laser, close LightBurn and then turn off the laser with the following steps:
Turn the Laser Source OFF.
Press the Controller Switch.
Press the Emergency Stop.
WARNING: Failure to power the laser ON or OFF in the proper sequence can lead to component damage and potentially personal injury. Follow the labeled sequence when powering ON or OFF the machine.
Reinstall the lens cap and fully clean the workbench. For the best results, be sure to disconnect your UV laser from its power source supply between uses.
Troubleshooting Tips
Not Framing/Connecting
If the laser is not framing or connecting, check the USB connection to the machine and to the computer, ensure the proper device profile is selected in LightBurn, and ensure the lens cap is removed. Try placing a piece of paper down where the job should be framing, the blue framing dot can be difficult to see.
Not Marking
If the laser is not marking correctly, check the settings. Things like Q-pulse and frequency settings will dramatically change the results seen. Try running LightBurns integrated material test to help narrow down the effective settings range.
No Red Dots
If the red dots are not present when powering the machine on, try pressing the small button between the red dots on the galvo head. This controls power to the red dots. Alternatively, being extremely far out of focus can lead the red dots to seem faint or blurry.
Conclusion
By following this guide, you are now well-prepared to run your first job with confidence. Always prioritize safety, carefully review the assembly instructions, and familiarize yourself with the machine's overview and capabilities. Understanding the unique features and benefits of your UV laser system will ensure smooth and successful operation.
If you have any questions or concerns, please send us an email at support@aeonlaser.us for the fastest service. If your laser is malfunctioning, please submit a support ticket.
Did you find this document helpful? Let us know what you liked or what we can improve on by sending an email to helpusgrow@aeonlaser.us.