-

Getting Started 16
-

Maintenance 14
-

Troubleshooting 14
-

Repair 8
-

Laser 101 3
-

Materials 10
-

Accessories 20
-

Multi-Roller 7
-

LightBurn 9
Step Per Rotation - Roller Rotary


Overview
What you will learn
In this guide, you will discover how to effectively manage steps per rotation (SPR) and make necessary adjustments while working with a rotary device.
When to do this
Adjustments to the SPR should be made when there is a discrepancy between the dimensions specified in the engraving software and the actual output of the machine.
What you need
- Computer with LightBurn
- Rotary
- Test Cup/Item to Engrave
- Calipers or Cloth Tape Measure (mm)
- Calculator
NOTE: This guide was written with an experienced rotary user in mind. If you are unfamiliar with the basics of using the rotary, see our AEON Laser Knowledge Base article(s) for the general rotary use process.
What are Steps Per Rotation?
Steps per rotation, or SPR, refers to the number of steps a stepper motor needs to complete one full rotation. In the context of working with a rotary attachment, the SPR setting determines the precision and accuracy of the rotary motion.
When setting up a rotary attachment, you need to configure the controller software to match the specifications of the stepper motor driving the rotary axis. This involves specifying the number of steps required for the rotary attachment to complete one full rotation. Here at AEON Laser USA, every CO2 laser we sell is sent with rotary settings on the USB drive that comes with the machine- for every rotary type that we offer. These settings are generic however, and may require some tuning with the rotary in terms of file dimensions.
If the file you tried to engrave is coming out elongated or squished along the Y axis, that means the SPR setting likely needs to be adjusted to correct this issue. It is important to note that SPR ONLY affects the Y axis dimensions when the machine is in rotary mode.
Identifying an SPR Issue
The first step to identifying if SPR needs to be adjusted is to run a test file with the rotary and look at the result. Does the file look visibly stretched or compressed around the perimeter of the cup (when held vertically, as if you were going to take a drink from it)? If so, SPR could use some attention.
Another important factor is the level of precision that your file requires. Are you working on a simple name or small-scale design, or attempting a full wrap around the cup? Minor sizing discrepancies may be less noticeable in smaller designs. However, for full wraps, precise SPR alignment is crucial to ensure all edges align seamlessly on the design.
Adjusting SPR
IMPORTANT: SPR adjustments MUST be done in mm.
Prerequisites for the process:
- Rotary settings loaded.
- Cup/item set properly in rotary.
- Cup/item set to proper focal distance.
NOTE: More likely than not, any cup used during your initial tests will be unable to be used as a final product. If you already have a test cup, use it for this process. Otherwise, it is recommended to acquire a test cup that can be engraved several times.
Steps
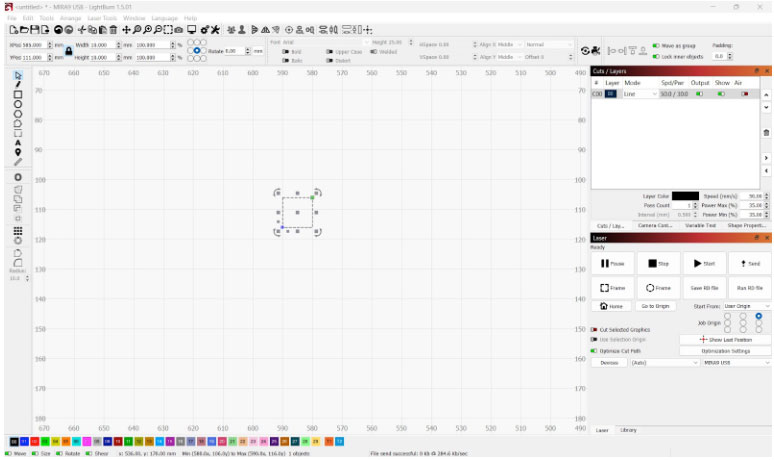
- Set up a 10 mm square design in LightBurn, configured for line mode with a speed of 50 mm/s and power ranging between 30-40%. Once completed, send the file to the machine.
- For larger designs or full wraps, opt for a 100 mm by 10 mm rectangle instead of a square. The process remains the same.
- Run the file on the cup.
- Detach the cup from the rotary and measure the engraved line's distance along the Y-axis.
- The Y-axis refers to the lines engraved when the laser head was stationary while the rollers moved the cup. Typically, these are the top and bottom lines when holding the cup upright.
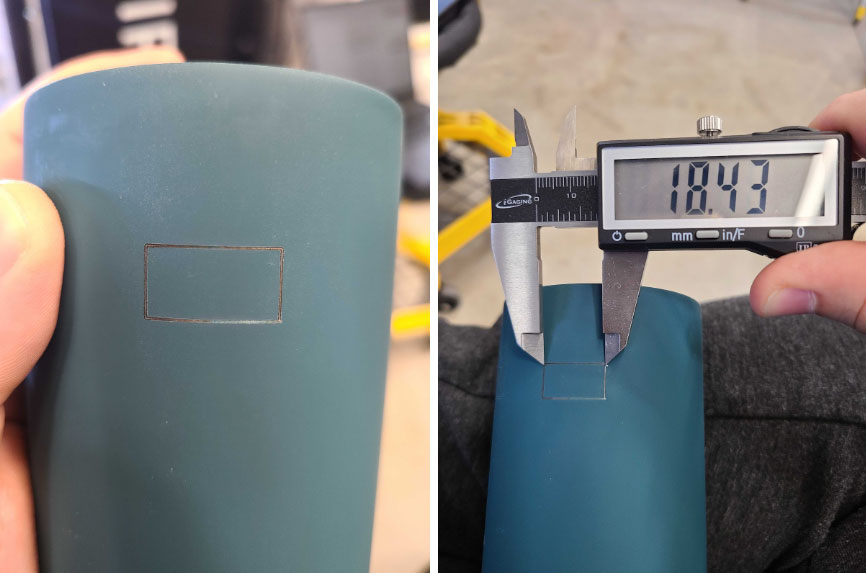
NOTE: It is CRITICAL to make all measurements from this point forward as precise as possible. When measuring, measure from the center of the engraved line to the center of the other engraved line at the corners of the box.
If doing a 100 mm rectangle, measure with a cloth tape measure. Calipers will not measure the curve accurately. - Utilize the following equation to compute the necessary SPR value:
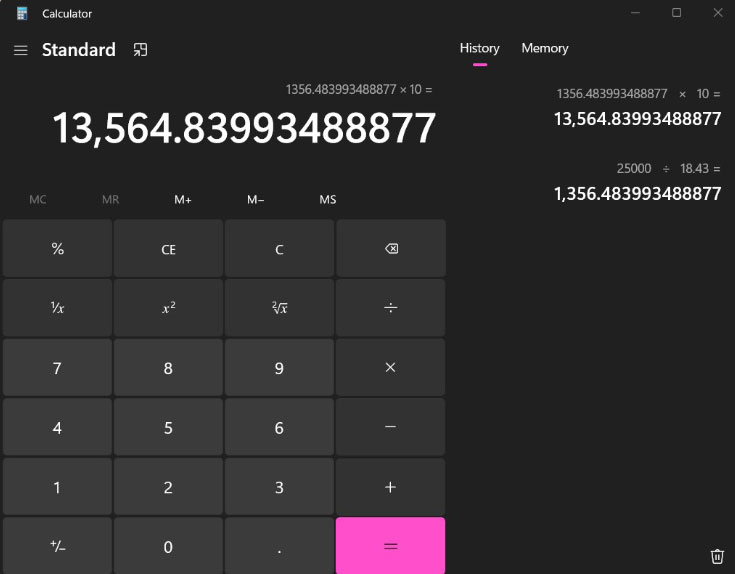
New SPR = old SPR / measured length * intended length.NOTE: For example, if the current SPR is 25000, with a measured length of 18.43 mm and an intended length of 10 mm, the result would be 13564.84. Our step length should be changed to match the value we calculated.
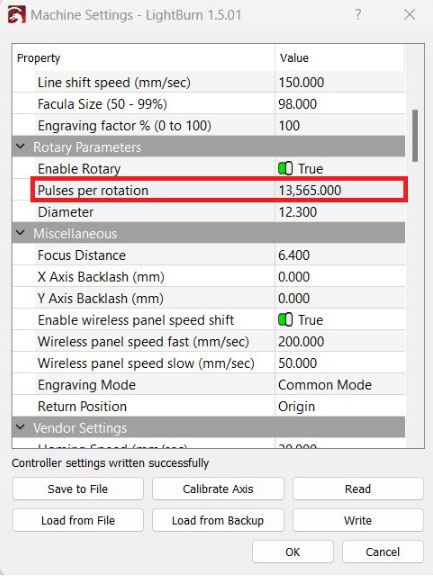
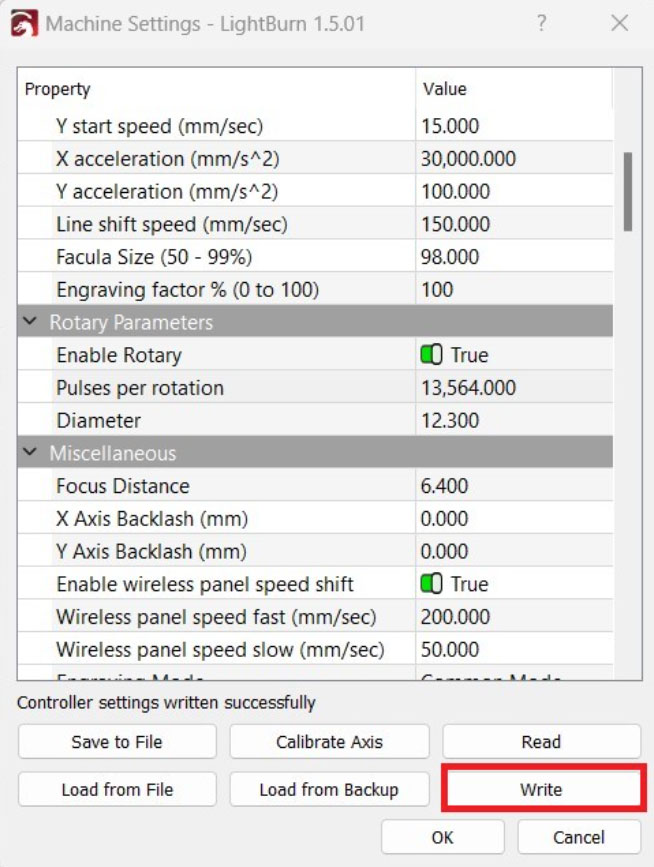
- Enter the calculated SPR into the “Pulses per rotation” box under “Rotary Parameters” in the LightBurn Machine Settings window.
NOTE: Rounding to the nearest whole number is acceptable. However, ensure the value is rounded to at least the thousandths place.
- Click “Write” in the Machine Setting window to update the SPR value.
- Re-position the cup and re-run the square test. No need to resend the file, as this adjustment only affects how the motor moves, not the file's set dimensions.
- Measure the new square.
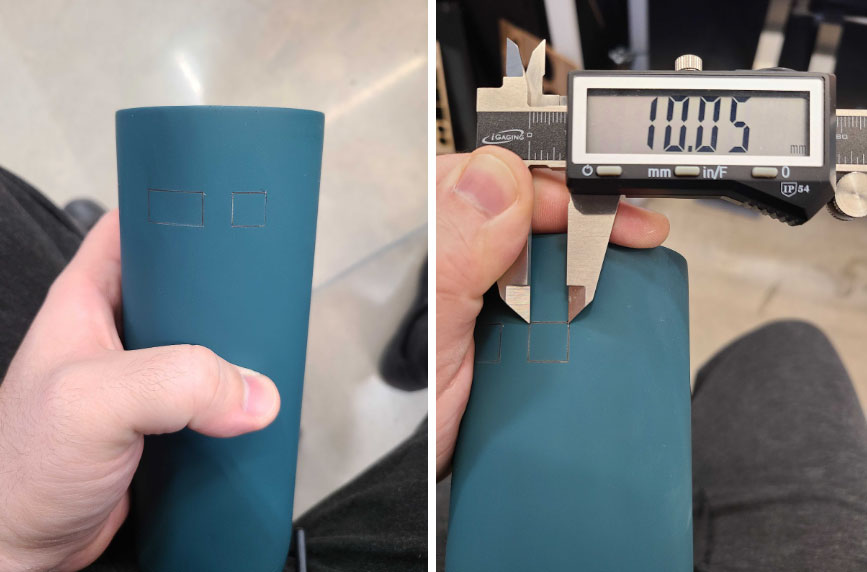
- The square should now be within tolerance (+/- 0.5 mm), assuming precise initial measurements. If not, repeat the process.
- Return to LightBurn. Save the adjusted settings and overwrite them on the flash drive for future use.
If you have any questions or concerns, please send us an email at support@aeonlaser.us for the fastest service. If your laser is malfunctioning, please submit a support ticket.
Did you find this document helpful? Let us know what you liked or what we can improve on by sending an email to helpusgrow@aeonlaser.us.
Happy Lasering!


